ModelBus is a model-driven tool integration
framework which allows you to build a seamlessly integrated tool environment
for your system engineering process.
ModelBus addresses some of the common
problems in today’s software development process:
- Inconsistencies between development artifacts
To cover the whole software development process you mostly need to apply
different independent tools. Modeling artifacts within one tool do not know
about modeling artifacts in another tool. There exist relationships between
those artifacts, but they are not explicitly covered and handled by the
separate tools.
- Low degree of automation
Due to the separation of the tools it is quite often complicated to automate
the development process. Combination of tools is mostly a manual process using
the export and import mechanism of the tools and perhaps manually adapting the
intermediate results. Those manual workflows are time consuming and
error-prone.
- Insufficient common terminology
Different tools quite often use different terminologies which need to be
adapted or a common terminology to be used
-
Complexity
Complexity of the systems as well as the processes is a real challenge.
Automating processes, concentrating on specific aspects through views could
help to handle this complexity.
-
Cost
Automating processes, reuse of sub steps could help to decrease costs
- Decoupled software tools
Decoupled tools need means to handle relationships of modeling artifacts
crossing tools boundaries
- Produced data remain proprietary and depend on specific tools
Quite often data created within one tool have a tool specific format.
Transformations and adaptations are needed to cross tool boundaries
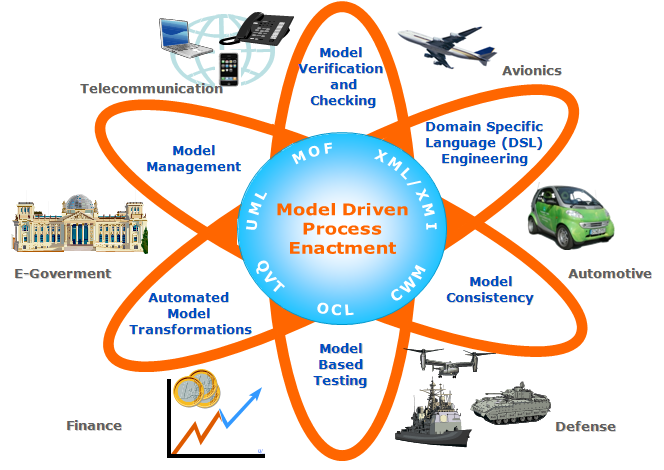
ModelBus addresses integration challenges
like:
- Data
Integration: How can tools share data (models)?
- Control
Integration ("service sharing"): How can a tool use a service
provided by another tool?
- Process
Integration: How can software engineering processes that involve several
tools, roles and work products be supported?
How does ModelBus help?
·
ModelBus offers open interfaces and is based on
SOA principles.
·
Commercial of the shelf tools (COTS) can be
plugged to the ModelBus to make their functionality available.
·
ModelBus helps you automating your development
process.
·
ModelBus supports transparent model sharing.
·
ModelBus allows homogenous views on
heterogeneous data and model sources.
·
ModelBus is built on existing standards (SOAP,
MOF, EMF, BPMN, BPEL, JMI, OCL).
The ModelBus Core components are provided
as Open Source.
Figure 1 and Figure 2 within this section show different
aspects of the ModelBus and its use.
The first shows the ModelBus as integration
and communication platform connecting different services offered by tools
connected to the ModelBus. Based on SOA principles it also offers a service registry
and notification service as core services. Workflows that can be executed
automatically can be defined and executed using orchestration tools. Models can
be stored within Repositories (Model Storage) and made available for all tools
attach to the ModelBus. Generic model verification services can be used to
verify intermediate modeling results with respect to some modeling guidelines.
Model transformations can be used to transform the results created with one
tool to be usable in the context of another tool. Keeping track of the
relationships between the artifacts within the model can be supported by a
traceability service.
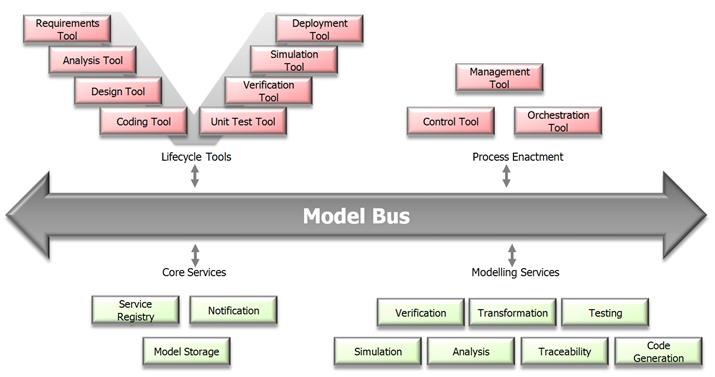
Figure 1 The ModelBus General Structure
Figure 2 shows
another view on the ModelBus.
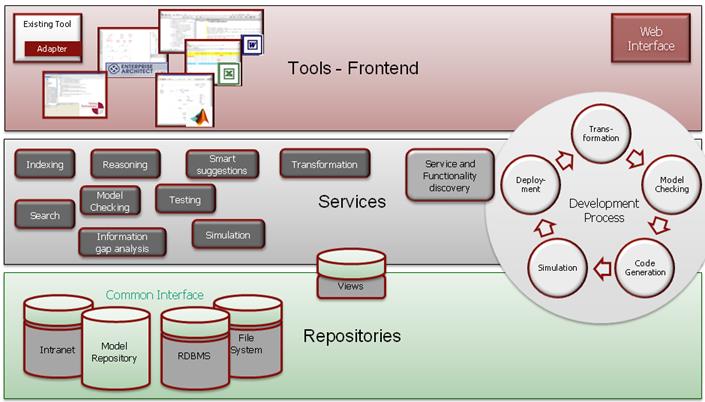
Figure 2 The ModelBus General Architecture
Figure 3 shows a
typical deployment of a simple ModelBus installation. The ModelBus installation
is usually done on a dedicated server or even on your local machine. In this
simple installation the ModelBus consists of a WebServer with the ModelBus
repository, which is based on Subversion. You can install this locally at your
site or you can use an installation remotely, run by another site. In more
sophisticated installations the ModelBus server most likely also includes other
modeling services (e.g. transformation).
On the left side we see the tools that
makes use of services (e.g. repository) through the ModelBus using WebServices
communication mechanisms. Those have to be installed separately. The concrete
installation process may differ from tool to tool.
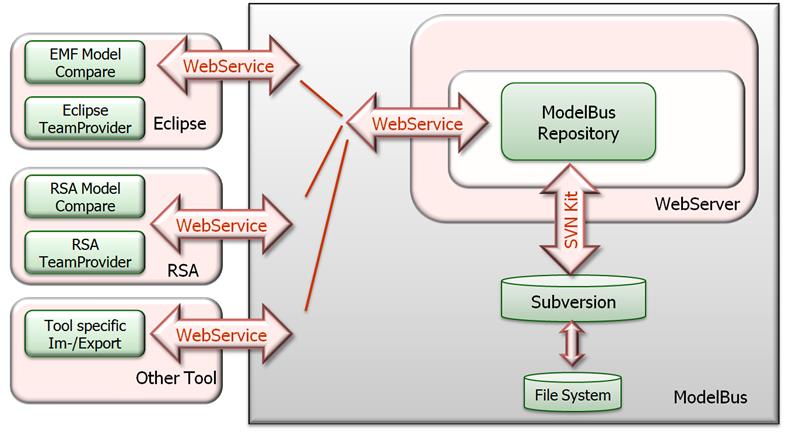
Figure 3 General Deployment Architecture
We will illustrate the installation of a
local ModelBus and the installation of a “client” based on Eclipse and offering
Team support on the ModelBus repository to the user.
|
 Please note: The ModelBus installation procedure has
changed significantly with the release of version 1.9.7. For installation
instructions for older versions please refer to the user guides of the
corresponding version. Please note: The ModelBus installation procedure has
changed significantly with the release of version 1.9.7. For installation
instructions for older versions please refer to the user guides of the
corresponding version.
|
You will find all the packages you need
through the ModelBus Web site:
http://www.modelbus.org/en/modelbusdownloads.html
.
Always use the links from the ModelBus
Website to get the actual current release version.
The ModelBus Server and Repository
is pre-bundled, but not complete with SVN-support. Due to license
restrictions you need to download this by your own. First download “Server”
from the Website. With release 1.9.5 there will be different versions of the
ModelBus Server on the Web site. This document focuses on the Windows
installation of ModelBus. It depends on your personal taste which Eclipse based
version to use. In our example installation the Juno based Win32 version will
be used. All other versions are installed quite similar. Be aware that for a 64
bit installation you also need a 64 bit Java JDK.
Unpack it to a location as you find
appropriate, e.g. C:\ModelBus\server.
The ModelBus installation procedure has
changed significantly with the release of version 1.9.7. However, for reasons
of backward compatibility, the settings for older releases will work with
release version 1.9.7 as well. In the following, both the installation process
for the 1.9.7 release and for older releases will be explained in detail.
For the ModelBus server setup, there is at
least one single environment variable MODELBUS_ROOT needed. This
variable has to point to the location the contents of the downloaded archive have
been extracted to (see Figure 5).
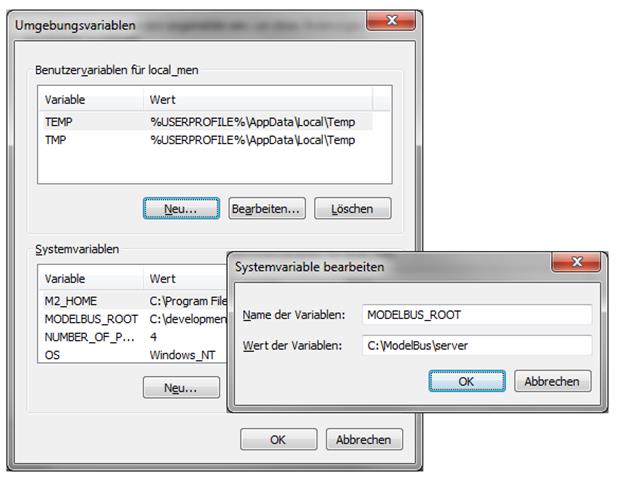
Figure 4 ModelBus Root System variable
The server is configured to look for a
configuration model named “modelbus.config” in the serverConfiguration folder
within the installation folder. This model contains the basic configuration
needed to run the ModelBus server. As default, the model for releases prior
to 1.9.9 is defined as follows:
|
<?xml
version="1.0" encoding="UTF-8"?>
<config:ConfigModel
xmi:version="2.0" xmlns:xmi="http://www.omg.org/XMI"
xmlns:config="http://www.modelbus.org/system/model/config.ecore">
<locations name="repositoryLocation"
location="http://0.0.0.0:8080/modelbusrepository"/>
<!--
<locations name="secureRepositoryLocation"
location="https://0.0.0.0:8181/modelbusrepository">
(...)
</locations> //-->
<locations name="notificationLocation"
location="tcp://localhost:61616"/>
<locations name="svnRepositoryLocation"
location="\repository"/>
</config:ConfigModel>
|
The configuration model for releases
1.9.9 or later is defined as follows:
|
<?xml
version="1.0" encoding="UTF-8"?>
<config:ConfigModel
xmi:version="2.0" xmlns:xmi="http://www.omg.org/XMI"
xmlns:config="http://www.modelbus.org/system/model/config.ecore">
<location
name="repositoryLocation"
location="http://0.0.0.0:8080/modelbusrepository"/>
<!--
<locations name="secureRepositoryLocation"
location="https://0.0.0.0:8181/modelbusrepository">
(...)
</location> //-->
<location
name="notificationLocation" location="tcp://localhost:61616"/>
<location
name="svnRepositoryLocation" location="\repository"/>
</config:ConfigModel>
|
The content of the configuration model is initially
made up of three different locations: repositoryLocation, notificationLocation
and svnRepositoryLocation. The repositoryLocation contains the
URL where the repository server will be running at (e.g. http://0.0.0.0:8080/modelbusrepository)
(see Figure 6). “0.0.0.0:8080”
must be replaced by the real host and port the server should run on.
|
 By specifying 0.0.0.0 as
host, the ModelBus server will be bound to both, the internal interface (localhost)
and the corresponding external interface. If you do not want the server to be
available externally, you should replace 0.0.0.0 by localhost. By specifying 0.0.0.0 as
host, the ModelBus server will be bound to both, the internal interface (localhost)
and the corresponding external interface. If you do not want the server to be
available externally, you should replace 0.0.0.0 by localhost.
Please make sure that you do not add
a query string (e.g. “?wsdl”) to the repository location.
|
The second location in the configuration
model, notificationLocation, defines the URL for the ModelBus
notification service (e.g. tcp://localhost:61616) which is needed to run
the ModelBus server. In most situations, it might be not necessary to change
the value of this location.
|
 Please mind the “tcp://” in the notification
address. Please mind the “tcp://” in the notification
address.
|
The value of the configuration option svnRepositoryLocation
defines the location where the ModelBus repository content should be
stored. This can be either a path in the servers local file system (e.g. \repository)
or an URL pointing to an external Subversion repository.
Local SVN Repository
In case of local repository storage,
ModelBus expects a path in the server’s file system as value for the
configuration option svnRepositoryLocation. You can specify either a
path relative to the ModelBus installation folder (e.g. \repository) or
an absolute path (e.g. C:\ModelBus\repository).
|
Please note: ModelBus installation
directory and ModelBus Repository directory have to be different. ModelBus
Repository directory shall be empty before starting the ModelBus server the
first time.
|
(Optional)
Create the directory defined as the svnRepositoryLocation
location, e.g. \repository. This folder needs to be empty. The
ModelBus server will create the initial data structure within that directory.
When you do not create the folder, the ModelBus server will create it
automatically on startup.
External SVN Repository
The
ModelBus server can also be bound to an external Subversion repository by
specifying an URL pointing to the repository location. ModelBus is able to
connect to repositories accessible via the Subversion protocol (e.g. svn://localhost/modelbus)
or via the WebDAV protocol (e.g. https://localhost/modelbus). In case of
using an external repository, the svnRepositoryLocation configuration
option needs to be extended with the credentials the ModelBus server should use
to connect to the repository. This should be done by using two additional
location properties providing the Subversion user and password:
|
<?xml
version="1.0" encoding="UTF-8"?>
<config:ConfigModel
xmi:version="2.0" xmlns:xmi="http://www.omg.org/XMI"
xmlns:config="http://www.modelbus.org/system/model/config.ecore">
(...)
<locations
name="svnRepositoryLocation" location="svn://localhost/modelbus/">
<properties
name="SVNUserName" value="ModelBus"/>
<properties
name="SVNPassword" value="yourpassword"/>
</locations>
</config:ConfigModel>
|
Or for
ModelBus releases 1.9.9 or higher:
|
<?xml
version="1.0" encoding="UTF-8"?>
<config:ConfigModel
xmi:version="2.0" xmlns:xmi="http://www.omg.org/XMI"
xmlns:config="http://www.modelbus.org/system/model/config.ecore">
(...)
<location
name="svnRepositoryLocation" location="svn://localhost/modelbus/">
<property
name="SVNUserName" value="ModelBus"/>
<property
name="SVNPassword" value="yourpassword"/>
</location>
</config:ConfigModel>
|
|
Please note: The Subversion user specified in the
configuration model is required for connecting the ModelBus server to the
external Subversion repository. For user-related transactions on the
repository via ModelBus, a user with the same credentials as used for the
ModelBus session needs to be added to the Subversion repository.
|
Sample Configuration for Local
Storage
The following is a summary of sample values
for the ModelBus locations mentioned above:
|
System variable
|
Value
|
|
repositoryLocation
|
http://0.0.0.0:8080/modelbusrepository
|
|
notificationLocation
|
tcp://localhost:61616
|
|
svnRepositoryLocation
|
\repository
|
|
 Since ModelBus
version 1.9.7, the ModelBus server can be run using https protocol. Please
see section 5 Setting
up ModelBus for Encrypted Communication (HTTPS) for more
detailed information for the setup. Since ModelBus
version 1.9.7, the ModelBus server can be run using https protocol. Please
see section 5 Setting
up ModelBus for Encrypted Communication (HTTPS) for more
detailed information for the setup.
|
Now, if the server should operate on a SVN
repository, we need to add the additional software for the SVN
support and thus add the SVNKit binaries compatible to Subversion 1.7 or
higher to the ModelBus server installation. Therefore, please download the SVNKit
Eclipse Update Site Archive version 1.7.5-v1 or higher using the
link on the ModelBus Website: http://www.svnkit.com/org.tmatesoft.svn_1.7.5-v1.eclipse.zip.
Unpack it to your most favorite temporary location and move the bundles contained
in the extracted plugins folder to the \bin\plugins folder of
your ModelBus server installation.
To be able to
run the ModelBus Server you need to have a Java 6 SDK installed, which
you can download at http://java.sun.com/javase/downloads/index.jsp, e.g. jdk-6uxx-windows-i586.exe for the 32 bit server or jdk-6uxx-windows-x64.exe for the 64 bit
server.
Local Git Repository
As of server release 1.9.8, the ModelBus server is
also able to store data in a local Git repository. The configuration option gitRepositoryLocation
has to be used to specify the location of the Git repository. You can either specify a path relative to the ModelBus installation
folder (e.g. \gitrepository) or an absolute path (e.g. C:\ModelBus\repository).
In addition, the credentials
the server should use to access the repository, i.e. a username and an email
address, have to be specified as a set of properties of the location:
|
<?xml
version="1.0" encoding="UTF-8"?>
<config:ConfigModel
xmi:version="2.0" xmlns:xmi="http://www.omg.org/XMI"
xmlns:config="http://www.modelbus.org/system/model/config.ecore">
(...)
<locations
name="gitRepositoryLocation" location="\gitrepository">
<properties
name="GitUserName" value="ModelBus"/>
<properties
name="GitUserEmail" value="server@somehost.com"/>
</locations>
</config:ConfigModel>
|
For ModelBus releases 1.9.9 or higher, the
configuration model should look like:
|
<?xml
version="1.0" encoding="UTF-8"?>
<config:ConfigModel
xmi:version="2.0" xmlns:xmi="http://www.omg.org/XMI" xmlns:config="http://www.modelbus.org/system/model/config.ecore">
(...)
<location
name="gitRepositoryLocation" location="\gitrepository">
<property
name="GitUserName" value="ModelBus"/>
<property
name="GitUserEmail" value="server@somehost.com"/>
</location>
</config:ConfigModel>
|
|
Please note: It is only possible to use a single
repository at runtime. If more than one repository location is set (i.e. one
location for SVN and another one for Git), the ModelBus server will use the
first one specified in the configuration model and ignore the other.
|
Create a directory where you want the ModelBus repository content to be stored,
e.g. C:\ModelBus\ModelBusRepository. This folder needs to be empty. The
ModelBus server will create the initial data structure within that directory.
You must create a new system variable MODELBUS_SVN_REPOSITORY_LOCATION
pointing to that location (see Figure 5).
|
Please note: ModelBus installation directory and ModelBus
Repository directory have to be different. ModelBus Repository directory
shall be empty before starting the ModelBus server the first time.
|
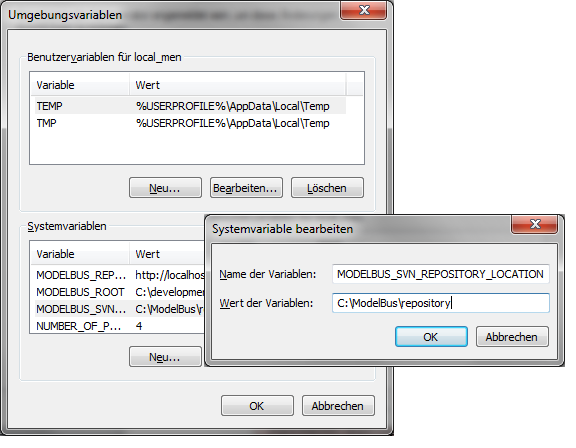
Figure 5 ModelBus SVN Repository Location System Variable
An additional environment variable MODELBUS_REPOSITORY_LOCATION
is needed that contains the URL where the repository server will be running
(e.g. http://localhost:8080/modelbusrepository) (see Figure 6). “localhost:8080” must be
replaced by the real host and port it is running on.
|
Please make sure that you do not add a query string (e.g.
“?wsdl”) to the repository location.
|

Figure 6 MODELBUS_REPOSITORY_LOCATION Variable
The variable MODELBUS_NOTIFICATION_LOCATION
with the URL for the notification service (e.g. tcp://localhost:61616)
(see Figure 7) is needed to use
the notification service.
|
Please mind the “tcp://” in the notification
address.
|

Figure 7 MODELBUS_NOTIFICATION_LOCATION Variable
The following is a summary of sample values
for the system variable mentioned above:
|
System variable
|
Value
|
|
MODELBUS_SVN_REPOSITORY_LOCATION
|
C:\ModelBus\repository
|
|
MODELBUS_REPOSITORY_LOCATION
|
http://localhost:8080/modelbusrepository
|
|
MODELBUS_NOTIFICATION_LOCATION
|
tcp://localhost:61616
|
Now we need to add the additional
software for the SVN support. Download the SVNkit using the link on
the ModelBus Website “1.3.4” which links to the version needed: http://www.svnkit.com/org.tmatesoft.svn_1.3.4.standalone.zip
(at least http://www.svnkit.com/org.tmatesoft.svn_1.3.2.standalone.zip). Unpack it to your most favorite temporary
location.
Move the following files to “…\ModelBusServer\lib”
(the lib directory of your pre-bundled Server):
- svnkit-javahl.jar
- svnkit.jar
- trilead.jar
- jna.jar
The rest of the
SVNKit is not needed any longer so that you can throw it away.
To be able to
run the ModelBus Server you need to have a Java 6 SDK installed, which
you can download at http://java.sun.com/javase/downloads/index.jsp, e.g. jdk-6uxx-windows-i586.exe for the 32 bit server or jdk-6uxx-windows-x64.exe for the 64 bit server.
Now you can make
the ModelBus and its repository available by starting the ModelBus
Server. You should use startModelBusServer.exe executable in the
server installation folder (see Figure 8 and Figure 9).
|
Please do not use “_service.exe” in the bin folder to
start the ModelBus Server. In this case the server would not start properly.
In addition, there would be no console available indicating problems on
startup.
|

Figure 8 Use startModelBusServer.exe to start the Server

Figure 9 Server Console Window
In order to shutdown
ModelBus server release version 1.9.6. or lower, just close the server’s
console window. As of ModelBus server release 1.9.7, it is recommended to type
“exit” in the server’s console window and to confirm the shutdown question.
If you plan to
handle large models it could be necessary to increase the Java heap space size
for the server. Therefore you have to edit the startup.bat file in the
bin folder and insert an additional parameter. The example shown sets the heap
space to 1024MB which also is the default value (Figure 10). With the 64 bit ModelBus server
version you can only increase the heap space to ~1.5 GB.

Figure 10 Increase Java Heap Space on the Server
You can quickly check whether the server is
running using a web browser and invoking URL that you stated in the repositoryLocation
configuration option augmented with the query string “?wsdl” e.g. http://localhost:8080/modelbusrepository?wsdl.
The result should be a listing of the RepositoryService wsdl.
We are going to install ModelBus in the
home directory. Therefore create a folder Modelbus there and two folders in it
as shown in Figure 11.
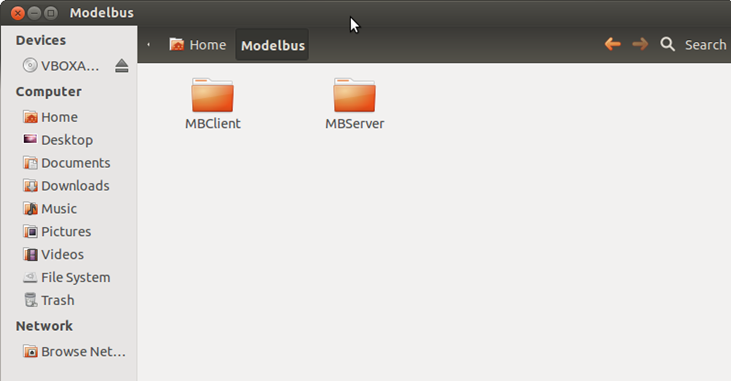
Figure 11 ModelBus installation location
Within this example we will install a
server and a client based on the Eclipse Juno release.
You can also use a Juno based client with
an Indigo based server and vice versa. A 32 bit client can also be used with a 64
bit server and vice versa, or a windows client with a Linux based server etc.
The only thing you have to keep in mind is that an appropriate java (32/64 bit)
has to be installed.
In the example we use a 32 bit Juno based
server on the 32 bit Ubuntu 12.04 Desktop system.
First we have to install a Java JDK. We use
the openjdk delivered with Ubuntu but we have to install it, e.g. using the
Synaptic Package Manager (see Figure 12).
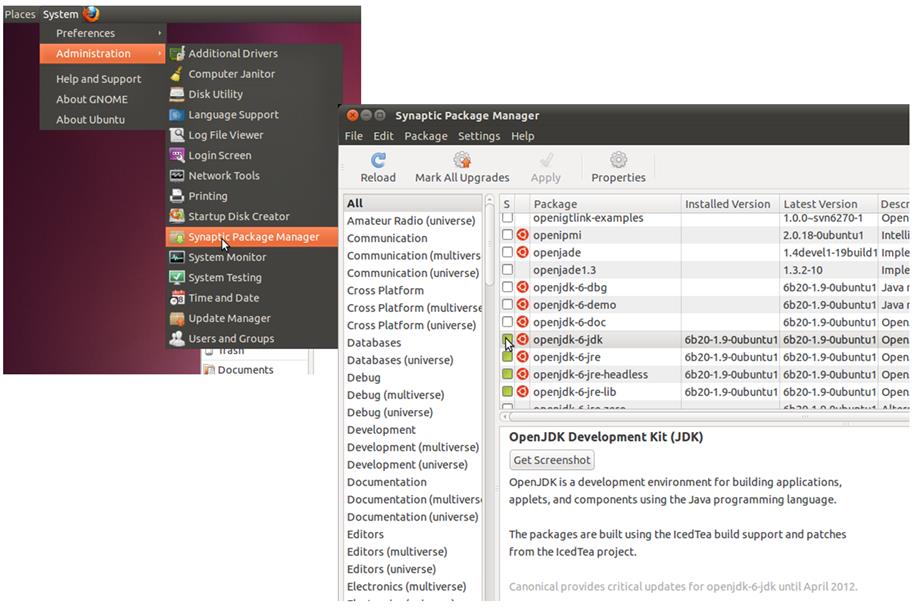
Figure 12 Install OpenJDK
Retrieve the Linux 32 bit (Juno) version
from the current release page at http://www.modelbus.org/en/modelbusdownloads.html.
Save the file in the Downloads folder.
Similarly
retrieve the SVN kit to be used later from http://www.svnkit.com/org.tmatesoft.svn_1.7.11.eclipse.zip.
Unpack the Juno based ModelBus Server
downloaded to the MBServer directory (see Figure 11) using the Archive manager (see Figure 13).
Similarly extract the SVN jars needed from
the org.tmatesoft.svn_1.7.11.eclipse.zip archive (see Figure 14) to the plugins directory of
the Modelbus Server installation.

Figure 13 Start Archive Manager
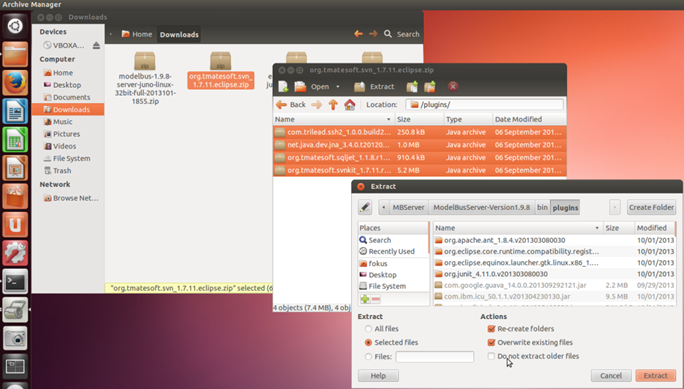
Figure 14 Extract the SVN kit jars
Next we have to
define the environment variable needed. We do this in the “.profile” for
the current user. This will be executed every time the user logs in. The
.profile file will only be visible after toggling the “Show Hidden Files” (see Figure 15).

Figure 15
Making .profile visible
Open .profile in the editor and add
the following lines at its end:
export
MODELBUS_ROOT=<Path to Modelbus Server Folder>
The MODELBUS_ROOT variable should
point to the directory where the Modelbus Server has been installed to.
The result is shown in Figure 16.
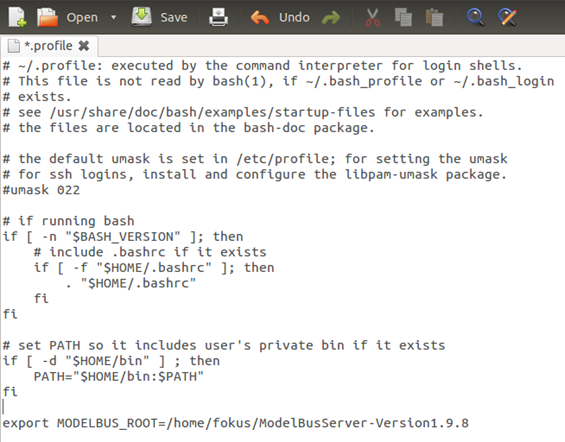
Figure 16 .profile
of the current user
If you want to configure the server location,
the notification service location and the location of the repository, you have
to adjust the modelbus.config file in the serverConfiguration
folder (see Figure 17).
However, for our example installation we don’t change anything.
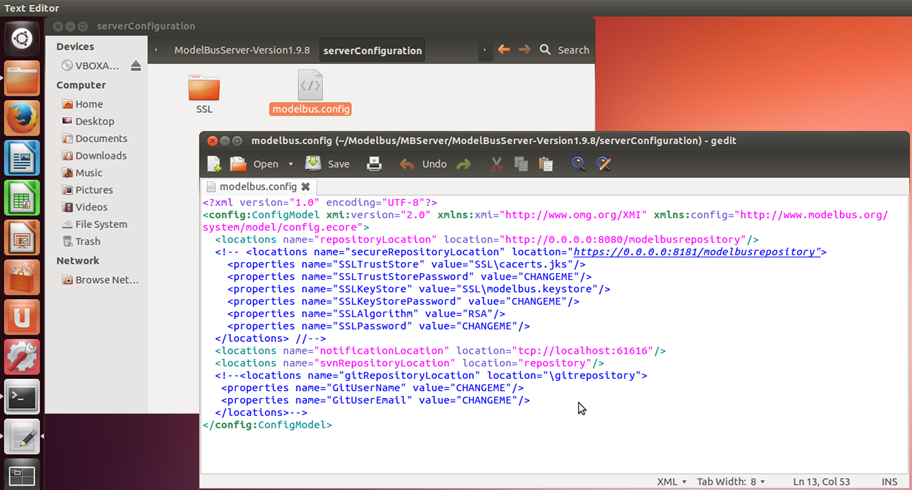
Figure 17 modelbus.config
Please note that the configuration meta
model has changed slightly with the release 1.9.9. See chapter 3.1.1 for details.
Finally, we have to make the “startup.sh”
and the “modelbus” file in the Modelbus Server executable (see Figure 18 and Figure 19).
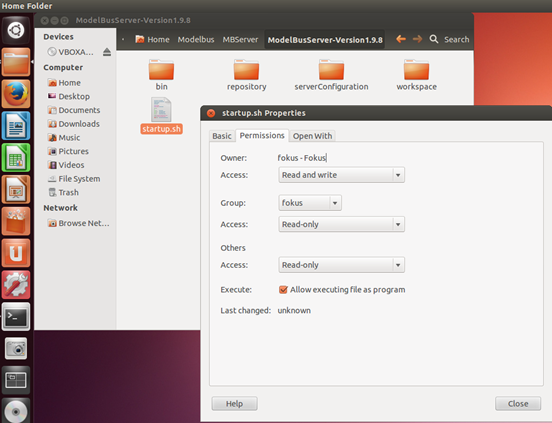
Figure 18 Set startup.sh executable
Figure 19 Set modelbus executable
Now we can start the ModelBus server by
double click on startup.sh and selecting “Run in Terminal” (Figure 20).
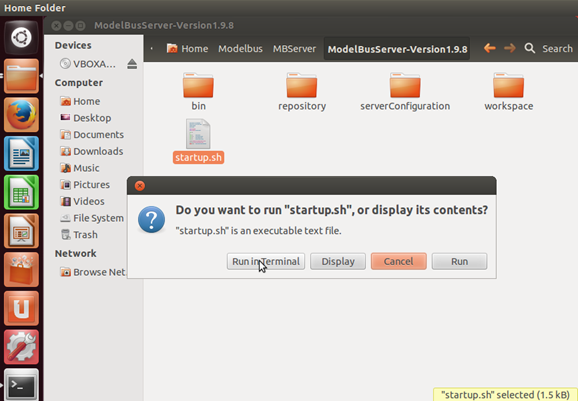
Figure 20 Run startup.sh
This will result in a terminal as shown in Figure 21.

Figure 21 ModelBus server started
Accessibility of the Modelbus server can be
checked using a browser and invoking the location specified in the repositoryLocation
property in the modelbus.config file (see Figure 17) concatenated with the string ”?wsdl”.
This will result in displaying the ModelBus Repository WSDL as shown in Figure 22.

Figure 22 Invoking the ModelBus Repository WSDL
Within this section we will describe how to
install the ModelBus Team Provider client based on the Juno modeling release.
First we need the eclipse Juno modeling
version for 32 bit Linux as a base to install the ModelBus client. You can
download it from:
http://www.eclipse.org/downloads/download.php?file=/technology/epp/downloads/release/juno/SR2/eclipse-modeling-juno-SR2-linux-gtk.tar.gz
Unpack it using the Archive Manager to the MBClient
directory (similar to the action shown in Figure 13 and Figure 14).
Open the folder eclipse and start
the eclipse file contained in there (Figure 23).
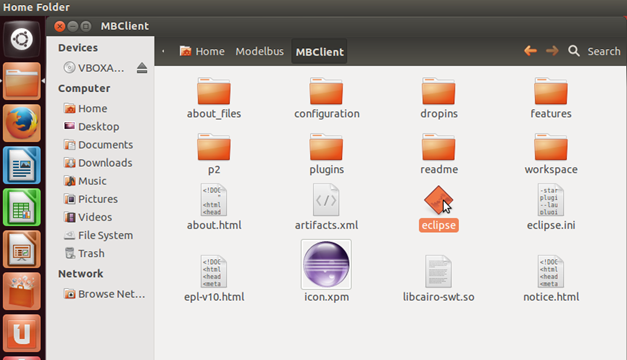
Figure 23 Eclipse client
From now on the installation is identical
to the Windows based client installation described in this guide and you can
follow the description there. To start the client afterwards you only need to
start Eclipse you installed it in.
Finally, you will be able to use the
Eclipse ModelBus Client (Figure 24) in the same way as the client in the Windows environment and you
can follow the descriptions there.
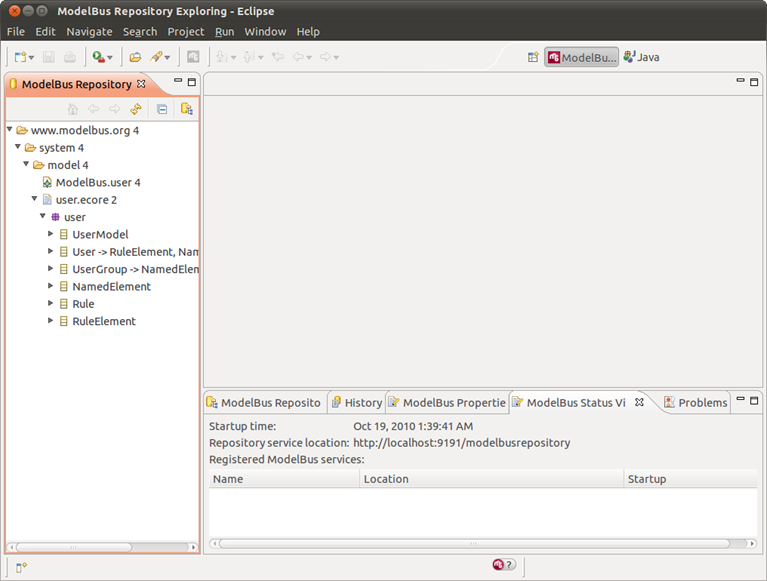
Figure 24 The ModelBus Client
As of release 1.9.7, ModelBus supports
encrypted communication using HTTPS. An HTTPS connector can be setup in
parallel to the HTTP connector or standalone.
If you are not familiar with SSL, see http://docs.oracle.com/javase/1.5.0/docs/tooldocs/
windows/keytool.html for some detailed information
about the terms and concepts in context of SSL and its implementation in Java.
The configuration options needed to setup a
HTTPS connection to the ModelBus server has to be provided through the ModelBus
configuration model modelbus.config introduced in chapter 3.1.1 by using the secureRepositoryLocation
location. The following excerpt of the configuration model shows the relevant
fragment to configure the HTTPS connection:
|
<?xml
version="1.0" encoding="UTF-8"?>
<config:ConfigModel
xmi:version="2.0" xmlns:xmi="http://www.omg.org/XMI" xmlns:config="http://www.modelbus.org/system/model/config.ecore">
(...)
<locations
name="secureRepositoryLocation"
location="https://0.0.0.0:8181/modelbusrepository">
<properties name="SSLTrustStore"
value="SSL\cacerts.jks"/>
<properties name="SSLTrustStorePassword" value="yourpassword"/>
<properties name="SSLKeyStore"
value="SSL\modelbus.keystore"/>
<properties name="SSLKeyStorePassword" value="yourpassword"/>
<properties name="SSLAlgorithm" value="RSA"/>
<properties name="SSLPassword" value="yourpassword"/>
</locations>
(...)
</config:ConfigModel>
|
For ModelBus releases 1.9.9 or higher, the
configuration model looks slightly different:
|
<?xml
version="1.0" encoding="UTF-8"?>
<config:ConfigModel
xmi:version="2.0" xmlns:xmi="http://www.omg.org/XMI"
xmlns:config="http://www.modelbus.org/system/model/config.ecore">
(...)
<location
name="secureRepositoryLocation"
location="https://0.0.0.0:8181/modelbusrepository">
<property name="SSLTrustStore" value="SSL\cacerts.jks"/>
<property name="SSLTrustStorePassword" value="yourpassword"/>
<property name="SSLKeyStore"
value="SSL\modelbus.keystore"/>
<property name="SSLKeyStorePassword" value="yourpassword"/>
<property name="SSLAlgorithm" value="RSA"/>
<property
name="SSLPassword" value="yourpassword"/>
</location>
(...)
</config:ConfigModel>
|
Beside the HTTPS location itself (https://0.0.0.0:8181/modelbusrepository)
some additional properties have to be passed to the ModelBus server in order to
configure a SSL connection for ModelBus:
1.
SSLTrustStore:
The absolute or relative path (relative to the configuration folder) to the
trust store which stores trusted certificates for certificate authorities (CAs)
known to the server. If this option is not set, the default trust store shipped
with the JDK will be used instead of an own one. See the Java Docs for more
detailed information http://docs.oracle.com/javase/1.5.0/docs/tooldocs/windows/keytool.html#cacerts.
2.
SSLTrustStorePassword: The password required to access the trust store referenced in the SSLTrustStore
property. If an own trust store is configured the password for the JDK built-in
trust store has to be used (default: changeme).
3.
SSLKeyStore: The
absolute or relative path (relative to the configuration folder) to the key
store containing the SSL certificate to use for the communication with the
ModelBus server.
4.
SSLKeyStorePassword: The password required to
access the key store referenced in the SSLKeyStore property.
5.
SSLAlgorithm: The
name of the algorithm used to generate the key pairs and to sign certificates
(e.g. RSA). An overview of supported algorithms can be found at http://docs.oracle.com/javase/1.5.0/docs/tooldocs/windows/keytool.html#DefaultAlgs
6. SSLPassword: The password required to
recover the private key generated for the certificate.
In the example configuration both the key
store and the trust store reside in a folder named SSL which is a subfolder of
the ModelBus configuration folder. Both files are not initially included in the
ModelBus configuration and have to be created as explained in chapter 5.2.
The usage of the SSLTrustStore property
is optional. If an own trust store is used, the ModelBus server will rely on
the CAs listed in the JDK built-in trust store. In this case, you either have
to import the certificate of your “own” CA to the JDK trust store - if you want
to use a self-signed certificate - or you have to use a certificate verified by
a real CA whose certificate is available in the trust store.
In order to check whether the server is
running correctly using HTTPS, you can open up a web browser and target it to
the URL you have defined in the secureRepositoryLocation configuration
option. Please do not forget to add the query string “?wsdl” (e.g. https://localhost:8181/modelbusrepository?wsdl).
The result should be a listing of the RepositoryService wsdl as indicated in
chapter 3.2.
You can either use a real SSL certificate
to run the ModelBus server in productive environment or you can create a
self-signed one for test purposes. This section describes how to create a
custom SSL certificate and how to ‘sign’ it using a custom CA.
Java is delivered with a key and
certificate management utility called keytool which allows users to create
and manage their own keys and the certificates associated to them. keytool stores
the keys and certificates in a file called “key store” which can be understood
as a repository of certificates holding the public and private keys required
for communication. In the default implementation the key store is implemented as
a file where the private keys are protected by a password. The keytool utility
can be used to import, export and list the contents of a key store and to
generate self-signed certificates for test purposes. For detailed information
about the keytool utility see http://docs.oracle.com/javase/1.5.0/docs/tooldocs/windows/keytool.html.
In order to create a certificate for the
ModelBus server, the following steps have to be performed:
1.
Create two folders, e.g. C:\keytools and C:\keytools\keys
and change to folder C:\keytools.
2.
Create the key store containing the ModelBus
certificate and its key pair.
With the keytool utility,
this can be done in one step using the genkey option:
|
keytool
-genkey -alias ModelBusServer -keyalg RSA -validity 365 -keystore keys/modelbus.keystore
|
This will prompt for some
information about the certificate’s owner needed to create the certificate. The
following fragment shows some example data for the creation of a certificate
for the R&D department of an exemplary company named ExampleCompany.
|
Enter keystore
password: yourpassword
What is your
first and last name?
[Unknown]: www.examplecompany.com
What is the
name of your organizational unit?
[Unknown]: R&D
What is the
name of your organization?
[Unknown]: Example Company
What is the
name of your City or Locality?
[Unknown]: Berlin
What is the
name of your State or Province?
[Unknown]: Berlin
What is the
two-letter country code for this unit?
[Unknown]: DE
Is
CN=www.examplecompany.com, OU=R&D, O=Example Company, L=Berlin, ST=Germany,
C=DE correct?
[no]: y
Enter key
password for <ModelBusServer>
(RETURN if same as keystore password):
|
|
 Please note: If you do not use a real domain name (value
for first and last name of the certificate owner) for the certificate, please
use the IP you have specified as host for the secureRepositoryLocation
instead. Please note: If you do not use a real domain name (value
for first and last name of the certificate owner) for the certificate, please
use the IP you have specified as host for the secureRepositoryLocation
instead.
|
As a result, a
key store file containing the ModelBus private and public keys and its wrapping
certificate is created at C:\keytools\keys\modelbus.keystore.
3.
Export the ModelBus certificate from the key
store.
This can be done using the export
option of keytool. The following command exports the ModelBus certificate to a
file named ModelBusServer.cer in the C:\keytools folder:
|
keytool
-export -alias ModelBusServer -storepass yourpassword -file ModelBusServer.cer
-keystore keys/modelbus.keystore
|
4.
Signing the certificate.
If the certificate should
be signed by a well-known CA, you first have to initialize a Certificate
Signing Request (CSR) and sent the generated artifact to the CA prior to
importing the certificate into a trust store. See http://docs.oracle.com/javase/1.5.0/docs/tooldocs/windows/keytool.html#certreqCmd for detailed information about this procedure.
5.
Import the certificate into a trust store.
The keytool utility can be
used with the import parameter to create an own trust store and add the ModelBus
server certificate to it. Therefore, the following additional parameters should
be used:
|
keytool
-import -v -trustcacerts -alias ModelBusServer -file ModelBusServer.cer -keystore
cacerts.jks -keypass yourpassword -storepass yourpassword
|
After having confirmed that you trust the
certificate you are about to import, a file named cacerts.jks is created
and the ModelBus certificate is imported as a trusted CA.
Both, the key store containing the
certificate for the ModelBus server (modelbus.keystore) and the trust
store providing the certificate of the custom CA (cacerts.jks), have to
be provided to the ModelBus using the configuration model as described in
section 5.1. In addition, the
passwords defined in this procedure have to be added to the ModelBus
configuration model.
ModelBus Manager is a web application for
the administration of a ModelBus server installation. In its current extent, it
allows to browse the ModelBus repository and to manage the user access rights
to ModelBus.
ModelBus Manager is shipped together with
some of the ModelBus Server distributions based on Eclipse 4.2 (Juno) or higher,
available on the ModelBus website. If you have downloaded a distribution containing
the ModelBus Manager, please install it as described in section 3.
The ModelBus Manager application starts up
together with the ModelBus server on the default port 8080. If you want to
change the port, please replace the port in the startup batch file (for Windows
distributions: bin\_startup.exe) with a port number of your choice.
|
Please note: In case of having changed the port of the
ModelBus Manager, you are required to start the ModelBus server by using the
corresponding batch file for the change to take effect.
|
After having started the server, the
ModelBus Manager application is available as a web application at http://%host%:%port%/modelbus?startup=manager
(e.g. http://127.0.0.1:8080/modelbus?startup=manager for a local
installation using the default port 8080). If access the corresponding URL with
your browser, the ModelBus Manager application starts up (see Figure 1).
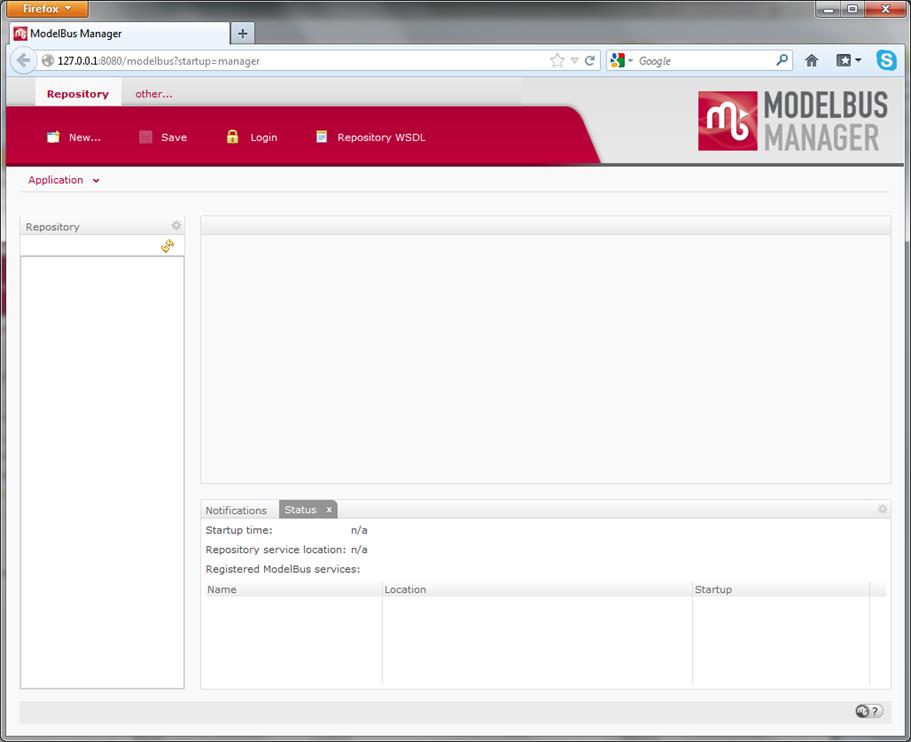
Figure 25 ModelBus Manager Application without any Open
Session
In order to use the ModelBus Manager
application, you have to authenticate with valid ModelBus user credentials.
Therefore, you can use the Login button in the application’s toolbar or
the Login view. The latter has to be added to the perspective first
using the Menu command Application > Show View > Login View.
After having successfully logged in by
using valid user credentials (see section 9 for more details), the ModelBus Manager
displays the current repository content (Repository view) and the status
of the ModelBus server (“Status” view) as shown in Figure 26.
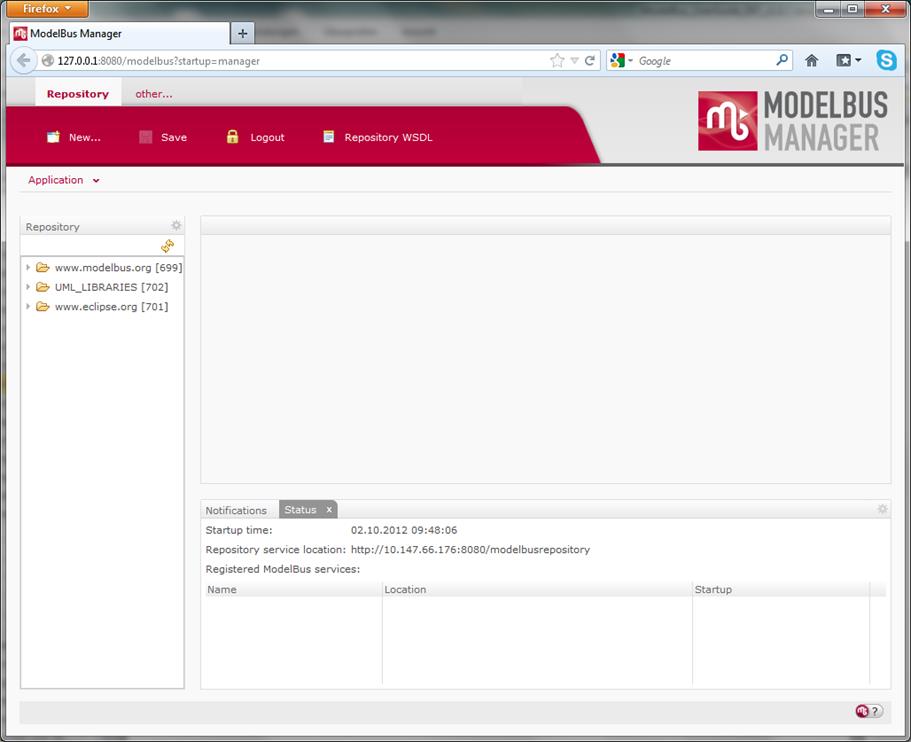
Figure 26 ModelBus Manager Application with Open Session
In general, ModelBus Manager allows to
browse the ModelBus repository content with read-only access except the
deletion of its artifacts. The Repository view displays the content
structure of the repository and allows to open the artifacts in a (read-only)
text editor (see Figure 27). With
the revision link list at its bottom, the editor provides access to the
different revisions of an artifact.
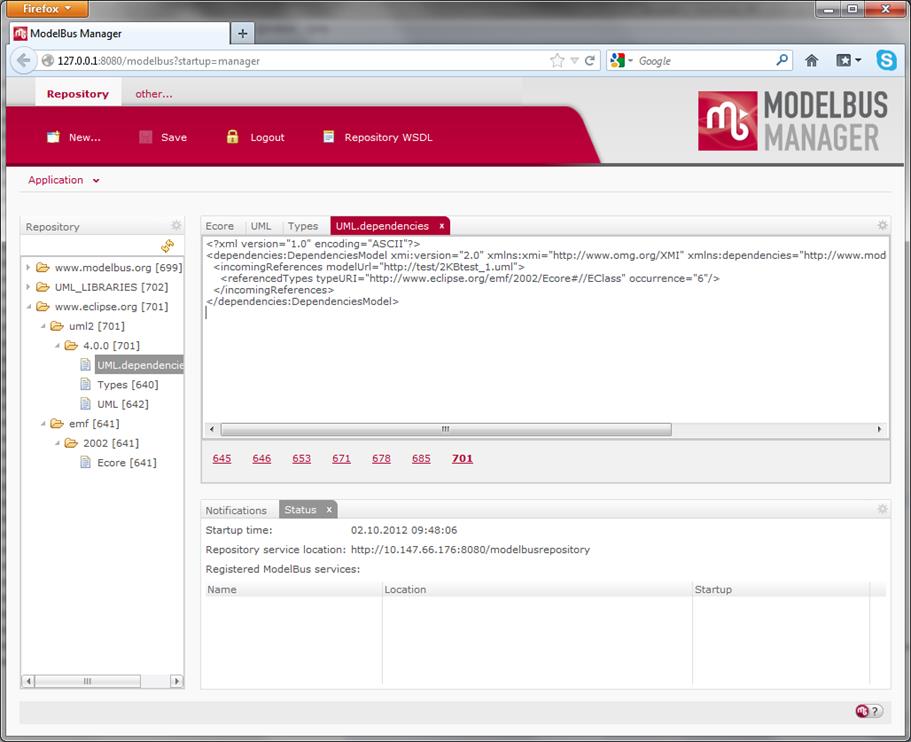
Figure 27 Browsing the Repository with ModelBus
Manager
In addition, the Repository view
offers a context menu with a set of actions like deleting artifacts or
comparing revisions of artifacts using the ModelBus Model DiffMerge tool (see Figure 28).
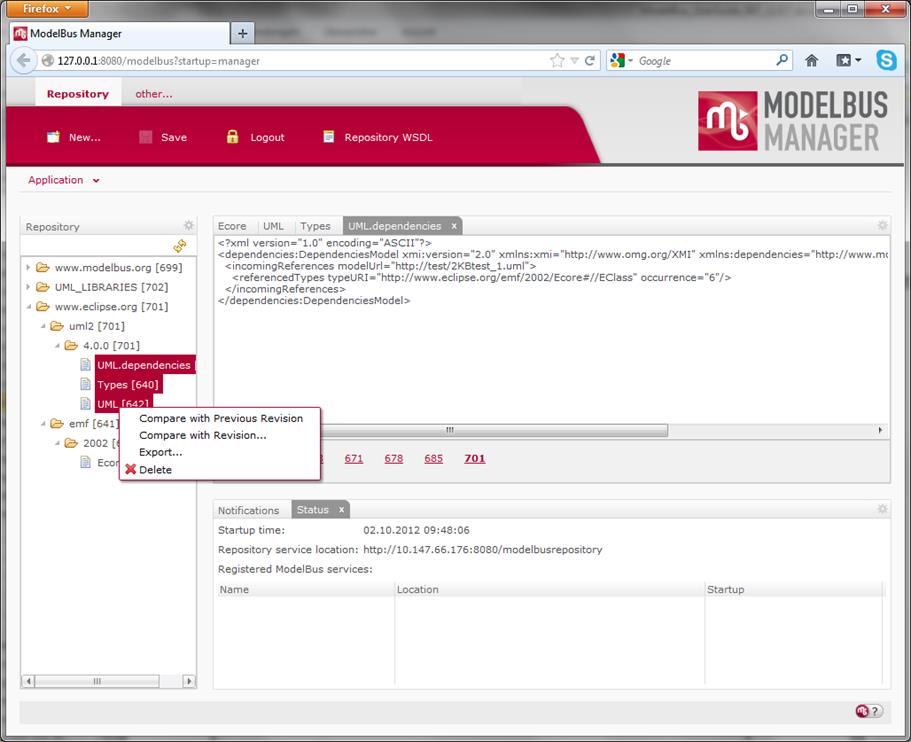
Figure 28 Repository Context Menu in ModelBus
Manager
ModelBus Manager offers the functionality
to export the repository content or a subset of its artifacts of a particular
revision as an archive file. Therefore, the artifacts to be included in the
exported archive have to be selected in the Repository view first. The
context menu of the Repository view provides the corresponding action
“Export…” (see Figure 28) which
displays a dialog to select the revision to use for the export procedure.
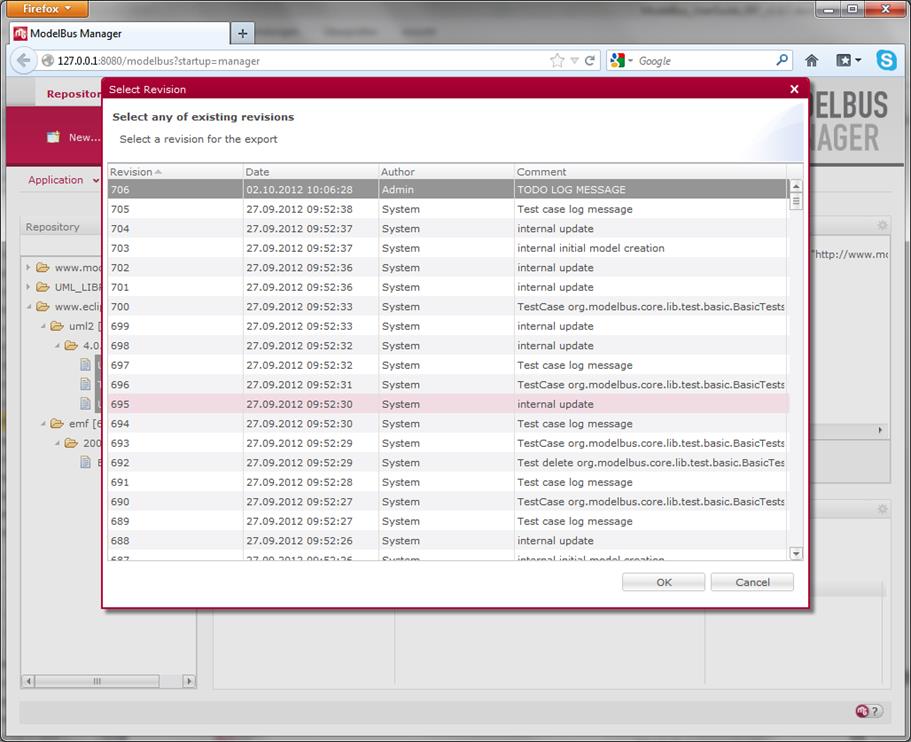
Figure 29 Export Revision Selection Dialog in
ModelBus Manager
After having selected the revision to be
used for the export, another dialog opens up providing a download link to the
assembled archive file.
ModelBus Manager provides an editor for
managing the user groups, the users and its access rights to ModelBus. In order
to use the user related functionalities of ModelBus Manager, you have to switch
to the Users application perspective first by using the perspective bar
located in the top-left corner of the application window. This bar provides a
button labeled with “other…” to select a particular perspective to switch to or
– in case of already having opened the Users perspective before – a button with
direct access to the perspective.
Figure 30 Export Users Perspective in ModelBus
Manager
The Users perspective provides a
view called “Users” showing the users and user groups defined in the current
ModelBus installation. A double-click on an item in this view opens an editor
that allows to edit the credentials of a user, its access rights and
memberships to user groups. The changes made to a user or a user group have to
be applied by clicking the Save button in the application bar.
|
Please note: Don’t forget to apply changes of ModelBus
users credentials also to the user configuration of your Subversion
repository.
|
As of release 1.9.9 ModelBus server is
shipped with a proxy component that allows browsing the repository. Therefore,
the URL of an artifact can be used to navigate to the artifact in a browser. An
artifact can be represented in terms of different contexts, e.g. as a set of
OSLC resources.
In order to setup this feature, you have to
configure a ModelBus user for the proxy access first and assign the appropriate
rights to it (see section 6.6).
Afterwards, you have to setup this user to be used for the ModelBus proxy by
adding two additional VM arguments to the startup.bat (for Windows,
corresponding file in other operating systems) file in the bin folder of
the ModelBus server installation folder. The required arguments are org.modelbus.proxy.user
and org.modelbus.proxy.password, respectively. The default Admin
user can be configured as followed:
|
-Dorg.modelbus.proxy.user=Admin
-Dorg.modelbus.proxy.password=ModelBus
|
After having done these steps, you have to
restart the ModelBus server using the modified startup.bat file so
that the changes can take effect.
On the client side, you have to setup the
proxy either on operation system level or on tool level. We recommend doing the
latter.
In the following we will demonstrate how to
setup the proxy for the Firefox browser:
1.
Please open the Firefox options dialog and
switch to “Advanced” and “Network”. The Network tab includes an
option “Connection” which allows you to configure the way the browser
connects to the internet.
2.
Press the “Settings…” button to open a
dialog for changing the proxy configuration of Firefox.
3.
Please select the option Manual proxy
configuration and specify the IP or network name and the port the ModelBus
server is running at for the option HTTP Proxy (e.g. localhost
and Port 8080 in case of local setup). Please leave the addresses for
the other proxy connections (SSL, FTP, SOCKS Host) empty! The text field
labeled with No Proxy for should contain the value localhost,
127.0.0.1. Figure 31 shows
an exemplary configuration.

Figure 31 Firefox Proxy Connection Settings
4. Apply the settings and close the options dialog.
Now you should
be able to browse the repository content within your browser. If navigating to
an URL that points to a repository artifact or a folder, the proxy will tell
the ModelBus server to deliver an HTML page displaying information and content
of the artifact or folder, respectively. In order to access the repository
content, you have to authenticate to the server with valid credentials for a
user that has sufficient access rights for the given URL.
For example, if
you enter the URL http://www.modelbus.org to the browser, it will not
show the project’s website but the corresponding folder in the repository. When
requesting repository content first, the browser is prompting for
authentication (see Figure 32).
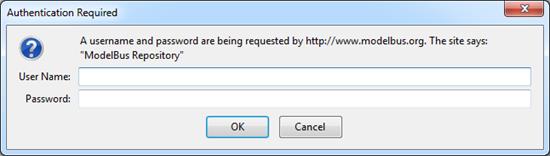
Figure 32 Authentication Dialog for ModelBus
Repository
Please enter valid credentials (e.g. Admin
and ModelBus for default Admin user) and confirm. After successful
login, the browser will display a HTML page as depicted in Figure 33.
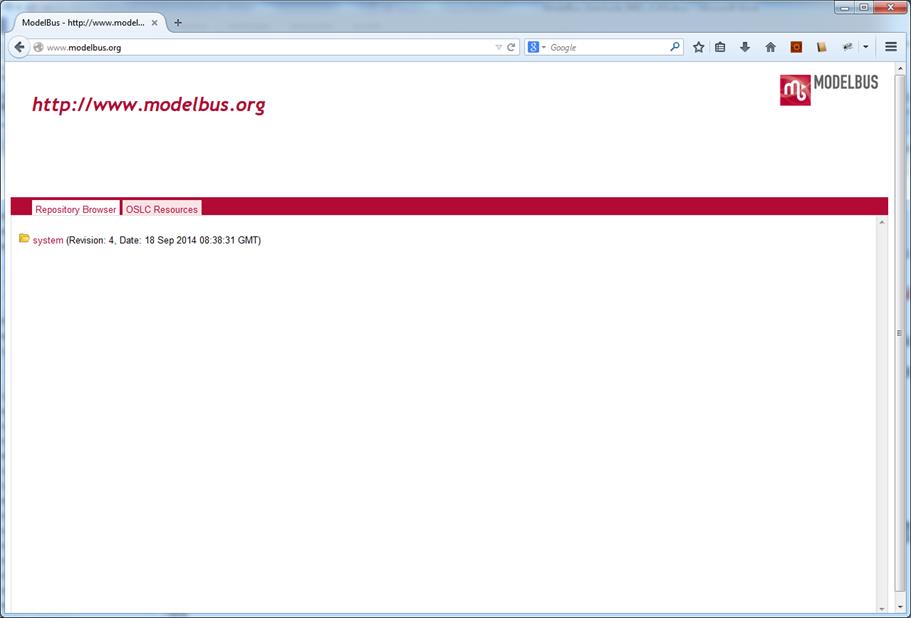
Figure 33 Proxy HTML Page for namespace
http://www.modelbus.org
Within the tap Repository Browser
you can browse the content of the folder and some metadata by selecting the
entries of the subfolders or files. When navigating to the URL http://www.modelbus.org/system/model/user.ecore,
the browser will show metadata of the last commit of the ModelBus user
meta-model like the user that has created the model, its current revision and
last commit date, etc.
The tab OSLC Resources allows
browsing information about OSLC resources contained in a model and even in all
models within a given folder (see Figure 34).
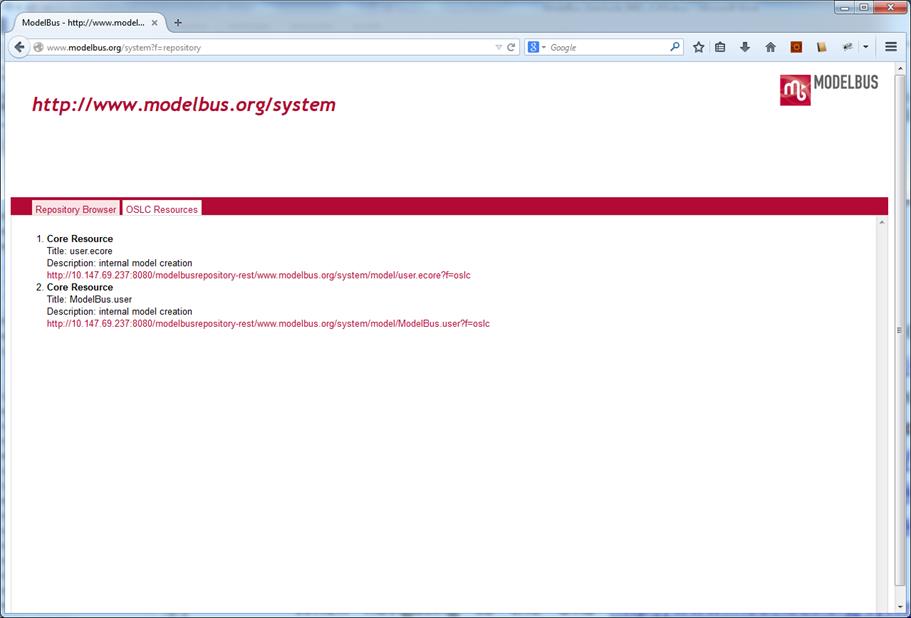
Figure 34 Information about OSLC resources contained
in the system folder
In the default setup, only OSLC information
corresponding to the OSLC Core 2.0 specification (see http://open-services.net/bin/view/Main/OslcCoreSpecification) like the title, the description and the (about)
URI of an OSLC resource are included in that list. Beside text/html,
you can also request a different representation of the resource by changing the
HTTP Accept header for the request. For example, you can request a
RDF/XML representation of the ModelBus user meta-model (URL: http://www.modelbus.org/system/model/user.ecore)
by setting application/rdf+xml as Accept header value (see Figure 35).

Figure 35 RDF/XML representation of the ModelBus
user meta-model user.ecore
You can also upgrade your setup by
adding support for other OSLC domains like Requirement Management (see http://open-services.net/bin/view/Main/RmSpecificationV2) and Architecture Management (see http://open-services.net/wiki/architecture-management/OSLC-Architecture-Management-Specification-Version-2.0/). If you are interested in such an upgrade, please contact us.
Beside the Repository Browser and
the OSLC Resources tabs, an additional Tab Source is available in
the context of artifacts that allows to display the content of an artifact,
e.g. the user.ecore model (see Figure 36).
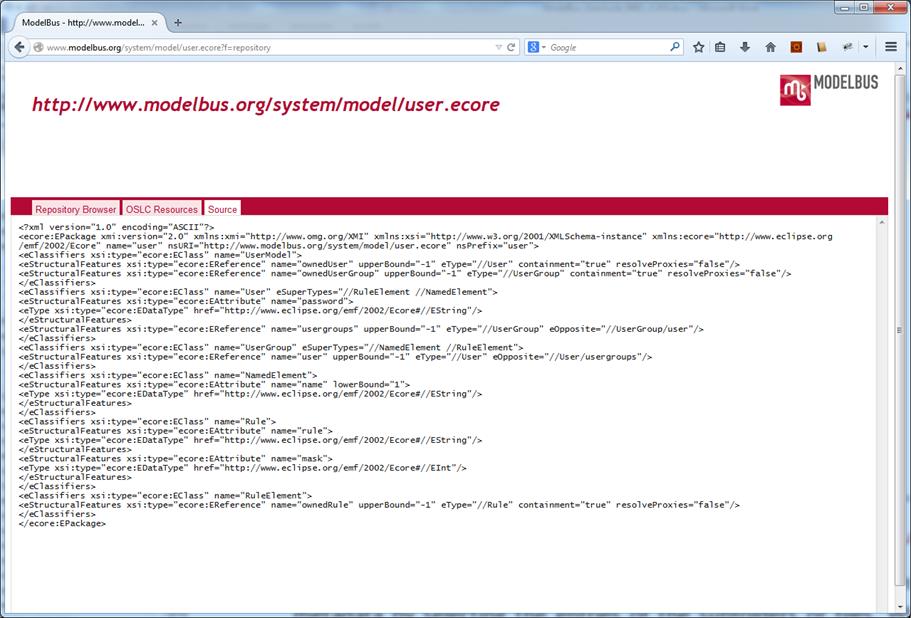
Figure 36 Content of the ModelBus user meta-model
Like the ModelBus server itself, the
ModelBus TeamProvider client release 1.9.7 or higher is designed to obtain the
required configuration options in a two-step manner. At first, it tries to
locate the ModelBus configuration model. In the second step, if no
configuration model was found, the TeamProvider client will rely on the values
for the environment variables MODELBUS_REPOSITORY_LOCATION and MODELBUS_NOTIFICATION_LOCATION
for configuration.
If you have either a local ModelBus server
installed or a configuration model created and the MODELBUS_ROOT
environment variable set to the corresponding value (see section 3.1.1), the TeamProvider will be able to load
all the required configuration options from the configuration model. Otherwise,
you will have to define the environment variables MODELBUS_REPOSITORY_LOCATION
and MODELBUS_NOTIFICATION_LOCATION as described in section 8.2.
If you neither have a local ModelBus server
installed nor at least the configuration model available to the ModelBus
framework (see section 3.1.1), the
ModelBus TeamProvider client first needs the same environment variable MODELBUS_REPOSITORY_LOCATION
as the server that points to the location where the server is running (Figure 37). “localhost:8080” or “0.0.0.0:8080”
must be replaced by the real host and port it is running on.
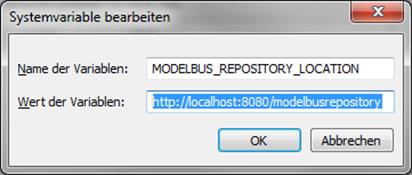
Figure 37 MODELBUS_REPOSITORY_LOCATION Variable
In addition, the ModelBus TeamProvider
client needs the MODELBUS_NOTIFICATION_LOCATION environment variable set
(e.g. tcp://localhost:61616) in order to be able to receive the
notifications broadcasted by the ModelBus server (Figure 38).
|
Please mind the “tcp://” in the notification
address.
|
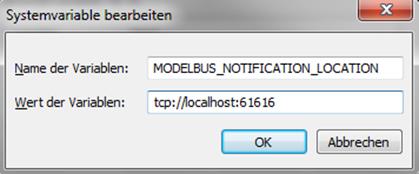
Figure 38
MODELBUS_NOTIFICATION_LOCATION Variable
ModelBus comes with a set of client tools
for Eclipse. This contains a TeamProvider implementation, a model repository
browser and a notification view. These client tools can be installed in any
Eclipse based tool and provide basic client functionality for ModelBus.
It is suggested to use the “Modelling Tools
edition” since it includes a lot of tools needed for ModelBus TeamProvider. You
may use the following link to pick up an Eclipse Modeling Tools distribution:
http://www.eclipse.org/downloads/
You can install Eclipse by just unpacking
the archive to the location you prefer. Then start the Eclipse and call
“Install New Software” from the “Help” menu and press “Add” in the window
popping up (Figure 39).
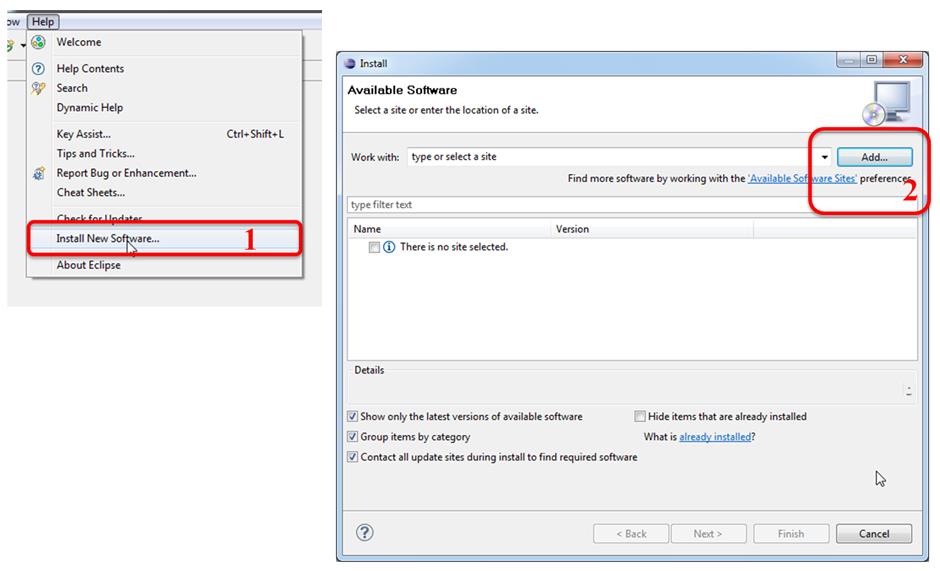
Figure 39 Adding New Software Site (1)
In the window appearing enter the location
of the update site – you find it on the ModelBus Download page (see http://www.modelbus.org/modelbus/index.php/downloads/current-release.
Give the site a name e.g. ModelBus (Figure 40).
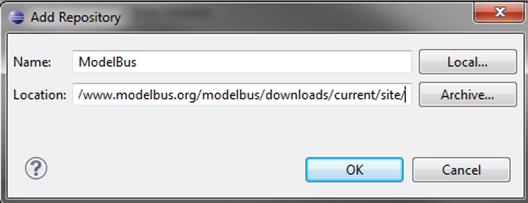
Figure 40 Add a New Site (2)
After pressing OK, the software available
will be shown and you select all features to be installed. Start the
installation by pressing “Next” (Figure 41). You will be guided through the next steps of the installation by
Eclipse. For our example, in addition to the ModelBus TeamProvider software
which is always needed, you can also install the ModelBus Services Examples, the
Interactive Modeling software or the Papyrus Adapter which are optional. There
are two Papyrus Adapters to install which are compatible to different versions
of Papyrus MDT. You have to choose one of them depending on your Papyrus
installation.
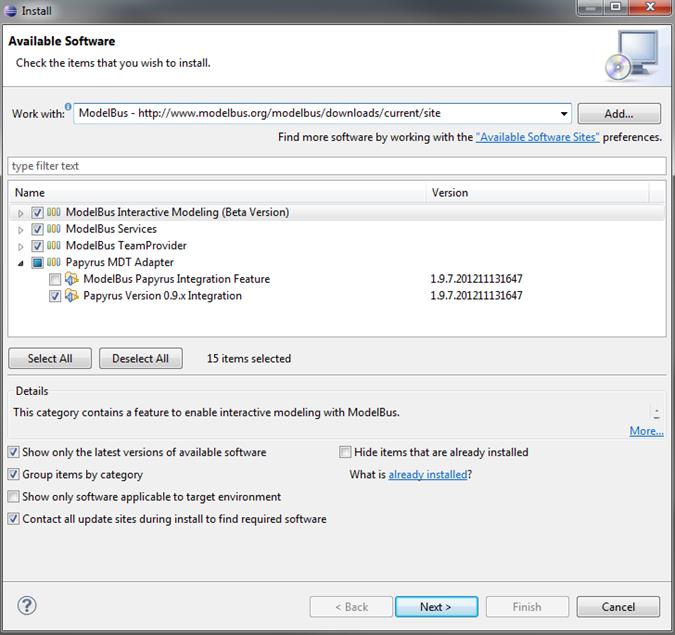
Figure 41 Available Software
After having installed the ModelBus
TeamProvider, please restart Eclipse to apply the changes properly. Then, in
case of ModelBus release 1.9.7 or higher, please open the ModelBus preferences
page, specify the user credentials and set the path to the configuration model.
Optionally, you can tell the TeamProvider to use a SSL encrypted communication
with the ModelBus server if the setup of the latter supports this (see section 5). Figure 42 shows some exemplary configuration
settings using the ModelBus preferences page.
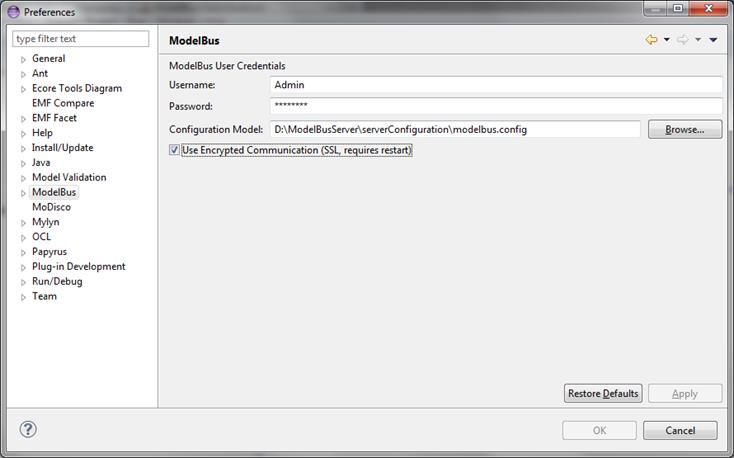
Figure 42 ModelBus Teamprovider Preferences Page
(1.9.7 or higher only)
In this section we will show how you can
test your installation.
Start the client and create a new Java
project (Figure 43). Name it
“Test1-MR”.
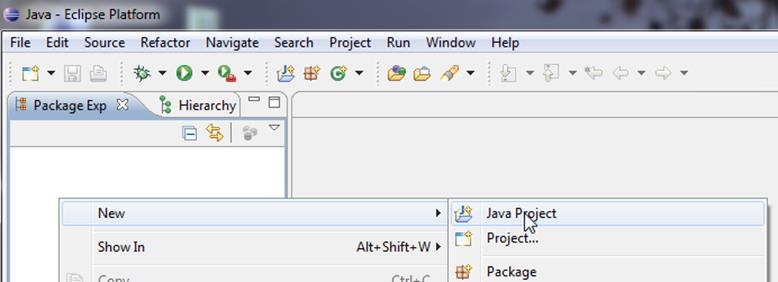
Figure 43 Create a Java Project
1.
Right click on the newly created Project to open
the context menu and select “Team” and “Share Project…” (Figure 44).
2.
Select ModelBus as repository type (Figure 44)
3. The repository creation/selection is disabled (grayed) (Figure 44)
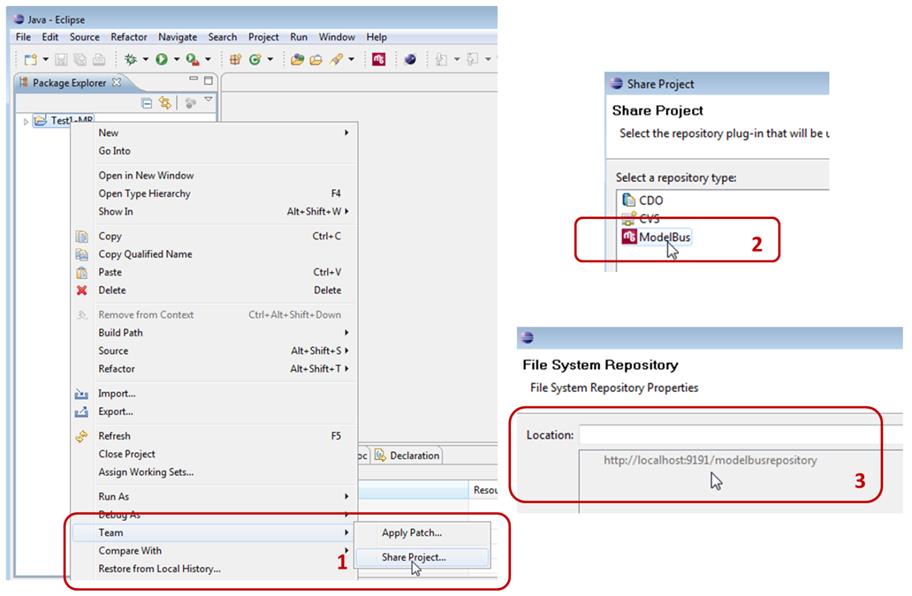
Figure 44 Share Project via Team Menu
What happened?
ModelBus repositories have Access Control!
Refer to section 9 for setting
user credentials.
Try again to share project (see Figure 45 Share Project via Team Menu – Second Try). Step 1 and 2 are the same as in the first try (Figure 44). Now we can select the entry “http://localhost:xxxx/.....
“. Enter a namespace for the project in the repository in the location field
after the” http://” as you like it. In our example it is “Test1-MR”. Press
“Finish” afterwards. To commit the content of the project you have to
synchronize your project and click commit (see Figure 46, Figure 47). You can enter a commit message
and press finish.
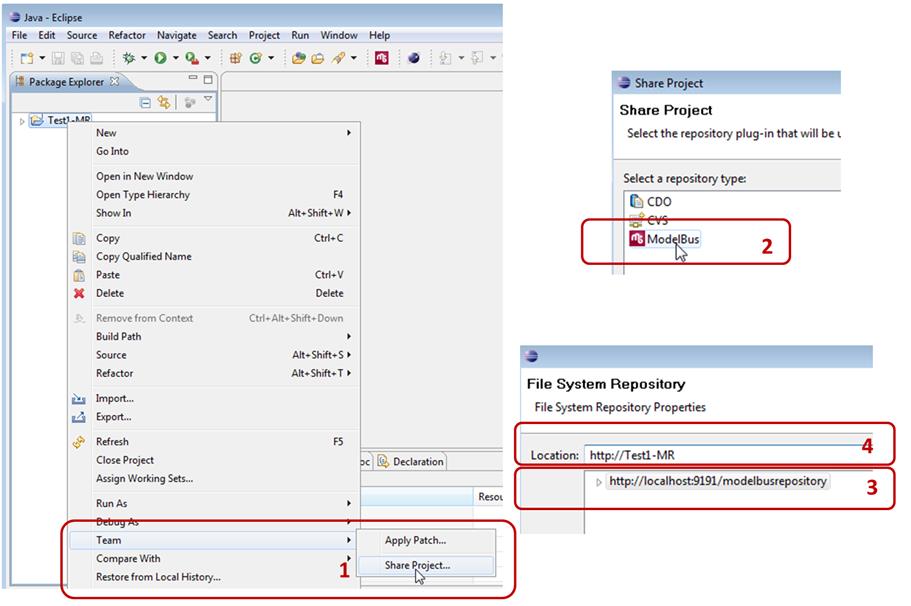
Figure 45 Share
Project via Team Menu – Second Try
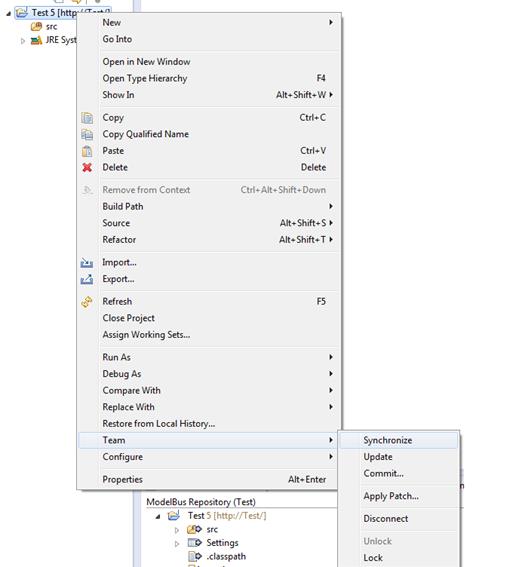
Figure 46:
Synchronize the shared Project
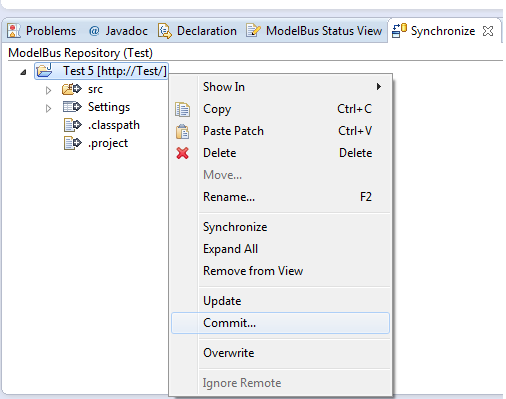
Figure 47 Commit project via Synchronize View
Now we have to switch to the “ModelBus
Repository Exploring” perspective (Figure 48):
1.
Select “Other” within the first step
2. From the window opening you can select “ModelBus Repository
Exploring”
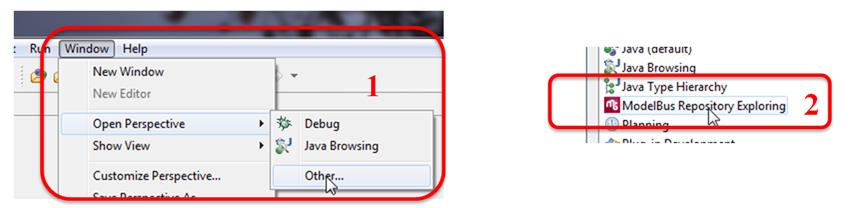
Figure 48 Select
ModelBus Repository Exploring Perspective
Within this perspective we can see the
newly created namespace in the ModelBus Repository view (Figure 49).
By the way: the “Test1-MR” artifact we
created in the Eclipse Explorer (e.g. in the Java Perspective) is called a
Project. In the “ModelBus Repository Exploring” perspective we call it a
namespace since it represents a namespace in the repository. The names of both
need not necessarily be the same. Using the “Share Project” they are associated
to each other.
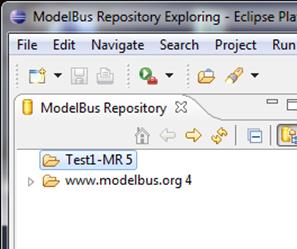
Figure 49 The Newly Created Repository
To work properly with the ModelBus Client
for Eclipse the correct user credentials need to be set. Therefore execute the
steps illustrated in Figure 50:
1.
Select Preferences
2.
There select the “ModelBus” preferences
3. Here you can enter “Username” and “Password”. Be
default, ModelBus is shipped with username “Admin” and password “ModelBus”
configured. This will be those to be used if you freshly installed a new local
ModelBus repository.
If you did not install the ModelBus repository locally on your own machine, you
have to ask the administrator of the repository you are linked to for the
credentials password to use.

Figure 50 Set ModelBus User Info
Additionally, you have to enter the path to
a ModelBus configuration model. If you want to connect to a ModelBus server
using HTTPS and the server itself is configured to run using the protocol, you
can provide a ModelBus configuration model to the Team Provider including the
required information for encrypted communication (see chapter 5 for more information concerning the setup).
Therefore, the ModelBus Preferences Page provides two additional configuration
options (see Figure 51):
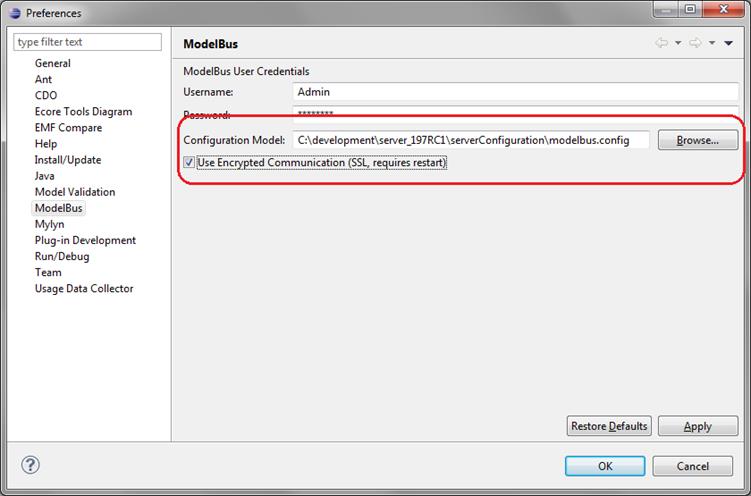
Figure 51 ModelBus TeamProvider HTTPS Setup
1.
Configuration Model: This option states which
configuration model should be used for the setup. If you have a ModelBus server
running locally, this should (but does not necessarily has to) be the
configuration model included in the ModelBus server distribution (see chapter 3.1.1). Otherwise it can be placed at a file
system location of your choice.
2. A checkbox to tell the Team Provider whether to use encrypted
communication. This option requires the availability of a configuration model
as stated in the “Configuration Model” option. Changing this option at runtime
may require restarting the Team Provider.
The connection status to the ModelBus
repository is indicated by an icon in the status line of the “ModelBus
Repository Exploring” perspective (see Figure 52).
Figure 52 Connection status to ModelBus repository
If the ModelBus icon is greyed, there might
be a problem with the connection to the repository. When you move the mouse
cursor over the icon, the connection status is shown as a tooltip. In order to
show a status view including services connected to the ModelBus, please click
on the icon.
10.
Managing Access
Rights with ModelBus Client for Eclipse
If you do not have a ModelBus server
running, just start it as described in section 3.2. The client is started by starting the
Eclipse it is installed in.
Switch to the “ModelBus Repository Exploring”
perspective (see Figure 48).
There you can explore the model repository
and can find the namespaces present in the repository (e.g. the one created
earlier in section 8.4). The
interesting one is www.modelbus.org. Expanding this one will show
something similar to Figure 53.
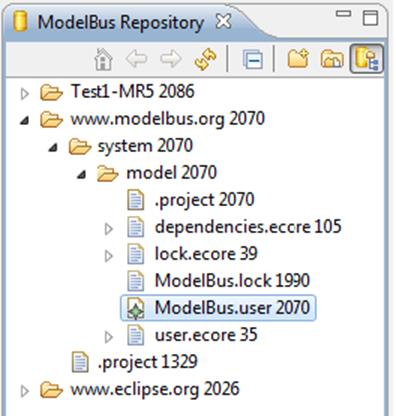
Figure 53 ModelBus repository tree
The ModelBus.user model is the one which
is needed for managing access rights to ModelBus. It can be opened in the User
Model Editor via the context menu of the ModelBus Repository view (Figure 53). This will look like shown in Figure 54. The file shown there is the “head”
revision directly from the repository. Since it is not a local copy you are not
allowed to change it and it is opened “read-only”.
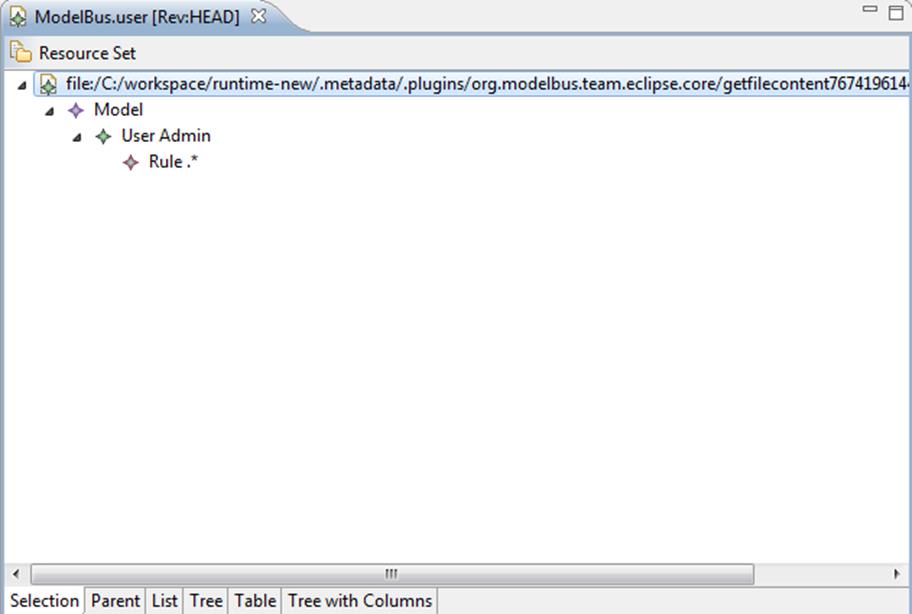
Figure 54 ModelBus.user opened in User Model Editor
To be able to edit the model a local copy
of it has to be created in the local workspace.
Open the “ModelBus Repository Exploring”
perspective and expand the “http://www.modelbus.org/system/model”
namespace (see section 10.1).
On “model” select “Check Out” in the
context menu (Figure 55).
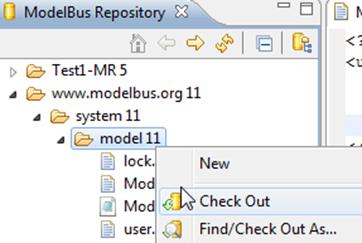
Figure 55 Check
out the “model” name space
Switching back to the Java perspective
you will find a “model” project, the shared one from the repository. You
can now open ModelBus.user in a User Model Editor (Figure 56). This will open an editor for the
tree-view of the model. Do not use the text editor. This will only open the
model in a plain XML view and not check your modifications for syntactical
correctness. You have a great chance to destroy the accessibility of ModelBus.
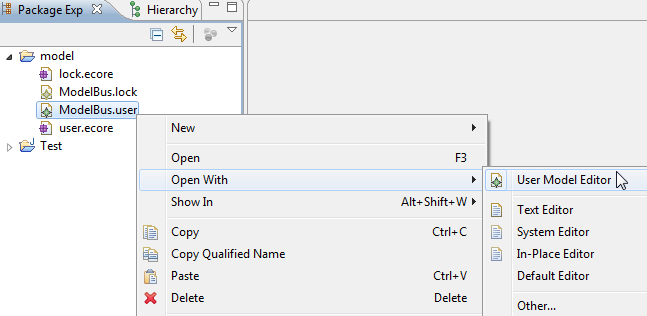
Figure 56 Open ModelBus.user in User Model Editor
After finishing the editing of the user
model you have to save the changes (in the workspace) and also to commit them back
to the repository. In the case of conflicts we will get informed during the
commit. The Team Synchronizing perspective, will be explained in section
12.
Figure 57 shows ModelBus.user
in the user Model Editor in a tree view. During editing it will be aware of the
corresponding user meta model and therefore give support to make only
syntactically legal changes which are conform to the meta model.
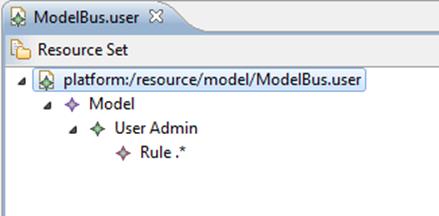
Figure 57 ModelBus.user in User Model Editor
To be able to see details about the elements,
you need to open the Properties View (see Figure 58). In Figure 59 you can see the user model with
the properties of the selected “User Admin” model element.
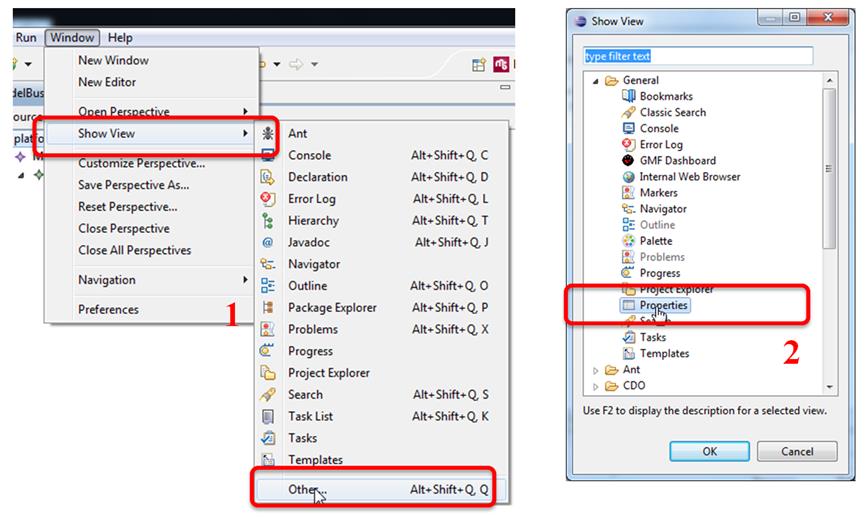
Figure 58 Open Properties View
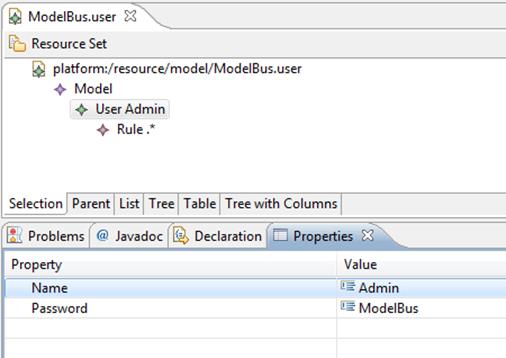
Figure 59 ModelBus User Model with Properties View
For adding a new user (see Figure 60):
1.
Create a User element under Model
2.
Set its properties (Name, Password)
3.
Create a Rule element within User
4. Set its properties (Rule, Mask)
For Mask you can set the values 1,
2, 4, -1 with the following meaning: Read=1, Write=2, Execute=4 and
Everything=-1.
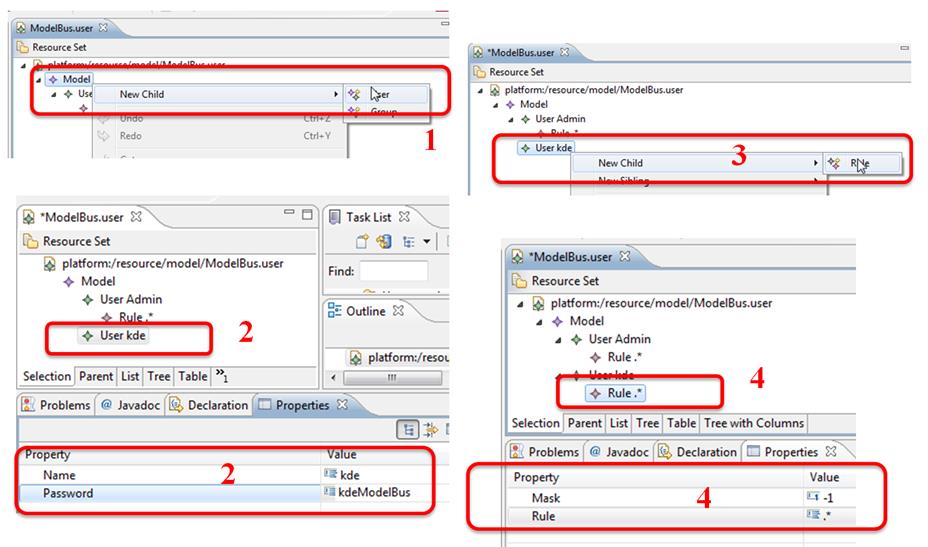
Figure 60 Add a new User
Next you have to save the changed model in
the local workspace and afterwards to commit the changes back to the repository
(see Figure 61).
In the case that there are activities by
other team members on the user model you should do a synchronize before the
commit and thereby switch to the Team Synchronizing perspective which is
useful to handle the relevant aspects with concern to discovering and managing
conflicts. This will be described in section 12 in detail.
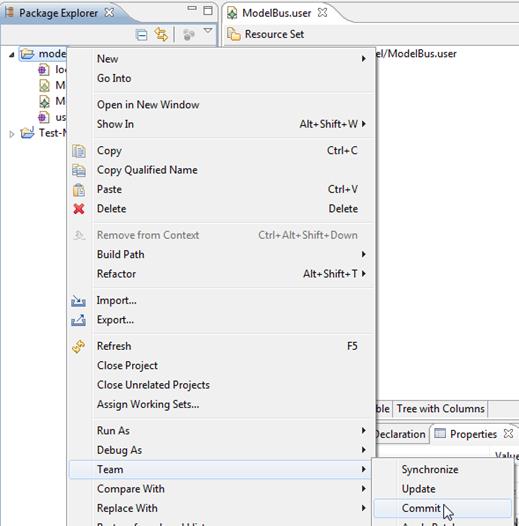
Figure 61 Commit Changes to Repository
After committing it to the ModelBus
repository you may disconnect the shared project and even delete it from the
workspace (see Figure 62 (1)
and (2&3)).
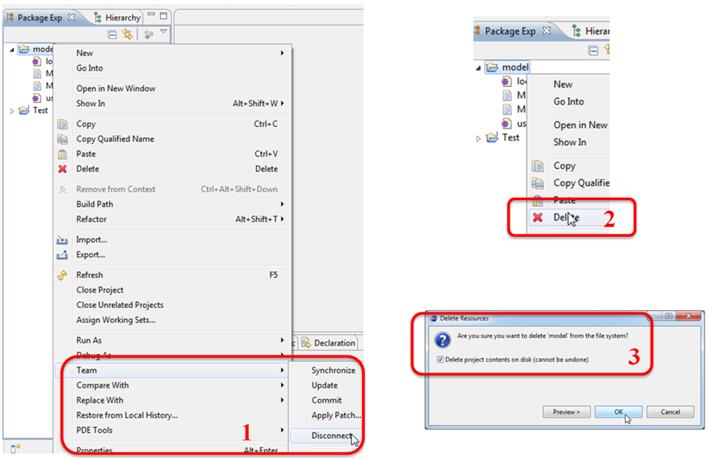
Figure 62 Disconnect shared project and delete it
from workspace
The content of the Package view (1)
and the Modelbus Repository (2) after disconnect and delete is shown in Figure 63. The changed ModelBus.user
is removed from the workspace. You can even inspect it there by opening it in the
User Model Editor (read-only). If the new user is not shown in the ModelBus.user
file in the repository you probably forgot to save the file in the workspace
before commit or you completely forgot to commit.
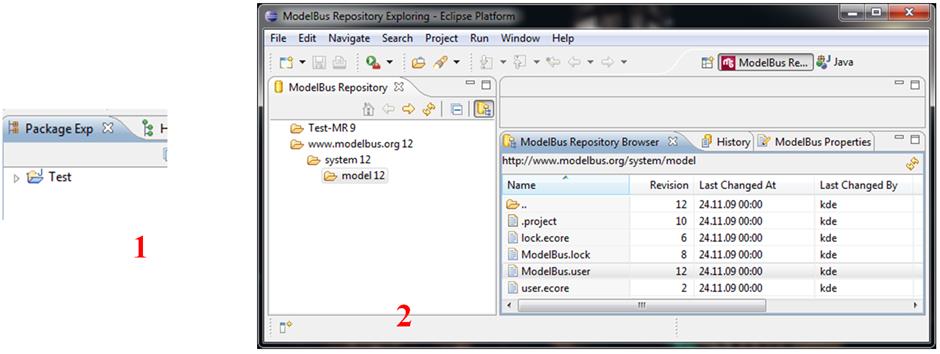
Figure 63 Package View and ModelBus Repository
(Browser) after Delete from Workspace
Checkout the ModelBus.user to your local
workspace (see section 10.2),
open the model in the User Model Editor (see Figure 56) and enter the password for the
current user in the Properties View.
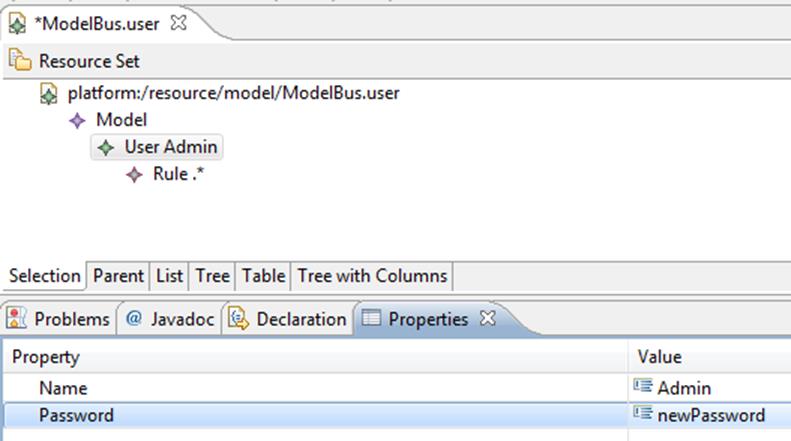
Figure 64 Change password of the current user
Save the model and commit the model into
the repository. You get a message box asking you to change your password in the
ModelBus Preferences Page, too (see Figure 65). After pressing “Ok”, you
get a message that a problem occurred because the combination of username and
password is not valid (see Figure 66). Then, you have to change your password in the ModelBus
Preferences Page (see Figure 50). After synchronizing the model project, you will see conflicts,
which can be resolved by “overwrite” or “ignore remote” and “commit…”. After
this procedure, you can work on normally.
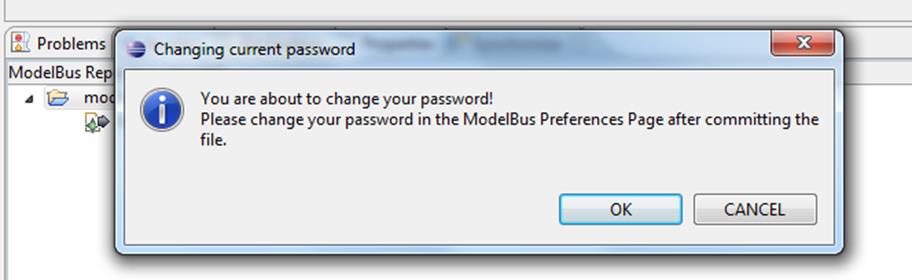
Figure 65 Info Dialog when trying to change the
password of the current user
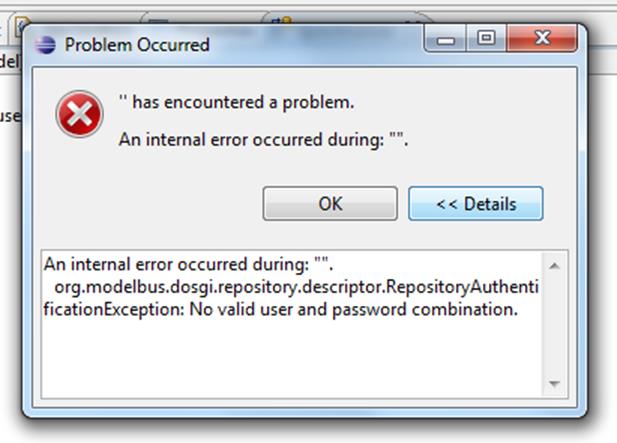
Figure 66 No valid username and password after
changing ModelBus.user
This section gives a small example how to
create access rules in order to separate access for the ModelBus users in a coherent
and consistent way. This example has a fairly simple respository structure as
outlined in Figure 67.
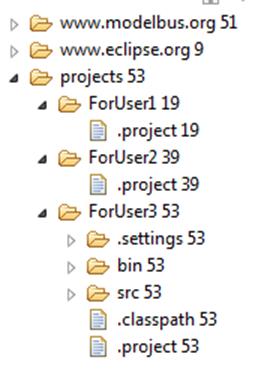
Figure 67 Example
Repository Structure
In this example we have three developers: User1,
User2 and User3. All shall have access to the projects folder, as
they store projects in this folder. But each developer shall only see its own
project. So all three developers are bound to the user group developer
which contains access rules for accessing the namespace http://project
and in addition rules for accessing other relevant namespaces, e.g. http://modelbus.org/system/model.
In Figure 68 you can see a
fundamental set of rules which would be needed for the developer user group. It
also shows the individual rules for each of the developers.
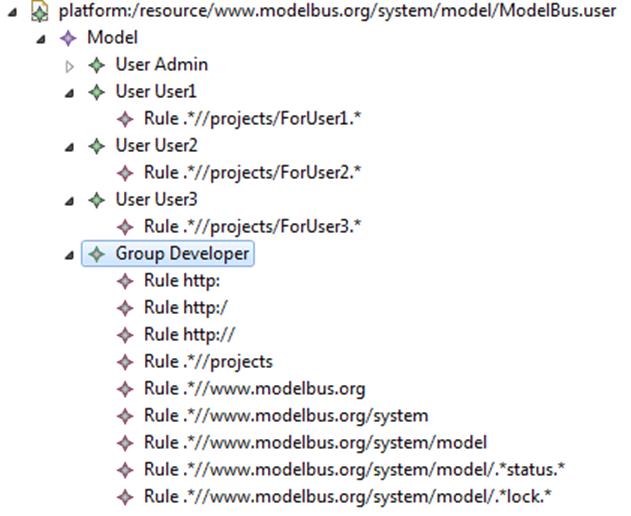
Figure 68 Rules for Developer User Group and its
users
There are different ways of checking the
availability of the ModelBus. One has been used before and is usable
independent of the use of the TeamProvider ModelBus client. Within an Web
browser window the invocation if the address that has been specified within the
MODELBUS_REPOSITORY_LOCATION variable or as the repositoryLocation,
respectively (see section 3.1)
followed by the query string “?wsdl” will display the WSDL of the
ModelBus repository. In our example the invoke: http://localhost:9191/modelbusrepository?wsdl.
Another possibility to check not only the
ModelBus availability but also the status of available services is offered in
the TeamProvider client. In the status line there is a small ModelBus icon (see Figure 69).
Availability of ModelBus will be indicated by a red icon, unavailability by a
grey one. If the icon is clicked, the ModelBus Status View will be focused
which shows more detailed information about the repository location and the
registered services (see Figure 69).
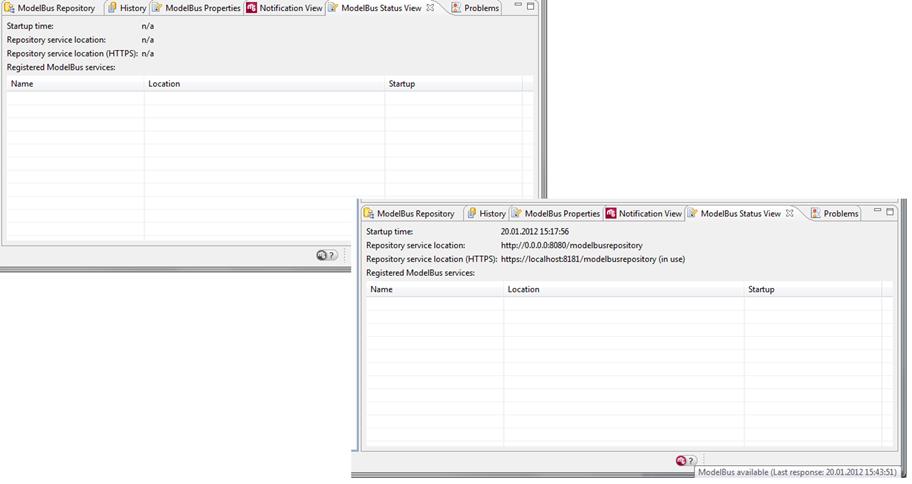
Figure 69 ModelBus Services Availability
To illustrate the synchronization process and
further aspects of ModelBus a small UML example model shall be introduced. If
you have installed an Eclipse distribution package including the Modeling Tools
for your ModelBus client, you may create the example UML2 class model and
diagram directly within your client. Create an empty project “Demo-Example”
with a folder “models” in it. Within it you create a folder “class-models”
where you can create the class diagram by invoking “New à Other” in the context menu of it and select “Class Diagram” (see Figure 70). Name it “library”. This
will automatically create the UML model (“library.uml”) when you create
and fill up the class diagram (“library.umlclass”).
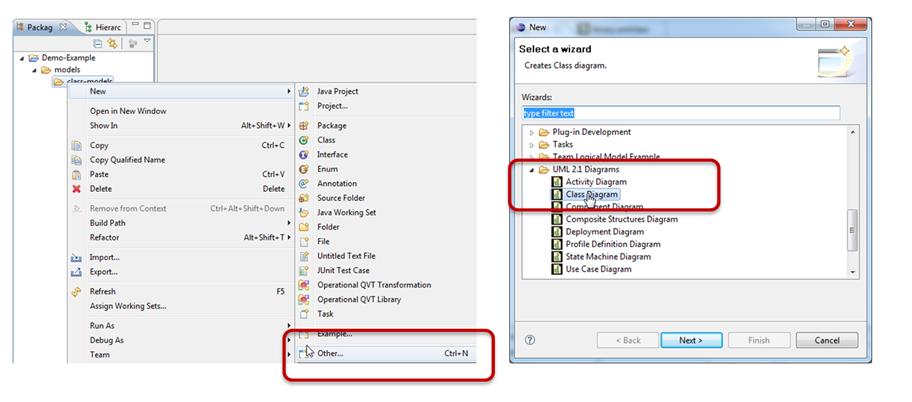
Figure 70 Create a UML model and class diagram
The UML class diagram and model example is
shown in Figure 71.
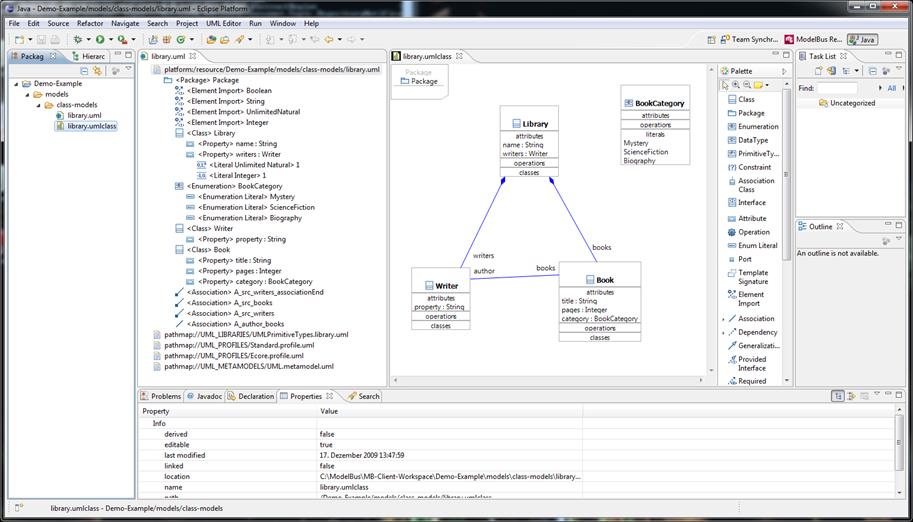
Figure 71 The simple UML demo example
To describe the Team Synchronization
perspective we will also need the following ModelBus configuration:
·
We have our local ModelBus repository installed
as described in section 3.1. The
server has been started and is running. We have installed and defined two users
for it: “Admin” and “kde” (see section 10) – both at the moment have the right to
do EVERYTHING (mask=-1).
·
We use two clients with separate local
workspaces, one for user Admin and the other for user kde (see
section 9).
·
The initial ModelBus.user model in the
repository looks as shown in Figure 72 (with the properties: passwords for “Admin”: “ModelBus”,
for “kde”: “kdeModelBus” , for “kde2”: “kde2ModelBus”
and mask=-1 for all of them in the rule entry)

Figure 72 Initial ModelBus.user for the scenarios
To illustrate the functionality offered in
the Team Synchronizing perspective we around a little bit with the UML
model created at the beginning of this section (see Figure 70 and Figure 71).
We are registered as ModelBus user “kde”
for the client we are using and work in the local workspace “MB-Client-Workspace”.
This is important because we will use a second client with a separate local
workspace later on in parallel.
As the first step we will create a shared
project/namespace in the ModelBus repository (see Figure 73):
1.
In the context menu on the project folder in the
Package Explorer select “Team” and “Share Project”.
2.
As type select “ModelBus”.
3. Give it a name for the location in the ModelBus repository. This
name (namespace) must be unique within the repository. For this reason you can
inspect the namespaces already used in the repository available in the field
under beneath the location field.
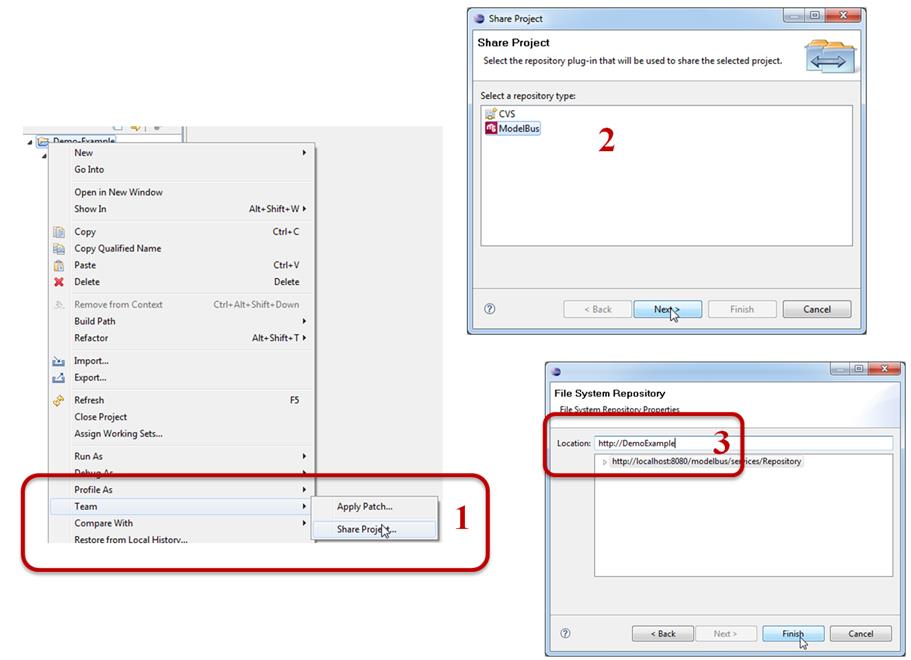
Figure 73 Create a shared project in the ModelBus
repository
Next we will synchronize the content of the
local workspace shared project with the content in the ModelBus repository (see
Figure 74):
1.
In the Package Explorer we can see the
folder structure of the local (shared) project.
2.
Select the folder we want to synchronize and
from the context menu invoke “Team” and “Synchronize”. This will
ask us to switch to the Team Synchronizing Perspective shown in the next
step. In our example we plan to put the whole project into the ModelBus
repository, which makes it easier for another user to get it working for him.
So we execute the “Synchronize” on project level to include all
subfolders and files in it. The “Synchronize” is not absolutely required
but a good style of working. We at this moment know that there is no
conflicting content in the repository. But “by accident” another client could
have created conflicts. Using “Synchronize” first will discover this
conflict.
3. In the Team Synchronizing Perspective, which is offered
automatically, we see all material that has been newly created in the local
workspace is not in conflict with anything in the repository and can be
committed to the repository. This is indicated by the grey arrow with the plus
inside it.
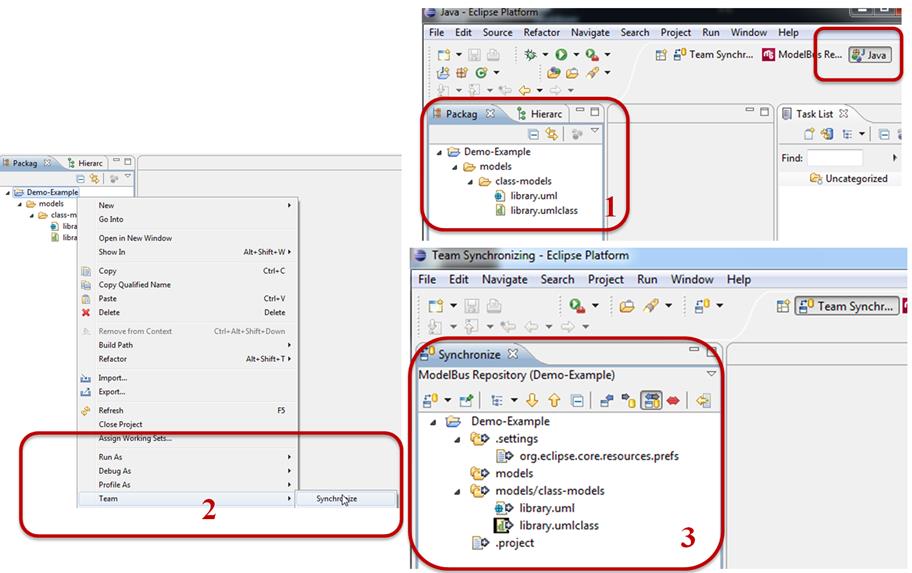
Figure 74 Synchronize local workspace and ModelBus
repository
Within the next step we will commit it to
the ModelBus repository (see Figure 75):
1.
In the Synchronize View of the Team
Synchronizing Perspective select the “DemoExample” and in its
context menu the “Commit” operation.
2. When we switch to the ModelBus Repository Exploring Perspective
and expand all the entries underneath “DemoExample”, we will find all
the material stored in the repository.

Figure 75 Commit project to ModelBus repository
To check that it is really there, we go
back to the Java Perspective and the Package Explorer (see Figure 76).
1.
In the context menu of our DemoExample
project we select “Team” and the “Disconnect” option to
disconnect the project from the repository.
2.
Then we delete the project form the local
workspace.
3. Do not forget to select the “Delete... content …”.
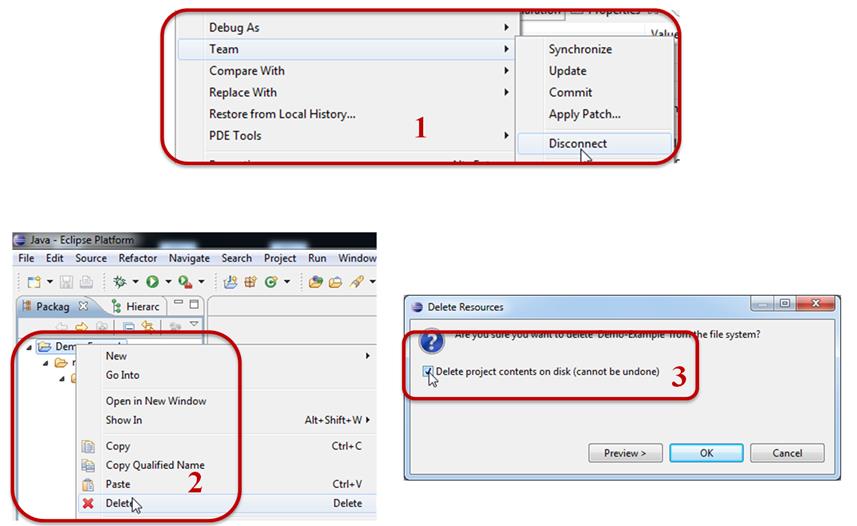
Figure 76 Discontinue share and delete local project
Now we can again check out the content we
just removed from the ModelBus repository (see Figure 77). Go to the ModelBus Repository
Exploring Perspective, select the “DemoExample” and in its context
menu the “Check out”. If you forgot to remove the project content from
your disk (step 3 in Figure 76),
you will see a window like shown in Figure 78 and must select to overwrite the
stuff in your local workspace.
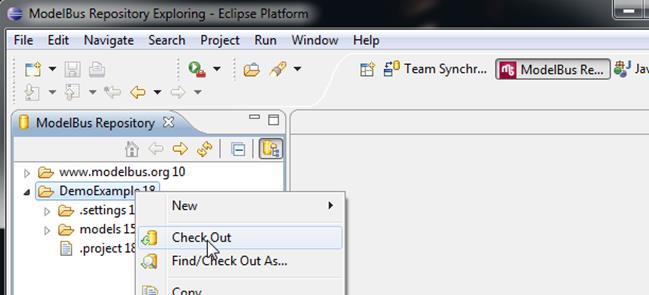
Figure 77 Check out the project again
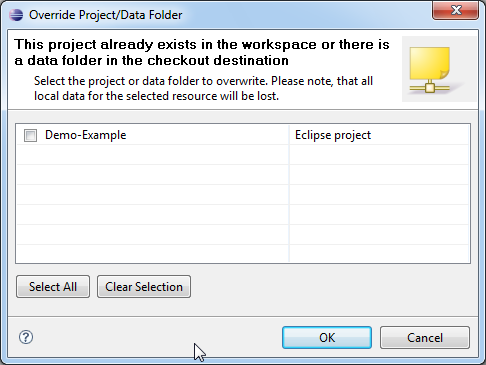
Figure 78 Overwrite request by Check Out
Switching to the Java Perspective,
expanding the project and folder and opening the UML model and diagram will
show us that we got it back unchanged (see Figure 79).
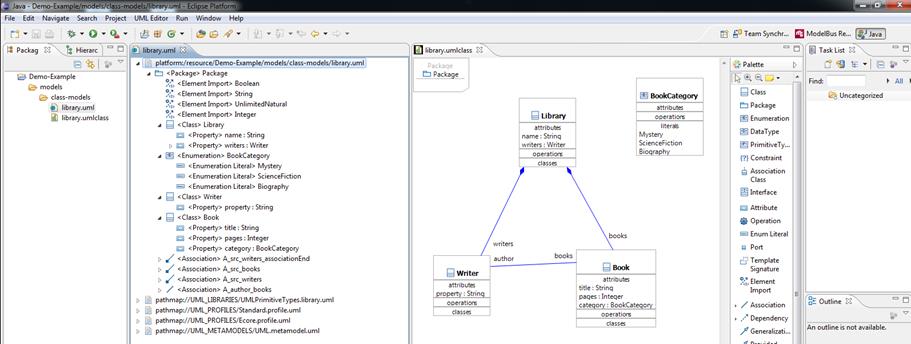
Figure 79 Demo example project is back again
To produce conflicts we need two clients
working with separate local workspaces at the same time on the same stuff.
We are still registered as user “kde”
in our client and work on workspace “MB-Client-Workspace”.
We now start a second client and let it work
on a separate workspace “MB-Client-Workspace 2”. We now open the preferences
of it and set the ModelBus user (see also section 9 and Figure 50). We use name “kde2” and
password “kde2ModelBus”.
Now we select the ModelBus Repository
Exploring Perspective (maybe we have to do it as shown in Figure 48).
Next we will check out the DemoExample
as we did it in the previous section (see Figure 77).
At this point both clients have checked out
the same version from the ModelBus repository and we can create changes on the
model and diagram that will produce conflicts afterwards.
Client 1 will create a new class “Reader”
and associate it while client 2 changes the name of class “Writer” to “Author”.
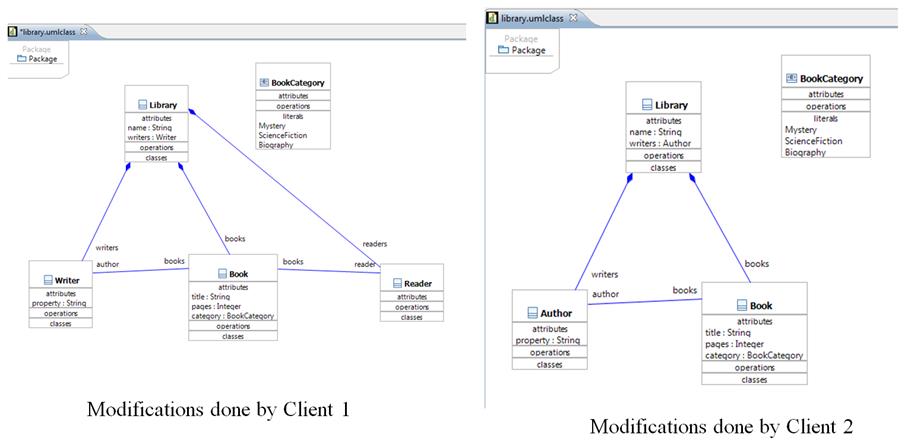
Figure 80 Conflicting modifications done
Now we try to commit the changes to the
ModelBus repository.
Client 1 starts (see Figure 81):
0.
It calls the Team Synchronize for its
whole project in the Package Explorer.
1.
Two artifacts (library.uml and library.umlclass)
have been modified in the local workspace (grey arrow left to right) and can be
check in without conflicts.
2.
Invoke “Commit” for each of the modified
artifacts (only shown for library.umlclass in Figure 80).
3. After the commits we find new versions (see numbering) when we look
in the ModelBus Repository.
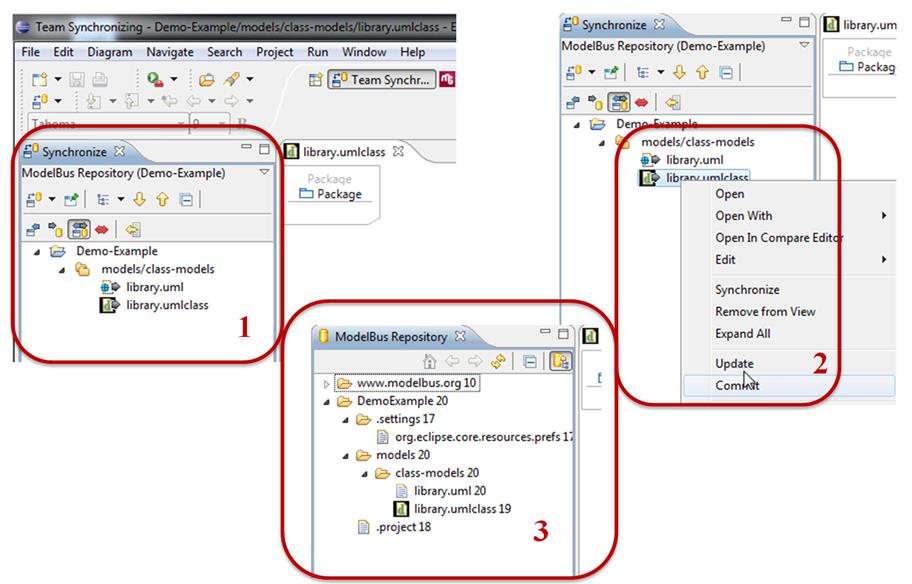
Figure 81 Commiting modifications from client 1
Next client 2 will try. It also invokes “Synchronize”,
but gets a conflict indicated. The red arrow on library.uml indicates
that there are conflicting changes between the content of the ModelBus
repository and the local workspace. The arrow goes in both directions what
indicates that there have been changes in the repository as well as in the
local workspace during the check out and the synchronize. In addition we see a
blue small arrow (right to left) on library.umlclass, the class diagram,
which indicates that it has been changed in between in the repository, too, but
there are no conflicts.
Reflecting about these indicators, we can
derive: there have been changes in the repository concerning the UML model and
the diagram while client 2 introduced his changes. These changes concerned the
model as well as the diagram. Since client 2 did not change the diagram but
only the model (rename a class), there are no “conflicts” concerning the
diagram but for the model there are changes in both directions.
Client 2 could decide to just discard his
local changes, check out the modified version and try again or try to inspect
the conflicts more deeply using a compare editor. This will be shown in the
section 12.3.
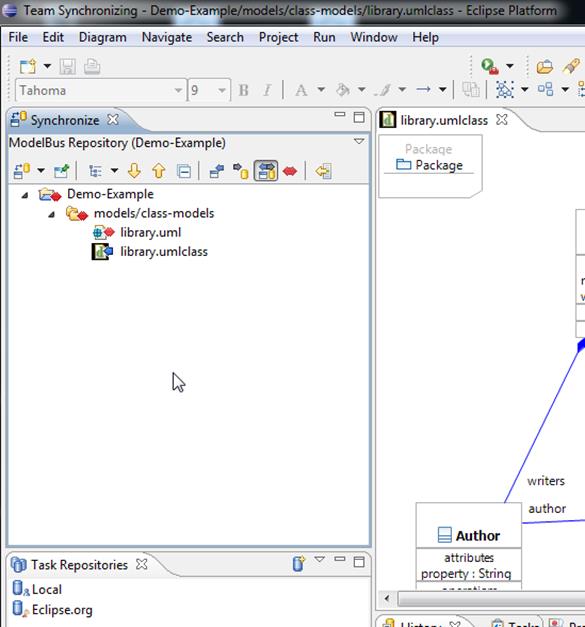
Figure 82 Synchronization conflicts indicated for
client 2
Additional help resolving the conflicts can
be obtained by invoking the Compare Editor (Figure 83). This is based on the EMF
Compare (see http://wiki.eclipse.org/index.php/EMF_Compare).
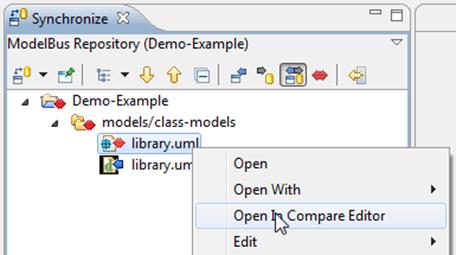
Figure 83 Invoking the Compare Editor
The Compare results for our UML model (library.uml)
are shown in (see Figure 84).
The UML model version client 2 wants to check in is shown in the bottom right
window, the one in the ModelBus repository in the bottom left window. Expand
the trees as far as you need them.
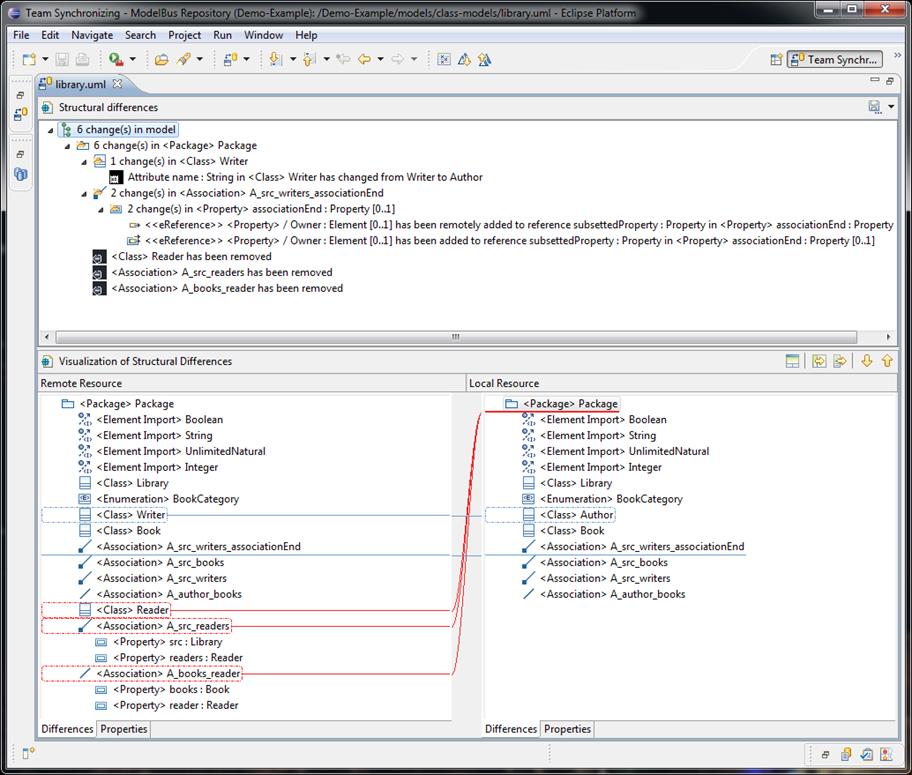
Figure 84 Results of the Compare Editor invocation
The Compare Editor allows you to
copy all or selected changes from the “left” to the “right” and to propagate
from one to the next change. Whether this is helpful for a specific conflict or
not must be decided individually. In our situation the UML model and diagram
are two separate instance files of meta-models. The compare editor therefore
handles them separately and therefore may create inconsistent model/diagram
situations.
So mostly the compare editor will only be a
helper to more deeply identify the conflicts.
Within this section some features of the Team
Synchronizing Perspective shall be summarized.
First of all we have the indication of
changes and conflicts in the Synchronize view (see Figure 85):
·
Blue arrow (right to left) indicates changes in
the repository
·
Grey arrow (left to right) indicates changes in
the local workspace
·
Red arrow (both directions) indicates conflicts
·
Additional + in the arrow indicates additions
·
Additional – in the arrow indicates deletions
In the Synchronize
View you can select filters from the menu bar to only show changes in a
specific direction or conflicts. You can also invoke an operation there to
merge all non-conflicting changes.
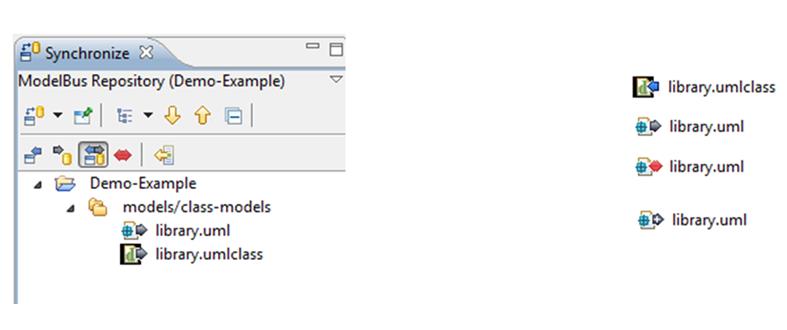
Figure 85 Synchronize View and Arrow Symbols
Alternatively one can synchronize the
changes between the local workspace and the repository on an object to object
basis using the commands in the context menu of the object (see Figure 86):
·
Commit: Copies
the object from the local workspace to the repository with a dialog if there
are conflicts.
·
Update: Copies
the object from the repository to the local workspace with a dialog if there
are conflicts.
·
Overwrite: Copies
the object from the repository to the local workspace without asking.
·
Ignore Remote:
Copies the object from the local workspace to the repository without asking.
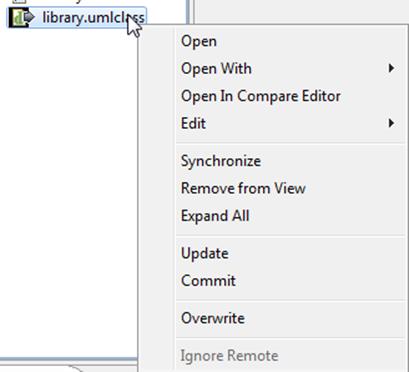
Figure 86 Synchronization Operations
This chapter describes the possibility of
locking elements in the ModelBus repository. This always works with complete
files and models as described in section 13.1. There exist ModelBus adapters for
Papyrus MDT and RSA and an adjusted Papyrus 1.12.3 version that allows locking
and unlocking for model elements as described in section 13.2.
Assume the situation that more than one
user want to work on the same files or models at the same time. In this
situation they can use the ModelBus repository, store their files and models
there and synchronize their work using the lock mechanism offered.
This shall be illustrated using a simple
text file and a simple UML model within this section.
Assume the first user has created a project
containing a simple text file and a simple UML model as shown in Figure 87 and shared and committed it to the
repository (see Figure 88).
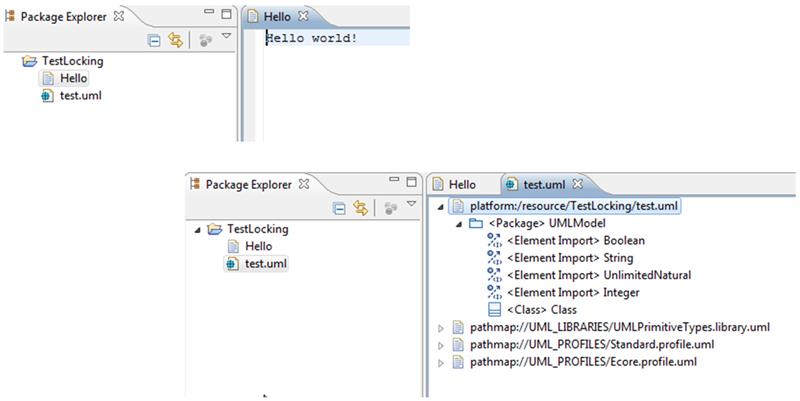
Figure 87 Example created by first user
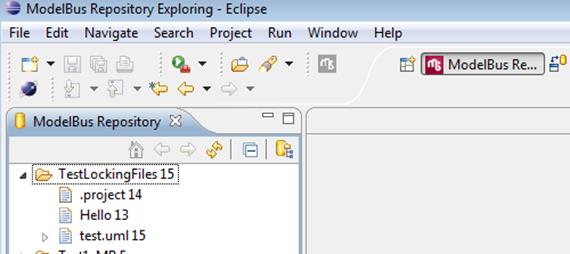
Figure 88 ModelBus Repository view on the example
A second user with its own ModelBus client,
username and local workspace checks out the project (Figure 89) and probably wants to make some
changes on the e.g. text files.
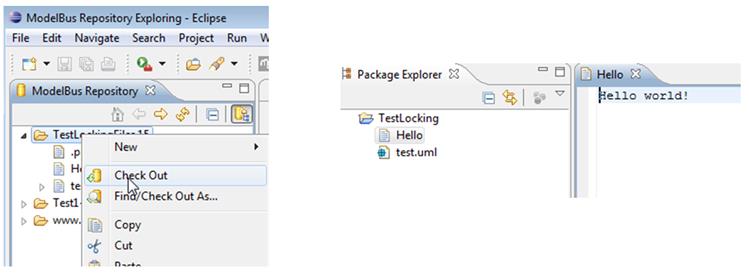
Figure 89 Second User Check Out
To
prevent the (text) file from being changed intermediately he may set a lock on
the text file (see Figure 90
(1)).
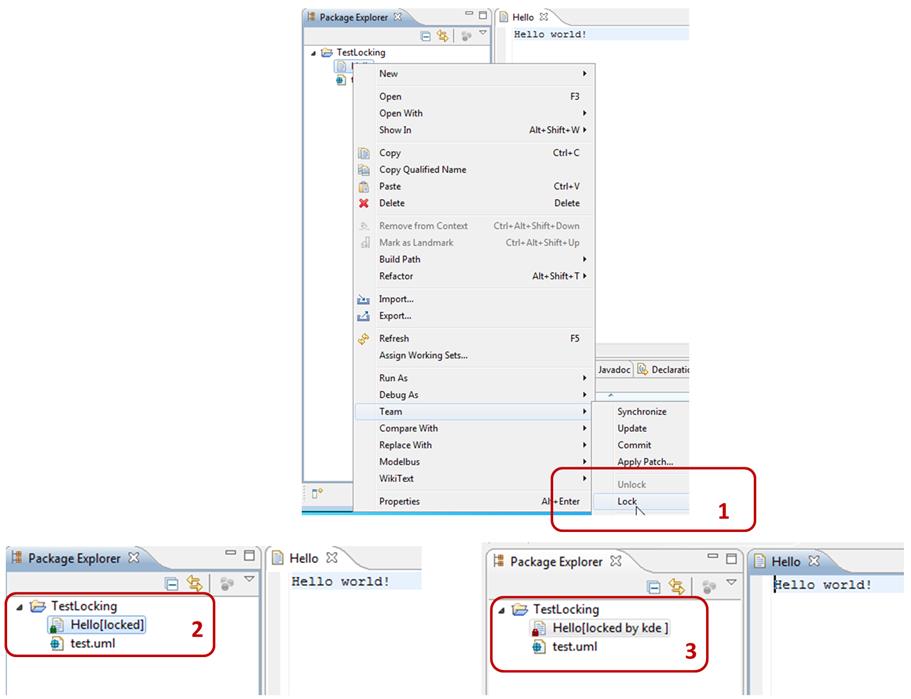
Figure 90 Locking a File
The lock will be indicated to the user who
set it and is still able modify it with a small green lock icon (see Figure 90 (2)) and to the other user(s) by a
red icon (see Figure 90 (3)).
The lock can be released using the Unlock
command (see Figure 91) by the
user that initiated the locking.
As you can see in Figure 91 another user has locked the UML
file intermediately indicated by the red lock icon.
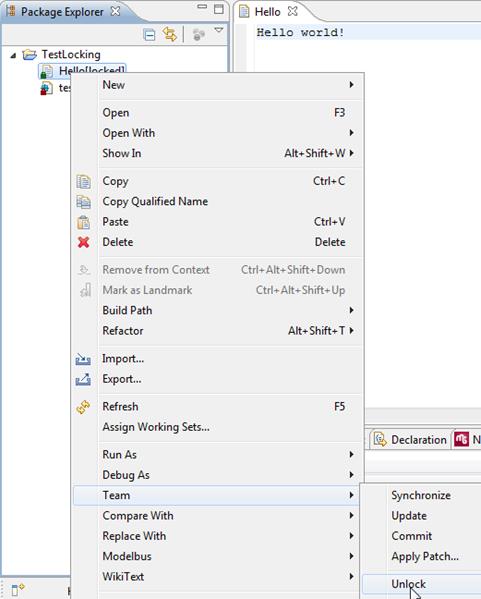
Figure 91 Unlock a File
The following section will explain a
specific feature implemented in ModelBus adapters for Papyrus MDT and RSA in
combination with the ModelBus Repository.
Two users working simultaneously on the
same model may synchronize their work using the locking and unlocking of model
elements in the repository.
One of the users may invoke the lock
operation on a model element (see Figure 92). The result will be indicated to
all as shown in Figure 93 by a
green lock symbol to the user who has set the lock and with a red lock symbol
to the others. In addition the text “locked” and “locked by …” will be shown
which will also show the name of the user that initiated the lock.
The unlock operation (see Figure 94) will release the locks.
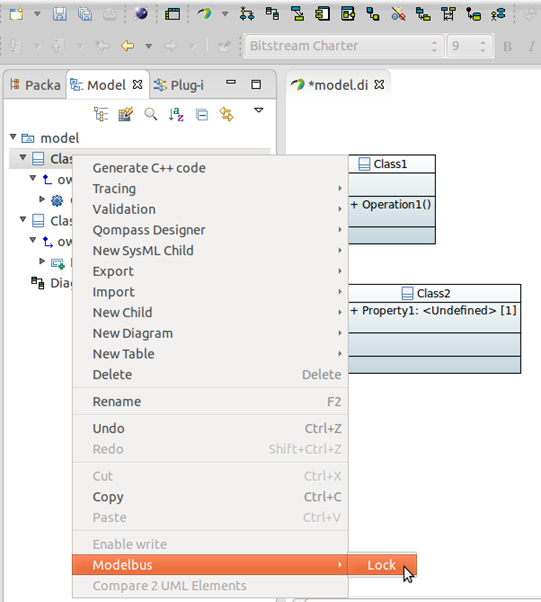
Figure 92 Locking a Model Element
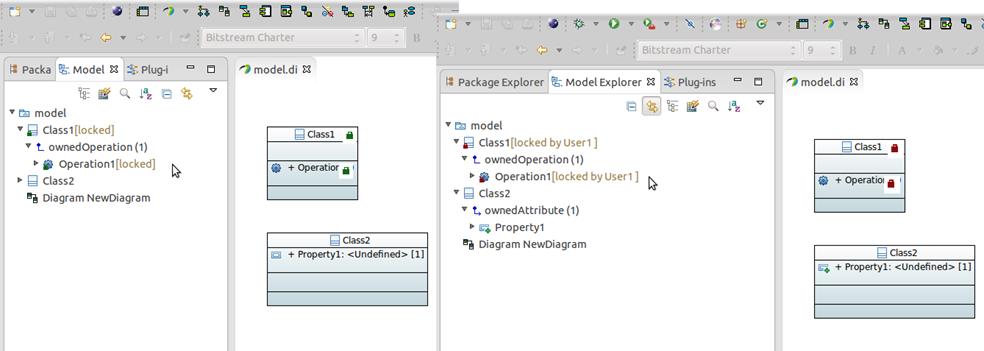
Figure 93 Lock result indication
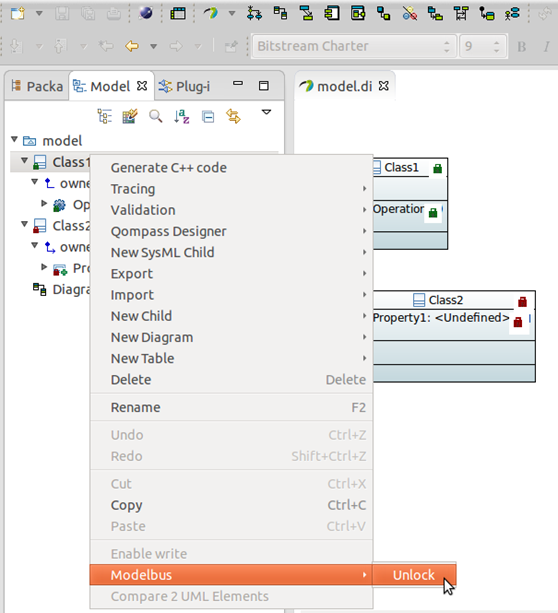
Figure 94 The Unlock Command
The ModelBus Repository Exploring
perspective allows inspecting the content of the repository. A screenshot of the
perspective is shown in Figure 95.
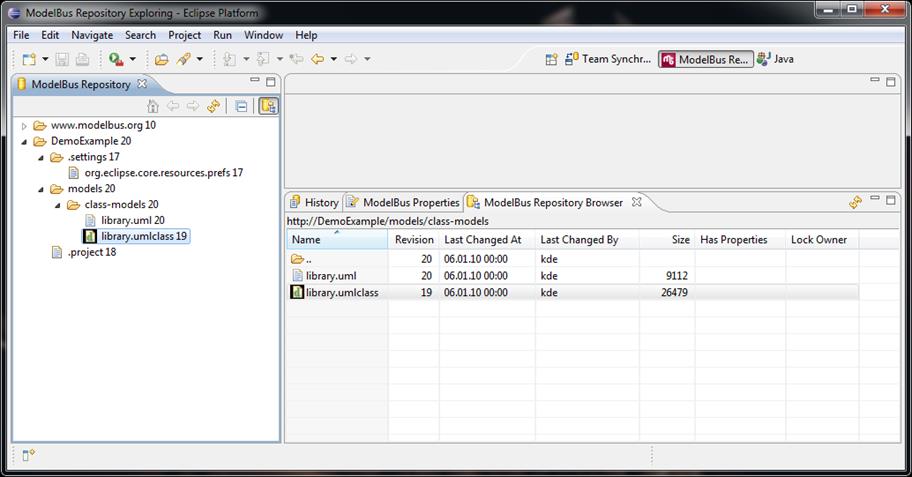
Figure 95 ModelBus Repository Exploring
The ModelBus Repository Perspective
can also be used to navigate through a model (in a tree view). You can select
the types to browse in the preferences (see Figure 96).
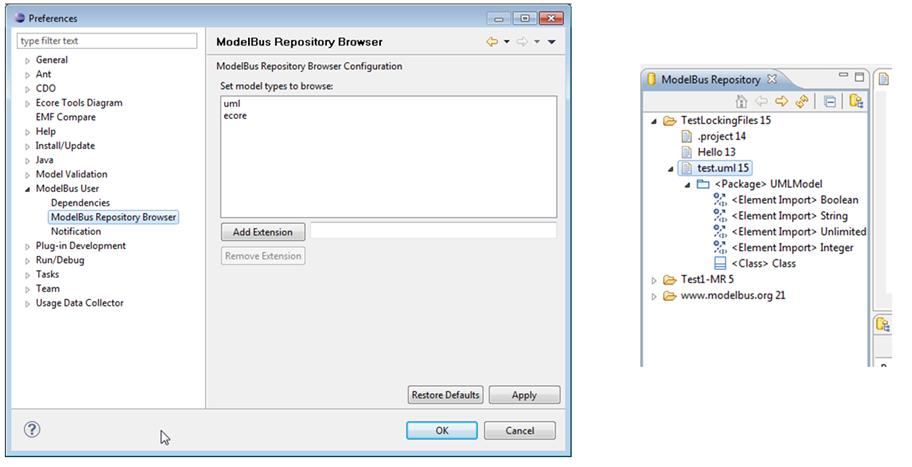
Figure 96 Browsing Models in the Repository
The ModelBus includes and offers notification
service. This can be used to send notifications between services and to
clients. The notifications are displayed in a specific view in a client (see Figure 97). In the example shown, the
successful update of the repository as a result of a commit request is
displayed.
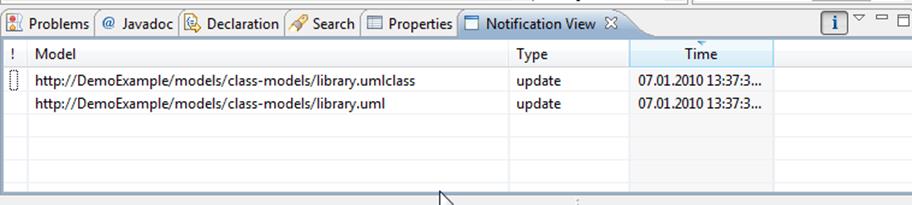
Figure 97 The Notification view
Within the Eclipse preferences exists a
section for the notifications in the ModelBus subsection (see Figure 98). Here you can select that you
want to receive notifications concerning open models only and / or specify a
filter (regular expression) for the notifications to receive.
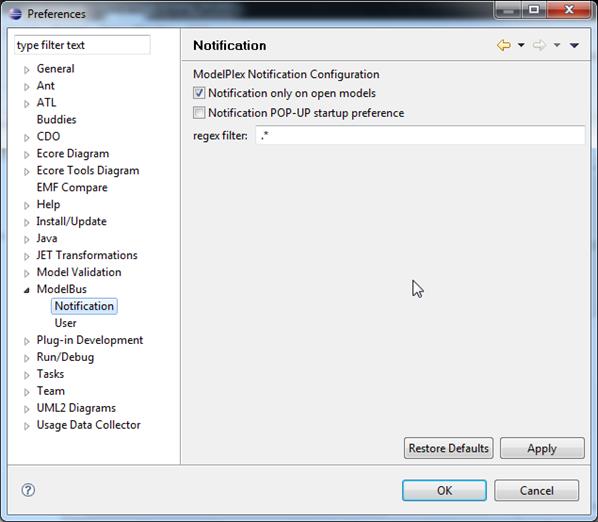
Figure 98 Notification Preferences
The ModelBus provides dependencies support.
That means, if you check in a model all its referenced models and meta models
are automatically checked in, too. Furthermore, the incoming references of a
model or a model element can be displayed in the Dependencies View.
Within the Eclipse preferences there is a
preference page for dependencies support (see Figure 99) where you can enable “check
dependencies” and declare the model extensions you want to support. “Check dependencies”
is disabled by default. In Figure 99 we have enabled the dependencies support for UML models.
The Dependencies View can be opened
via the “show Dependencies” action, which can be selected in the context
menu of a model file or a model element in the submenu “ModelBus”. Figure 100 shows incoming references for a
model element. You can see information about the referencing object (URI, name,
type). Figure 101 shows
incoming references for a model.
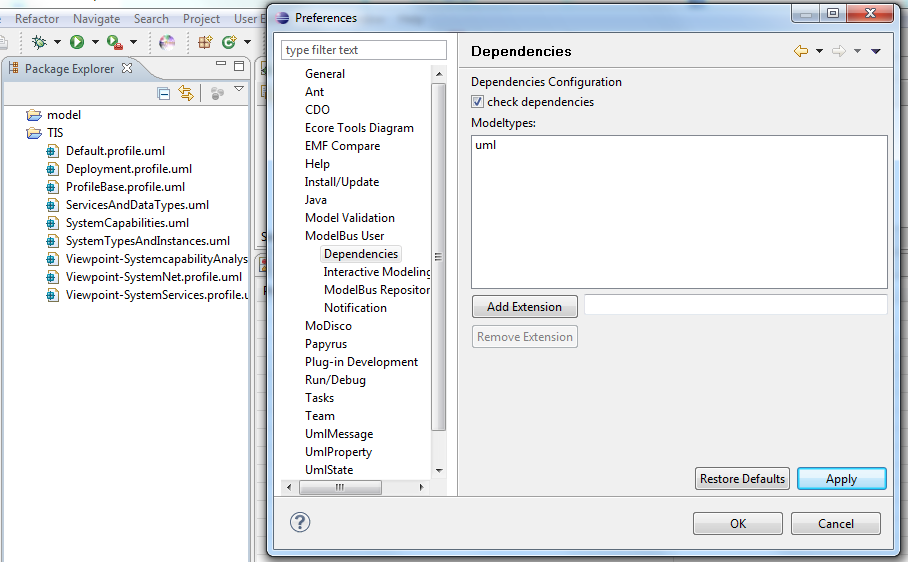
Figure 99 Dependencies Preferences

Figure 100 Dependencies View for a Model Element
Figure 101 Dependencies View for a Model
You have the ability to divide your models
into several fragments. Select the entry “control fragment” in the
submenu “ModelBus” in the context menu of a model element (see Figure 102).
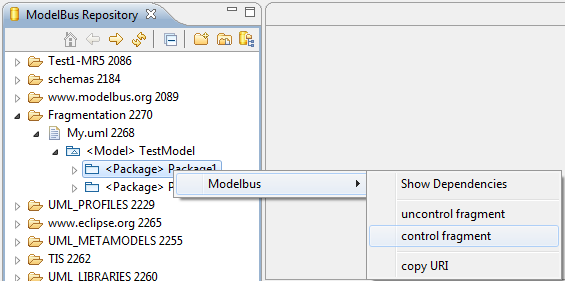
Figure 102 Control Fragment in the Repository View
A repository wizard opens where you have to
choose the destination namespace for the fragment file. Enter the filename and
click on the button “Finish” (see Figure 103). Then you have to synchronize
your project. The previously created fragment file is seen in the Synchronize
View and you have to update your project. Now you can work on the fragment.
After you have committed the changes, the fragment can be uncontrolled again by
selecting “uncontrol fragment”.
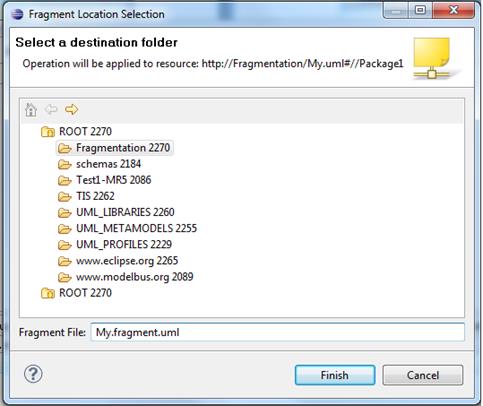
Figure 103 Choose Destination Folder and enter the File
Name for the Fragment
ModelBus offers an interactive mode that
makes it possible to change models interactively in near real time and to
commit model changes incrementally. There exists an “Interactive Modeling”
preferences subsection within the ModelBus Preferences section (see Figure 104) where you can enable three
different checkboxes. The “Interactive Modeling” checkbox enables the
interactive mode in general. Before you can use the interactive mode, you have
to ensure that the model has been committed to the repository with all its
dependencies (see section 16).
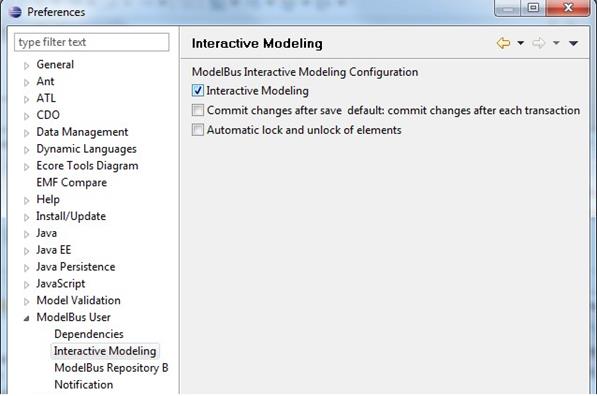
Figure 104 Interactive Modeling Preferences
To enable the interactive mode for your
model, the model has to be opened in an editor. If the model is shared and if
the editor uses transactional editing domains, the “Interactive Modeling”
button in the toolbar is enabled (see Figure 105). When the button is activated,
you are ready to work interactively. After each change transaction, a change
set is committed to the repository and clients that work on the same model and
have enabled the interactive mode are updated automatically. The second
checkbox enables commits on save. It can be enabled only if the first checkbox
“Interactive Modeling” is enabled. In the commit on save mode your
changes are committed in a batch after saving the model. The third checkbox
enables automatic locking and unlocking of model elements to change. This can
only be used in combination with the commit on save mode. When you start to
change your model, the current changed model element and all its children are
locked and cannot be changed by other developers. After saving your model, all
locked elements are unlocked again.

Figure 105 Interactive Modeling Button
ModelBus operations and services based on
ModelBus are specified as web services. Their interfaces are described by a
WSDL and can be invoked using webs service mechanisms. This offers the chance
to use all well-known and proven methods and tools for orchestration in the web
services area in the context of ModelBus orchestration, too.
In addition the ModelBus repository emits
notifications whenever its contents, e.g. a model, has been created, updated or
deleted.
Both features are very useful to automate
workflows in the model based development environment based on ModelBus.
In the web services area at least two
approaches for orchestration exist:
·
BPMN (Business Process Modeling Notation), a
graphics based modeling approach for business workflows, defined in an OMG
specification (http://www.bpmn.org/)
·
BPEL (Business process Execution Language), an XML
based language specified by OASIS (http://docs.oasis-open.org/wsbpel/2.0/wsbpel-specification-draft.html)
BPMN is a graphical notation which is not
directly executable, meanwhile BPEL workflows can be executed but there is no
standardized graphical representation for them.
Some BPEL tools have invented their own
graphical representation. On the other hand BPMN includes the specification of
a mapping from BPMN to WS-BPEL.
There exist not only tools that allow the
specification of workflows in BPMN or BPEL separately but also tools that allow
the graphical modeling of workflows using BPMN than generate BPEL from it,
deploy it and then execute it using a BPEL engine.
For one of those tools exists an
open-source edition, that shall be used in the context of this user guide to
further on illustrate the orchestration in the context of ModelBus (http://www.intalioworks.com/products/bpm/opensource-edition/).
The Intalio tool consists of two parts:
·
Intalio Designer is used to model the workflows
using BPMN, then augment them with information from the web service
specifications (WSDL) used and deploy them to an execution environment.
·
Intalio Server is the environment the BPEL based
workflows are deployed to and executed in.
The Intalio tool also includes an extension
for BPEL that supports human interactions (BPEL4PEOPLE), which is also
specified by OASIS.
The principle approach of defining a
workflow starting with BPMN is mostly the same in different tools supporting
it:
·
Specify the workflow using BPMN
·
Add information about the service operations,
notifications, data used based on the WSDL
·
Deploy the executable workflow to a server
·
Execute it
A small example should illustrate the use
of a very simple workflow in the context of ModelBus based services. The
workflow should illustrate the combination of a model editor that changes a
model, model repository to store it and a transformation tool (QVTService) to
execute a transformation if necessary.
Assume the following situation:
· A modeling service (e.g. some editor) is doing some changes within a
specific model. It stores the updated model to the repository.
· The Repository will emit an updateModel notification.
· Anybody interested in this event might receive it and react on it.
· A workflow in an orchestration tool will react on the update notification
and depending on some condition (e.g. if it is a specific type of model) invoke
a transformation service (QVT Service).
·
If the transformation is invoked, it will
transform the model (from the repository to the repository.
The resulting basic BPMN diagram looks
quite simple (see Figure 106):
·
There are 3 separate pools representing the
separate domains of the orchestration workflow, the ModelBus repository and the
transformation service. For reasons of simplicity we did not include the model
editor which would have been the initiator for the update of the model in the
repository.
·
We have two tasks and one sub process: the Repositorynotification
task sending the notification about the model update; the transform task being
used to execute the transformation in the QVT service and the Transform task /
sub process in the workflow that invokes the QVT transformation.
·
One start event in the workflow receives the updateModel
notification and starts the workflow.
·
The “exclusive data-based” gateway
decides whether the transformation should be executed or not.
·
Two end events mark the end of the workflow
execution: one for the successful execution and one in the case of an error
(the one with the flash symbol in it).
·
An intermediate/boundary event is used to catch
exceptions during the transformation at the boundary of the sub process.
·
Flow connectors (solid arcs) represent the flow
inside a pool while message connections (dashed arcs) represent the sending and
receiving of messages between pools.
Figure 106 The Basic BPMN Diagram
The orchestration workflow still shows some
error and warning symbols: the decision for the gateway has not been specified
yet and also the details for the messages received and send are not specified.
This will be described in section 19.2.
In addition we will have to define one of
the exit paths of the gate as a default condition. This path will be taken,
whenever no other path qualifies. This is done by setting the “Default
condition” in the properties view for this path to true.
First the possible modeling elements for
BPMN should just be sketched. For a complete specification of BPMN see the
official OMG document at http://bpmn.org/.
The basic shapes (see Figure 107) allow modeling the separate
domains using pools and lanes, offer simple tasks or tasks executed in a loop
and sub processes (simple and looping) which represent “sub workflows”.
Connectors represent the flow inside a pool (flow connector) or between pools
(message connection).
Figure 107 Basic BPMN Shapes
Events distinguish between start,
intermediate and end events (see Figure 108):
·
Start events mark the starting point of a
workflow. The execution can be initiated receiving a message or signal, some
timer, some rules specified etc.
·
Intermediate events mark the position between
start and end of a workflow where the reception or sending of an event is
possible.
·
End events mark the end of a workflow. They may
signal whether the execution was successful or not by issuing a specific event.
A special type of event is the
compensation. This is used to realize a transaction like execution within
workflows. Normal transaction mechanisms are not always useful in the context
of business workflows since there duration could be hours, or even days or
months. Therefore the concept of compensation actions exists. For every subpart
of a workflow (e.g. specified as a sub process) that should probably “rolled
back” should have the specification of a flow of tasks that undo (compensate)
the work of it explicitly. Those could start at an intermediate event at the
boundary of the sub process similar to the error event in Figure 106. The unsuccessful sub process will
then end in a compensation end event. This will be caught at the boundary of
sub process and continue execution there undoing the actions of the sub
process.
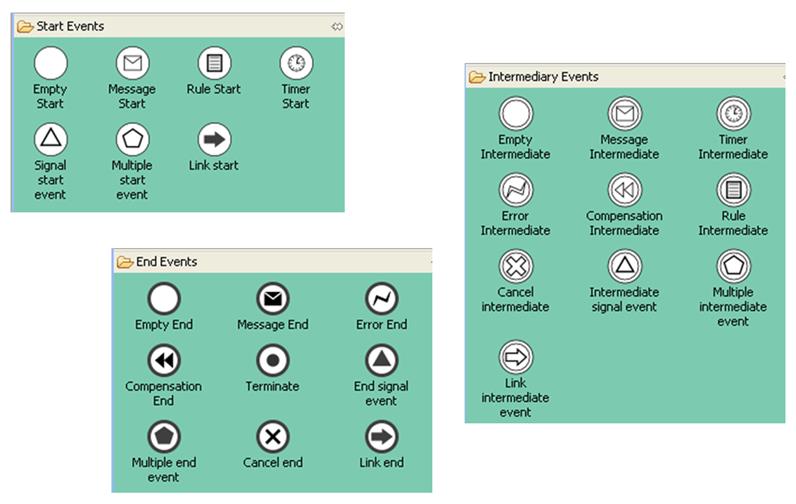
Figure 108 Event Shapes
Gateways are the points in the workflow to
branch and join the flow in a controlled way.
Figure 109 Gateway Shapes
Up to now the BPMN workflow knows that
there are tasks that do something in different pools, decision points, messages
etc.
It does not know details about the messages
exchanges, what ports/operations are realized/implemented by what tasks what
exactly is the decision in a gate etc. Due to that no fully executable BPEL
workflow can be generated. The information kept in the WSDL can be used to
augment the BPMN diagram. This will be illustrated here in the context of the
Intalio tool, but works in a similar way with other tools combining BPMN and
BPEL. It might be that they do not use “drag and drop”, but require you to set
some additional properties for the modeling artifacts in your diagram manually.
As a first step the necessary WSDLs and XSDs
have to be added to your project. You can do this with “drag and drop” of the
files or by using import.
Figure 110 shows
how to use the RepositoryNotification WSDL as first step:
·
Expand the WSDL and drag and drop the updateModel
operation from the Process Explorer to the RepositoryNotification/update
task in the BPMN diagram (ModelBus Repository pool).
·
Select “Provide operation ‘updateModel’
…” when you are asked (the task will provide the operation).
·
Drag and drop the updateModelRequest from
the updateModel operation (WSDL in the Process Explorer) to the message
going to the start event in the Orchestration Workflow.
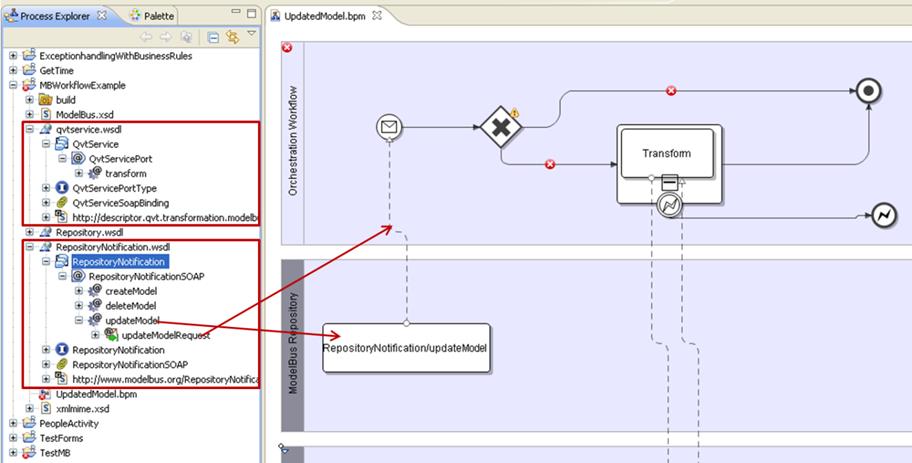
Figure 110 Assigning the Information from the
RepositoryNotification WSDL
For the transform task in the QVT Service
pool another approach shall be illustrated.
Assume we started with modeling the BPMN
workflow in the Orchestration Workflow pool only without filling up the QVT
Service Pool. The situation could look similar to the one shown in Figure 111.
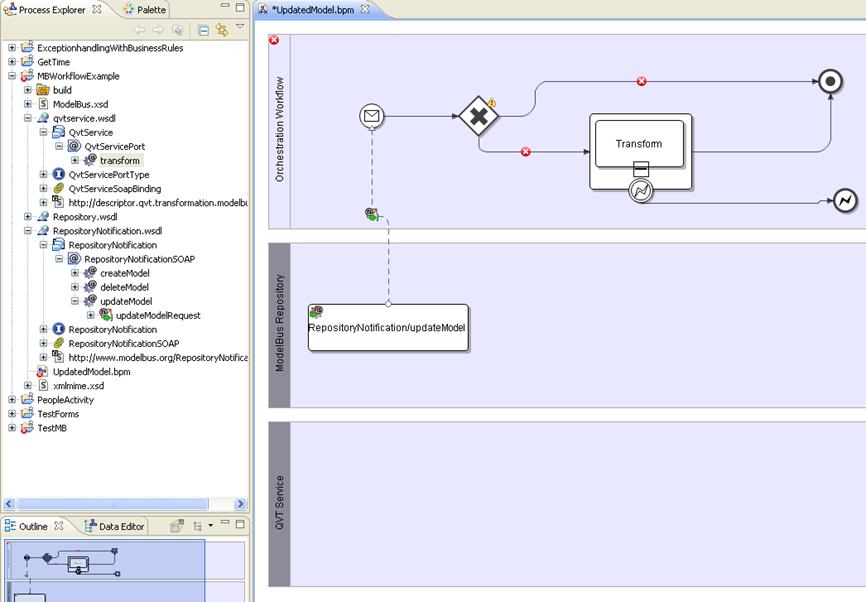
Figure 111 Integrating the qvtservice.wsdl
Instead of first creating a BPMN task we
may drag and drop the transform operation from the qvtservice WSDL to the QVT
Service pool (see Figure 113).
This will ask as whether it should create a single task for the operation (see Figure 112 (1)) or two linked task connected
by a flow representing the receive and reply separately (see Figure 112 (2)). We will select the single
task version.
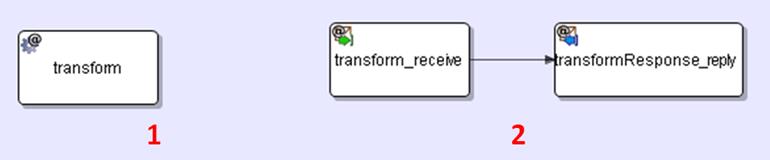
Figure 112 Single or Separated Tasks
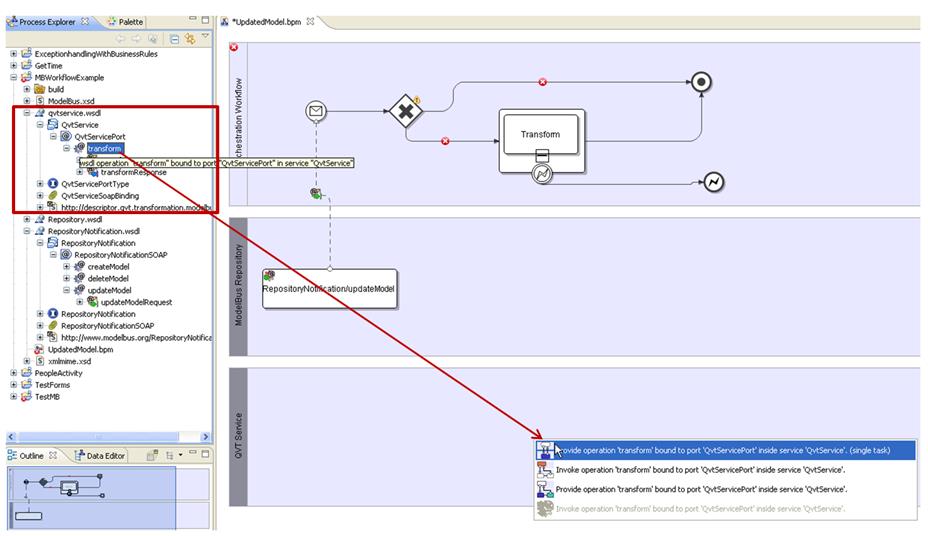
Figure 113 Creating the Transform Task by Drag and
Drop from the WSDL
Drawing the message flow connections
between the transform task in the Orchestration Workflow and the
transform task in the QVT Service is done with the normal BPMN modeling shapes
but will automatically assign the request and respond messages of the transform
operation. The resulting diagram is shown in Figure 114.
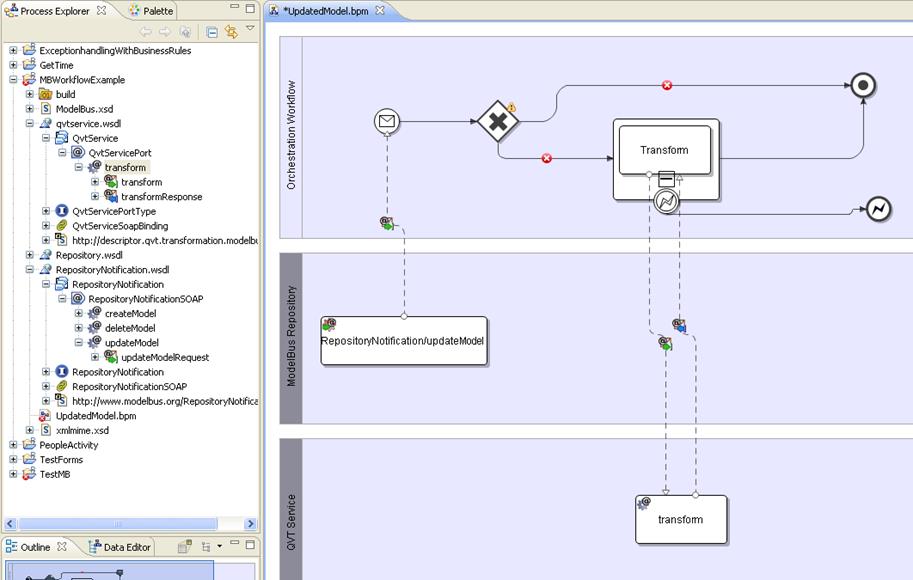
Figure 114 The final BPMN Diagram augmented with the
WSDL Information
The diagram still contains a warning marked
at the decision gateway and errors on the outgoing flows. The actual decision
is not defined sufficiently.
There are at least two places where we need
to have access to the data in the workflow:
1.
To describe the decision to be made in the
gateway and
2. To send and receive info to and from the transform operation in the
QVT service.
We got variables introduced to our BPMN
workflow by assigning operations from the WSDL to our message connections.
The first are introduced by the Repository
Notification operation updateModel (see Figure 115): the two parameters of the updateModelRequest
received by the start event in the workflow.
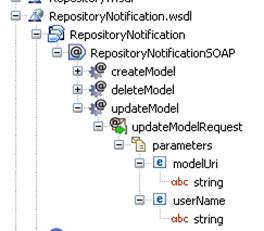
Figure 115 Repository Notification WSDL
These will be used in the decision. If the modelUri
ends with “.uml”, that means it is an UML model, the transformation
shall be called.
Within Intalio Designer the “Mapper” view
is used to connect the variables. Selecting the decision gateway, opening the
Mapper the request parameters are shown in the left column (data sources). On
the left we see the condition and in the middle column we will specify how to
build the decision. This is done graphically in Intalio Designer.
The mapping for the decision is shown in Figure 116.
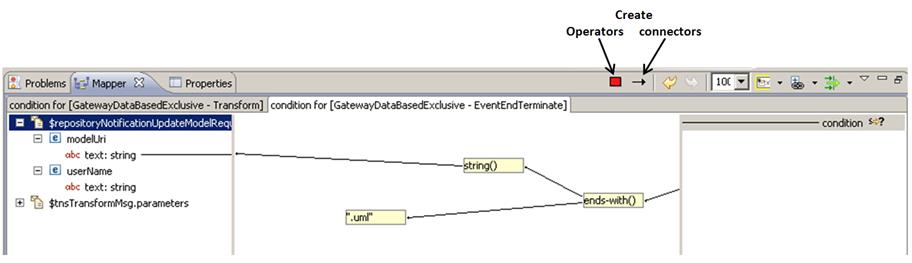
Figure 116 Data Variable Mapping for the Decision
For the transform request the situation is
similar except that we have to assign data to the request parameters. Most of
the parameters are constants. The modelURI is just passed through.
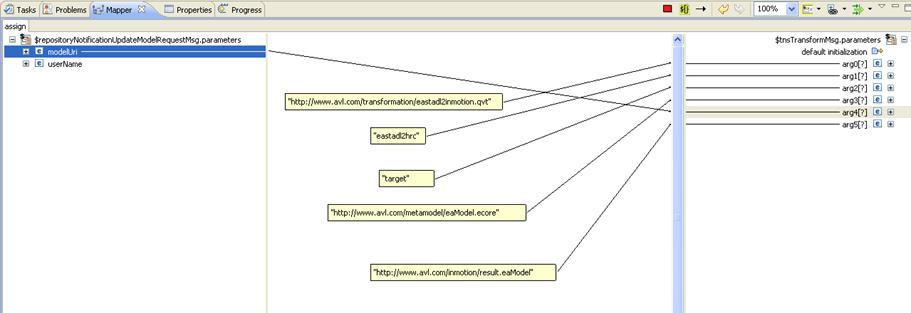
Figure 117 Data Variable Mapping for the Transform Operation
Request
From the BPMN workflow an xml file with the
executable BPEL workflow will be generated. With the Intalio tool this file
normally is complete and will not have to be touched. The following sections
should only give some glimpse into it to give an impression of the
correspondence between the BPMN and the BPEL workflows.
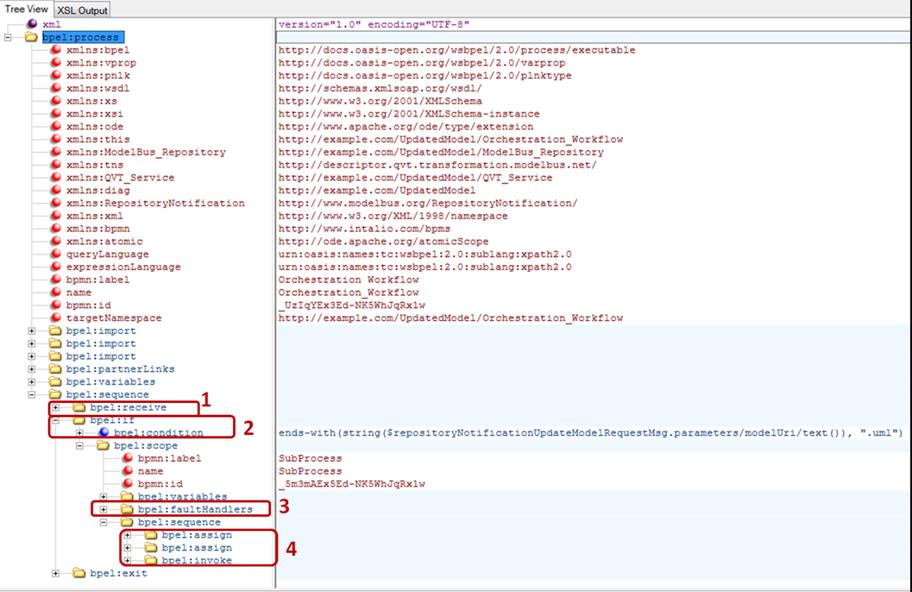
Figure 118 The Generated BPEL Workflow (Treeview)
Looking at the BPEL workflow in the tree view
of an xml editor (see Figure 118) the following elements can be identified:
1.
The receive of the updatemodel
notification
2.
The gate with its condition
3.
The fault handler catching the exception
4. The assignment of the parameters and invocation of the transform
A lot of details are still hidden in the
collapsed parts of the xml file. Nevertheless the executable workflow could
also have been created directly using the support of a BPEL editor. In this
case a non-graphical workflow editor or one with a proprietary graphical
notation would have to be used.
To be executed the BPEL workflow and
possibly needed additional xml files have to be deployed to an appropriate BPEL
server. In this case a BPEL 2.0 server has to be used. Using the Intalio Server
is most appropriate due to its integration with the Designer environment but
other BPEL 2.0 servers might work to.

Figure 119 BPEL Workflow Deployment
Just invoke Deploy (see Figure 119). Doing this the first time it
will open a configuration view to select the files to be deployed. To change
the configuration afterwards, it can be invoked directly. Pressing the deploy
button will send the files and information to the server ready to be executed.
The Intalio BPM-Server can be controlled
using a server console in a web browser (see Figure 120).
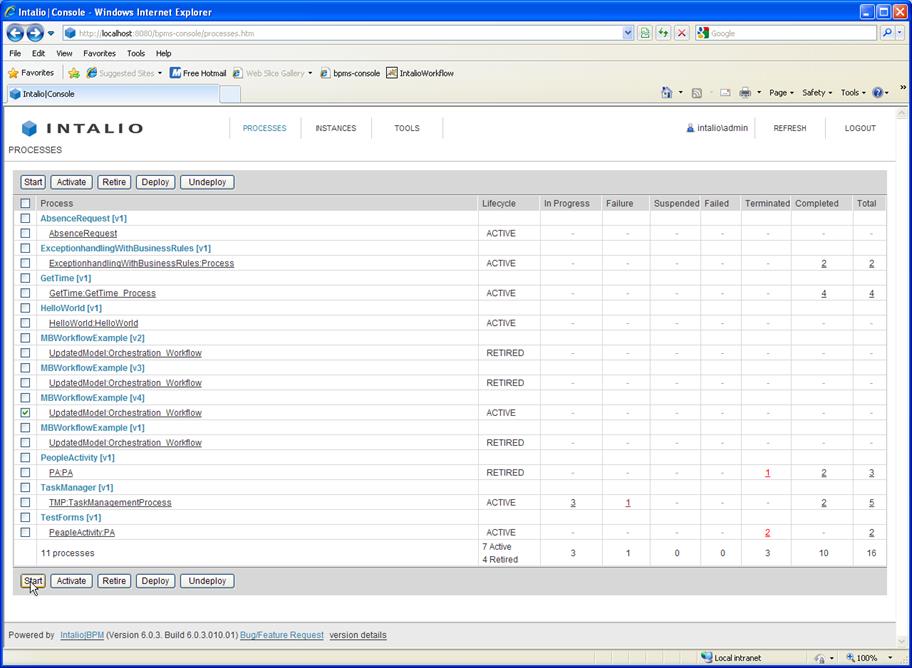
Figure 120 The BPM Server Console
For more details on the BPM workflow
definition, execution and control see the Intalio documentation on the web site
(http://community.intalio.com/) or
the documentation of your favorite tools.
The BPMN workflow (see Figure 121) caught exceptions from the
transformation on the border of the sub process invoking it. Exceptions can be
handled in different passed (as done) or automatically processed including a
specific task / sub process or semi automatically processed by invoking a human
interaction.
Figure 121 The BPMN Workflow
For BPEL an extension (BPEL4People) exists
that allows interactions with humans. Intalio implements this in it tool. In
the following section it shall be sketched how this feature can be used in a
workflow and how it will influence the automatic execution. The will not be a
full and detailed description of integration of human interaction in a workflow
using the Intalio tools. For that use the documentation and examples from the web
site (http://community.intalio.com/).
Human interaction means communicating
information with human users. For this Intalio allows to define “forms” which
allow the definition of the information exchange. This must be defined with the
Designer tool. Intalio offers two different ways to define those forms. For detailed
information see the Intalio community documentation. Since only the principles
of human interaction shall be shown here, the outdated and less flexible way is
used here I the examples.
Then the interaction with a human user must
be included in the BPMN workflow. Assume that in the case of an exception in
the transform operation a human activity shall be invoked to do some “repair”
depending on its success the normal or error exit shall be taken.
The form to interact with the user is shown
in Figure 122. The upper part
is to output the URI of the model where the transformation went wrong. Normally
you should deliver here detailed information about the error. The second is to
input the result of the human action and to deliver it back to the
orchestration workflow.
Figure 122 Human Interaction form for the “repair
action”
The repair process in the orchestration
workflow will be started catching the exception at the border of the transform
sub process. It is shown in Figure 123. The task in there must be linked to some tasks in a pool
representing the human actor.
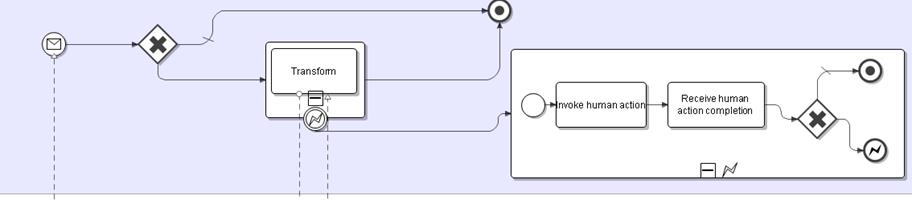
Figure 123 Orchestration Workflow Extension for the Repair
Process
Therefore, an additional non executable pool
has to be created and a chain of two tasks to receive the action request and to
respond when it is completed has to be created. This is done by just drag and
drop the form created to the pool and anther the question popping up (see Figure 124).
The two resulting tasks in the Human User
pool have two be connected to the corresponding tasks in the orchestration
workflow by message flows as shown in Figure 125. The order of the message flows
is important. They are automatically combined with the WSDL information for the
interaction.
In addition, we have to set the role of
human the task should be assigned to in the properties of the pool. The result
is shown in Figure 125.
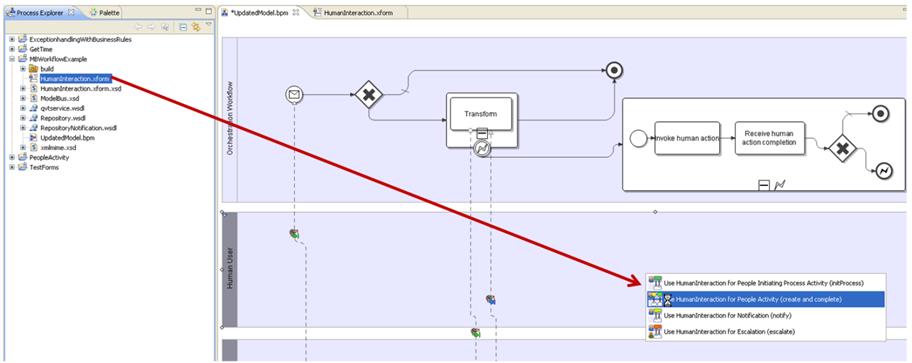
Figure 124 Drag and Drop the Human Interaction Form
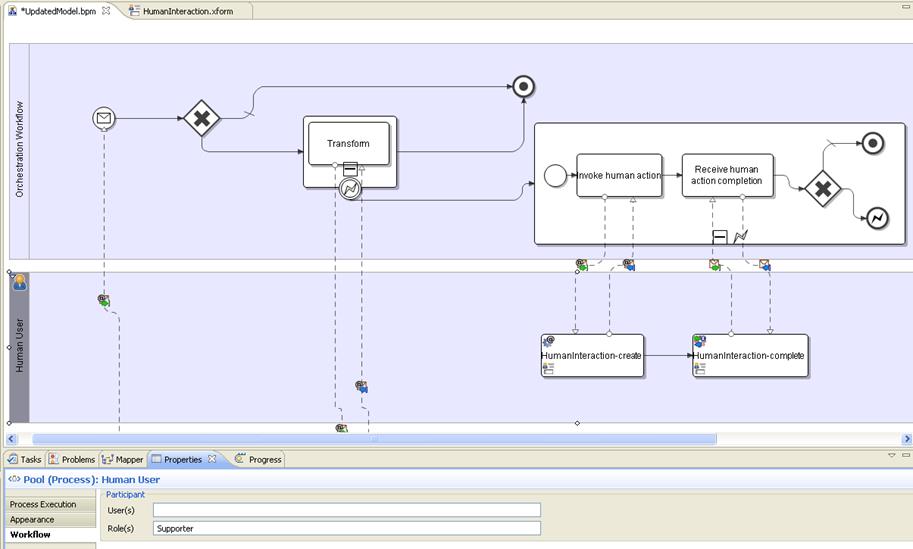
Figure 125 Message Flows to the Human Tasks and Role
Property for the Pool
The last step to be done is the mapping of
information:
1.
In the “Invoke human action task” the model URI
has to be assigned to the form info (see Figure 126).
2. The condition for the gate has to be defined (see Figure 127).

Figure 126 Data Mapping of the Model URI
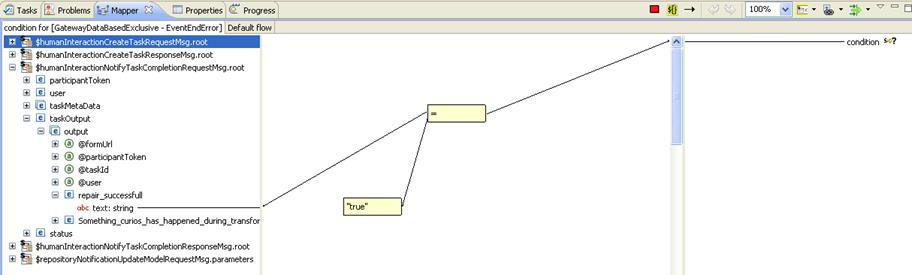
Figure 127 The Gate Condition in the Repair Sub Process
In addition, to the BPMS console of the
server used to administer the workflows, there exists an Intalio workflow
console where a user logs in as a member of a specific role. When in our case a
member of the “Supporter” role logs in he will find the invoked human action in
its tasks, will be presented the form and react on it. After he sends the
completion, the processing will continue in the orchestration workflow.
Be aware that it can take hours, or even
days or month until the human interaction is completed. For this reason compensation
actions instead of transactions must be used and it may be useful to use timers
in the orchestration workflow not to be forced to infinitely wait.
The following section describes the
ModelBus architecture in more detail. The first sections describe the
underlying concepts and the corresponding interaction pattern.
Within a ModelBus environment each artifact
that is shared between different tools is unique identified by a namespace. The
namespace is represented by URLs. The namespace could also be used to structure
artifacts by grouping them into domains and sub-domains. An example structuring
can look like this:
|
http://www.mycompany.org/docs/example.doc
http://www.mycompany.org/models/
http://www.mycompany.org/models/mymodel
http://www.externalcompany.org/projects/models/b2bmodel
|
The example.doc file is identified
within a ModelBus environment by a namespace which is represented by the URL http://www.mycompany.org/docs/example.doc.
Likewise, models were addressed and identified by the same mechanism. Thus, the
model mymodel is addressed by the URL http://www.mycompany.org/models/mymodels.
Both, file and model, are grouped into the domain mycompany.org. However,
they are separated into different sub-domains.
In the context of ModelBus models are
special artifacts which will be shared. In contrast to plain files models have
dependencies and references to other models. For instance a model has no
meaning without its meta-model. Thus, for instance, we have to share
meta-models as well in order to share models between tools. Furthermore, models
can become very huge with thousands of elements. However, due to the fact that
models are well structured, we can use model-driven techniques as incremental
model transportation or transferring only parts of model (model fragments) in
order to deal with the complexity of such big models. There are several other
questions with respect to model sharing. Therefore, ModelBus comes with a set
of particular functions which handle model sharing issues like scalability or
consistency. This handling is transparent to the user and managed by the
ModelBus infrastructure.
Due to the fact that the ModelBus
infrastructure is designed for model sharing in particular, this also reflect
to the connectors to the infrastructure. In general, we have to define a
meta-model for each tool, which will be connected to a ModelBus tool chain.
Figure 52 illustrates a generic ModelBus integration. The basic idea is that a
tool wants to share its data with other tools in an integrated environment. In
addition to that a tool can also provide operation for others. However, in many
cases tools don’t have the same data structure, data format or data basis.
Models can help. Therefore, we specify a meta-model of the tool internal data
and adapt them into a specific tool data instance model which conforms to the
meta-model. Then, we only exchange and share these instance models.
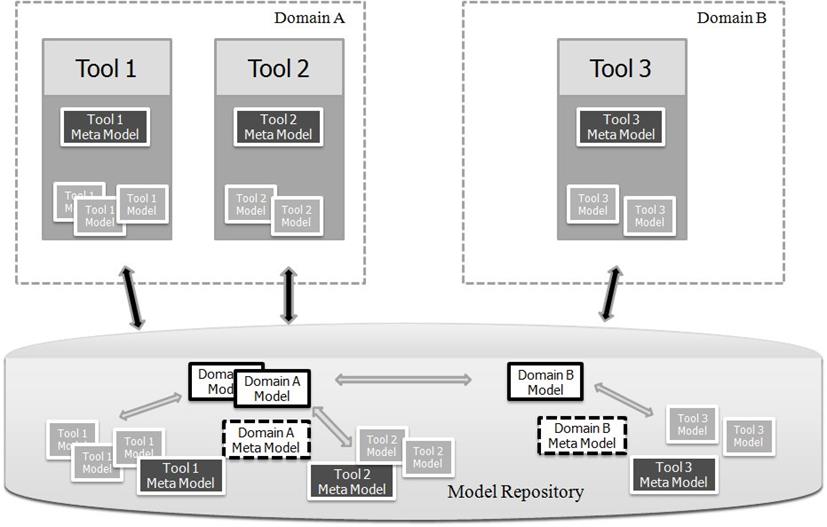
Figure 128 Generic ModelBus Integration
In today’s software development processes
different tools are used in the same engineering phases. For instance, Doors (http://www-03.ibm.com/software/products/de/ratidoor)
and Microsoft Office (Word/Excel) (http://office.microsoft.com)
are important and frequently used tools in the requirement engineering phase of
software projects. Thus, we can also define a meta-model for the requirement
domain and share instances of it as well. Thereby, we will have a common
language for different tools in the same development phase.
Every instance model has an URL
representing the namespace of it, regardless of domain or tool. All models are
stored in a model repository. The next section describes the repository
briefly.
The key concept of model sharing in
ModelBus is realized via a model repository. This repository interface is open
and allows straight forward addressing of models via URLs. This addressing
schema also results in simple service interfaces, because only model references
instead of models are transmitted. Repository vendors can implement this
interface in order to be ModelBus conform. ModelBus itself is delivered with a
built-in model repository, which supports versioning, partial check-out of
models and coordinates the merging of model versions and model fragments.
The model repository is a web service and
provides the following services and notifications.
|
service name
|
description
|
|
checkInModel
|
The checkInModel operation stores or updates
the model into the repository at the given modelURI and it creates a
new revision. The operation returns a checksum in order to verify the
successful transmission of the model. If the model does not exist within the
repository the model will be created initial by the operation
|
|
checkOutModel
|
The checkOutModel operation gets a model from
the repository according to the given modelURI. If a specific revision
of the model is requested the URL needs to contain the corresponded revision
number or peq revision number
|
|
checkInFile
|
The checkInFile operation stores the file
into the repository at the given fileURI. The file will initial
created if it does not exist already.
|
|
checkOutFile
|
The checkOutFile operation gets a file from
the repository according to the given fileURI. If a specific revision
of the file is requested the URL needs to contain the corresponded revision
number or peq revision number.
|
|
delete
|
The delete operation removes the corresponding
artifact according to the given URL.
|
|
exists
|
The exists operation checks whether the
corresponding artifact exists at the given URI with the given revision
number.
|
|
getDir
|
The getDir operation gets information of the RepositoryDirNodeKind
according to the given URL and revision’s version number.
|
|
info
|
The info operation gets information of the
artifact according to the given URL and revision number.
|
|
lock
|
The lock operation locks the artefact
according to the given URL. The timeout parameter specifies the timing end of
the lock. If the timeout value is 0 the lock is permanent and has no
timeout.
|
|
unlock
|
The unlock operation unlocks the locked artifact
according to the given URL.
|
|
getLocks
|
The getLocks operation gets information of
all locked artifacts according to the given URL prefix.
|
|
specific notification
|
|
createModel
|
The
createModel event will triggered whenever a model was created or
initially stored in the repository.
|
|
updateModel
|
The
updateModel event will triggered whenever a new version of model is
checked into the repository.
|
|
deleteModel
|
The
deleteModel event will triggered when a model was deleted in the
repository.
|
ModelBus make use of the call-by-reference
interaction pattern which is described in the next section.
ModelBus provides an interaction pattern in
order to enable model sharing in a distributed and heterogeneous model-driven
development process. Figure 53 depicts the general interaction pattern in a
ModelBus integration scenario.
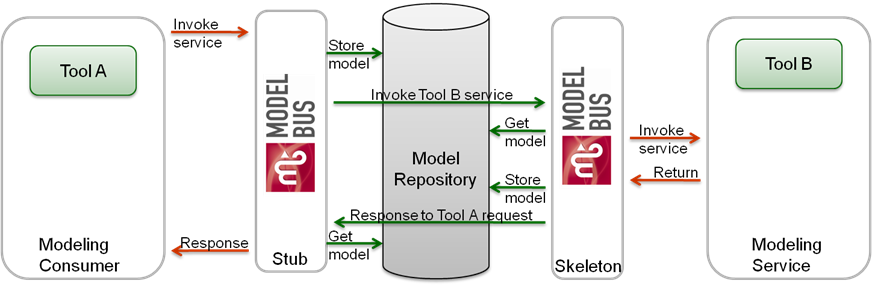
Figure 129 ModelBus Interaction Pattern
The basic idea is that Tool A interacts as
a consumer of the provided service of Tool B, which interacts as a service. If
Tool A wants to consume the service of Tool B it simply invokes the
corresponding operation in the ModelBus Stub. The generated stub will offer by the
ModelBus infrastructure automatically and it is based on distributed OSGI. The
stub stores the model into the repository, for instance by calling the checkInModel
operation of the repository. After that the stub invokes the service skeleton
which is also offered by the ModelBus infrastructure. During this invoking stub
and skeleton only exchange the references of the models. This means that the
consumer only specify of URL of the model, whereas the service skeleton only
expects this URL. On the other hand the service skeleton takes this URL and
gets the model from the repository by calling checkOutModel. The
skeleton, itself, calls the corresponding implementation of Tool B.
The response is analog, due to the fact
that the result data of the service operation is a model as well. The response
model will also check into the repository by the skeleton. The skeleton returns
to the stub only by transferring the URL of the response model. The stub checks
out the response model again and delivers it to Tool A.
The advantage of this is interaction
pattern is that service interfaces become simple and only use standard WSDL
data types. Thereby, external tools, like Intalio BPMS Designer (http://www.intalio.com/products/bpms/overview/)
can be used in order to orchestrate ModelBus services as well as exclusive or
in combination with other non-ModelBus services.
The architecture of a provider adapter is
illustrated in figure 54. In general, an adapter consists of three parts. The
colors shall depict the different parts.
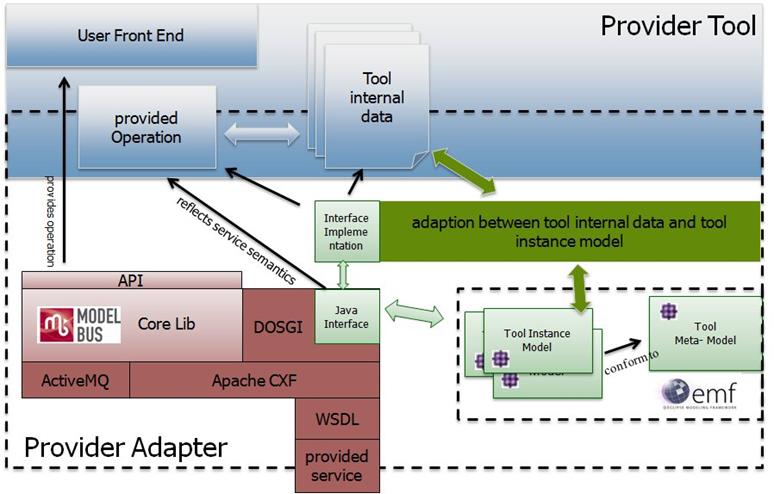
Figure 130 Provider Tool Adapter Architecture
The blue part represents the tool logic and
its data. Usually, a tool represents the data, which the tool is working on, in
its own format. Therefore, we have to adapt this internal data into a common
exchange format. For this reason we have to define an EMF-based meta-model that
represents all necessary aspects of the internal data in the context of
ModelBus. The concrete tool data are adapted into instances of this meta-model.
This part is represented in figure 54 by the green color. The third part of an
adapter is a more generic part represented by the red color. This includes
several third party libraries as well as the ModelBus Core lib. The core lib
provides an API that enables the access to the model repository directly. This
API can also be used in order to querying or browsing the repository from a
tool specific user front end. The interaction between provider and consumer is
realized via Apache CXF DOSGI implementation (http://cxf.apache.org/distributed-osgi.html).
Therefore, the integration effort to ModelBus is similar to the integration
effort of DOSGI. Furthermore, the core lib provides a number of specific
functions in particular for models like dependency management or fragment
support.
A ModelBus consumer adapter isn’t very
different to a provider. It also consists of the generic part, the tool and its
data and as well as the adaption part to a model-based representation of the
tool internal data.
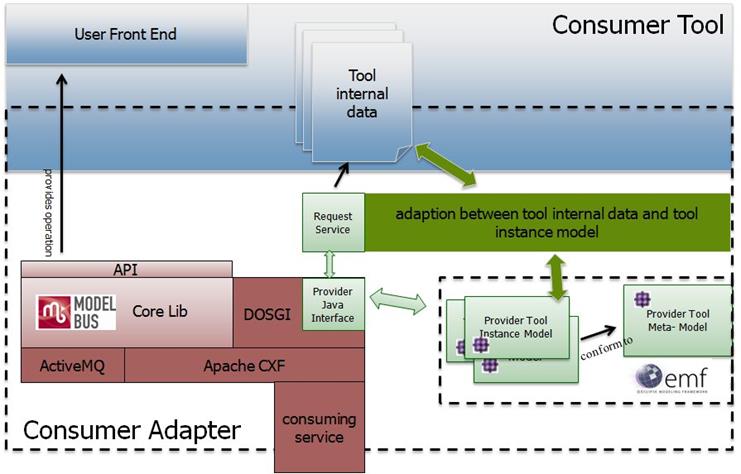
Figure 131 Consumer Tool Adapter Architecture
In this generic example the consumer use
the provider tool meta-model. This meta-model is the common exchange format
between these tools. The transformation between this format and the tool
internal data of the consumer is done by an adaption component. This component
is tool specific and different from tool to tool. However, a lot of tools
already have a model as basis for their internal data. And also many tools
already use the EMF for defining such models. In this case the adaption between
tool internal data and the corresponding tool instance model has no significant
effort. Of course the consumer can also use the ModelBus Core lib in order to
browsing the repository as well as to check-in or check-out models or other
artifacts directly into the model repository.
The communication infrastructure framework
is based on third party library for the consumer as well. Again the DOSGi
project is used to enable the web service functionalities for remote services
via SOAP over HTTP. Nevertheless, the communication frameworks as well as the
model handling facilities are completely transparent to the developers of the
provider or consumer.
One of the important classes within the ModelBus
core lib is the ModelBusCoreLib. This class encapsulates the remote
access to the model repository and ModelBus services and therefore provides an
implementation of a so called “repository helper” or “services helper”,
respectively. The RepositoryHelper, which is the default implementation
for a repository helper, is located in the package org.modelbus.core.lib.dosgi.
The following section shows some examples
in order to demonstrate how to work with the ModelBus core lib. In addition to
the RepositoryHelper class an example illustrates also how to receive
notifications from the ModelBus infrastructure.
In the following we describe some examples how
to use the core lib and interact with the repository. The source code of these
examples is available on the www.modelbus.org
website.
The starting point for the examples is that
you have already gone through the installation part of this user guide. Make
sure that everything is installed correctly and the server containing the model
repository is up and running.
This example illustrates how to use the
core lib and its API in order to browse through the repository.
Step 1 -
Create an Eclipse Plug-In Project and add org.modelbus.core.lib.dosgi,
org.modelbus.cxf.dosgi.startup, org.eclipse.core.runtime and org.eclipse.emf.ecore.xmi
to the required plugin-ins in the project MANIFEST.MF file.
Figure 132 required Plug-ins configuration
Step 2 -
Create a java class and the two properties.
|
public class
RepositoryBrowserExample {
public static
IRepositoryHelper repository = ModelBusCoreLib.getRepositoryHelper();
public static
Session session = new
Session();
}
|
We define a repository attribute of
type IRepositoryHelper. To construct the IRepositoryHelper we
have to call the method getRepositoryHelper() of the class ModelBusCoreLib.
In addition to that we also need a session in order to authenticate with the
repository as a valid user.
Step 3 - initialize
the session with corresponding data
|
public class RepositoryBrowserExample {
// ...
public static void
initSession() {
session.setId(EcoreUtil.generateUUID());
Property
propertyUserName = new Property();
propertyUserName.setKey("username");
propertyUserName.setValue("Admin");
Property
propertyPassword = new Property();
propertyPassword.setKey("password");
propertyPassword.setValue("ModelBus");
session.getProperties().add(propertyUserName);
session.getProperties().add(propertyPassword);
}
}
|
In general, the user Admin with the
password ModelBus is created initially by the ModelBus infrastructure.
This user information is encapsulated within the Session object.
Step 4 – use
the ModelBus core lib API
|
public class
RepositoryBrowserExample {
// ...
public static void
main(String[] args) {
//
initialize the (static) session
initSession();
try {
//
retrieve the root entry from the repository
RepositoryDirEntry
root = repository.getRoot(session);
System.out.println("Root:" +
root.getName());
//
write out repository entries recursively
writeEntries("+",
root);
} catch
(IOException e) {
e.printStackTrace();
} catch
(RepositoryRuntimeException e) {
e.printStackTrace();
} catch
(RepositoryAuthentificationException e) {
e.printStackTrace();
} catch
(NonExistingResourceException e) {
e.printStackTrace();
} catch
(InvalidRevisionException e) {
e.printStackTrace();
}
}
public static void
writeEntries(String plus, RepositoryDirEntry entry)
throws RepositoryRuntimeException,
RepositoryAuthentificationException,
InvalidRevisionException,
NonExistingResourceException,
IOException
{
//
retrieve the child entries from an repository
//
entry from the repository
//
(note that revision -1 corresponds to the latest revision)
RepositoryDirEntry[]
entries = repository.getDirEntries(session, URI.createURI(entry.getUri()),
-1L);
for (int i
= 0; i < entries.length; i++) {
System.out.println(plus
+ " " + entries[i].getName() + "(" +
entries[i].getRevision() + ")");
if
(entries[i].getKind().equals(RepositoryNodeKind.DIR)) {
writeEntries(plus
+ "+", entries[i]);
}
}
}
public static void
initSession() {
//
...
}
}
|
The main method of our class calls the initSession
method. After that, the root node of the model repository is fetched by the repository.getRoot(session)
operation call. The return value is of type RepositoryDirEntry. Figure
57 depicts the structure of a RepositoryDirEntry.
Figure 133 RepositoryDirEntry and
RepositoryNodeKind
The RepositoryDirEntry class holds
several information of a repository entry. For instance the URL and the
revision number of the entry. Furthermore, RepositoryNodeKinds are
defined for repository entries. They can be of type File, Dir, Model as
well as unspecified (kinds like None, Unkown). Please note, that NONE
has been moved with release 1.9.9.
By using this information we are now able
to browse through the repository. This is shown in the writeEntries
method displayed in the previous table.
In order to use the core lib with the .NET
framework, IKVM has been used to compile the JAVA core lib into .NET
libraries. This is an example of how the core lib can be used in a C#
application to browse through the repository.
Step 1 -
First of all the IKVM libraries are required. Version 0.46.0.1 has been used to
translate the core lib. You can download IKVM at http://sourceforge.net/projects/ikvm/files/.
|
 Please note that
IKBM release 0.46.0.1 is the last release that supports Java 1.6. Please note that
IKBM release 0.46.0.1 is the last release that supports Java 1.6.
|
Step 2 –Download the ModelBus .NET core lib from the
release website http://www.modelbus.org/en/modelbusdownloads.html.
Step 3 -
Create a Visual Studio project, e.g. a Console Application and reference
the following .NET-libraries:
·
From the .NET CoreLib:
o
org.modelbus.core.lib.dll
o
org.eclipse.osgi.dll
o
org.eclipse.equinox.dll
o
org.eclipse.emf.dll
o
org.eclipse.core.dll
·
From the IKVM-0.44.0.5/bin
o
IKVM.OpenJDK.Core.dll
o
IKVM.OpenJDK.XML.Bind.dll
o
IKVM.OpenJDK.XML.WebServices.dll
Step 3 –
With these libraries, you are enabled to write ModelBus applications in C#. In
this example, a program similar to the above Java example is realized in C#:
using System;
using System.Collections.Generic;
using System.Linq;
using System.Text;
using System.Diagnostics;
using org.eclipse.emf.ecore.util;
using org.modelbus.dosgi.repository.descriptor;
using org.modelbus.core.lib;
namespace IKVM.corelib.example
{
class CoreLibExample
{
static void Main(string[]
args)
{
IRepositoryHelper
repositoryHelper =
ModelBusCoreLib.getRepositoryHelper();
Session
session = createSession("Admin", "ModelBus");
writeEntries(repositoryHelper.getRoot(session),
repositoryHelper,
session, "+");
}
private static void
writeEntries(RepositoryDirEntry entry,
IRepositoryHelper helper, Session session, String
plus)
{
try {
RepositoryDirEntry[]
entries =
helper.getDirEntries(session,
URI.createURI(entry.getUri()), -1);
foreach
(RepositoryDirEntry child in entries) {
Debug.WriteLine(plus
+ " " + child.getName() +
"
(" + child.getRevision() + ")");
if (child.getKind().equals(RepositoryNodeKind.DIR))
{
writeEntries(child, helper, session, plus + "+");
}
}
} catch
(java.io.IOException e) {
e.printStackTrace();
}
}
public static Session
createSession(String username, String password) {
String
sessionId = EcoreUtil.generateUUID();
session.setId(sessionId);
Property
propertyUserName = new Property();
propertyUserName.setKey("username");
propertyUserName.setValue(username);
Property
propertyPassword = new Property();
propertyPassword.setKey("password");
propertyPassword.setValue(password);
session.getProperties().add(propertyUserName);
session.getProperties().add(propertyPassword);
return session;
}
}
}
Using the IKVM converted Java
classes, it is possible to connect to the Modelbus repository very similar to
the Java implementation.
This example illustrates the usage of the
ModelBus core lib to split models into fragments.
Step 1 – see
section 21.1
Step 2 –
Create a Java class (see section 21.1)
|
public class
FragmentationExample {
public static IRepositoryHelper
repositoryHelper =
ModelBusCoreLib.getRepositoryHelper();
public static
Session session = new
Session();
}
|
Step 3 –
initialize the session (see section 21.1)
Step 4 – use
the ModelBus core lib API
|
public static void
main(String[] args) {
initSession();
ResourceSet
resourceSet = new ResourceSetImpl();
resourceSet.getPackageRegistry().put(UMLPackage.eNS_URI,
UMLPackage.eINSTANCE);
resourceSet.getResourceFactoryRegistry()
.getExtensionToFactoryMap().put("*",
new XMIResourceFactoryImpl());
URI
uri = URI.createFileURI("D:/…/my.uml");
Resource
resource = resourceSet.getResource(uri, true);
EObject
rootElement = resource.getContents().get(0);
EObject
fragmentElement = rootElement.eContents().get(0);
URI
fragmentUri = EcoreUtil.getURI(fragmentElement);
try {
resource.setURI(URI.createURI(
"http://FragmentTest/my.uml"));
repositoryHelper.checkInModel(session,
resource, uri,
Collections.EMPTY_MAP, "logMessage");
String
fragmentFileLocation =
"http://FragmentTest/myFragment.uml";
repositoryHelper.control(session,
fragmentUri,
fragmentFileLocation, "logMessage");
repositoryHelper.checkOutModel(session,
resource,
Collections.EMPTY_MAP);
Resource
fragmentResource =
resourceSet.createResource(URI.createURI(
fragmentFileLocation));
repositoryHelper.checkOutModel(session,
fragmentResource,Collections.EMPTY_MAP);
//
change the controlled fragment here
repositoryHelper.checkInModel(session,
fragmentResource,
Collections.EMPTY_MAP, "logMessage");
repositoryHelper.uncontrol(session,
URI.createURI(fragmentFileLocation),
"logMessage");
} catch
(IOException e) {
e.printStackTrace();
}
}
|
After the session has been initialized you
have to create a ResourceSet and put the UMLPackage to the PackageRegistry.
Then you load the model you want to split into fragments. We call the getContents()
method on the resource to get the root element of our model. Afterwards you get
the “fragmentElement” from the “rootElement” by calling eContents().
This element will be our fragment which we want to control. First you have to
check the original model into the repository and then you can call the method control()
on the “repositoryHelper”. After this you can check out the two models from the
repository, modify the fragment, check in the changed fragment and uncontrol
the fragment again.
This example shows how to use the ModelBus
core lib API to enable dependencies support for models and to get the
dependencies of models or model elements.
Step 1 – see
section 21.1
Step 2 –
Create a java class e.g. DependenciesExample (see section 21.1)
|
public class
DependenciesExample {
public static IRepositoryHelper
repositoryHelper =
ModelBusCoreLib.getRepositoryHelper();
public static
Session session = new
Session();
}
|
Step 3 –
initialize the session (see section 21.1)
Step 4 – use
the ModelBus core lib API
|
public static void
main(String[] args) {
initSession();
repositoryHelper.setEnableDependencies(true);
repositoryHelper.setModelExtensions(new
String[]{"uml"});
ResourceSet
resourceSet = new ResourceSetImpl();
resourceSet.getPackageRegistry().put(UMLPackage.eNS_URI,
UMLPackage.eINSTANCE);
resourceSet.getResourceFactoryRegistry()
.getExtensionToFactoryMap()
.put("*", new XMIResourceFactoryImpl());
URI
uri = URI.createFileURI("D:/…/my.uml");
Resource
resource = resourceSet.getResource(uri, true);
try {
resource.setURI(
URI.createURI("http://DependenciesTest/my.uml"));
repositoryHelper.checkInModel(session,
resource, uri,
Collections.EMPTY_MAP,”logMessage”);
IncomingReferencesInfo[]
referencesInfos =
repositoryHelper.getIncomingReferences(session,
URI.createURI(
"http://DependenciesTest/my2.uml"));
for (IncomingReferencesInfo
referencesInfo :
referencesInfos) {
// the uri of the referencing object
String
referencingObjectUri = referencesInfo
.getReferencingObjectUri();
// the uri of the type of the referencing object
String
objectTypeUri = referencesInfo
.getObjectTypeUri();
// the name of the referencing object
String
objectName = referencesInfo.getObjectName();
System.out.println("referencing
Uri: " +
referencingObjectUri + " type uri: " +
objectTypeUri + " object name: " +
objectName);
}
} catch
(IOException e) {
//
TODO Auto-generated catch block
e.printStackTrace();
}
}
|
After the initialization of the session you
have to enable dependency management and to specify the model extensions to use
for the dependency analysis. In this example, the modelExtensions
parameter is set to a new array of strings with the one element “uml”.
Then you load your model (my.uml) which should reference some other
models (here my2.uml) beside the UML meta-model and call the checkinModel
operation on the repositoryHelper. All referenced models and meta-models
are committed to the repository. Afterwards you obtain the incoming references
of a referenced model (my2.uml) by invoking the operation getIncomingReferences().
The return value of this method is from type IncomingReferencesInfo[].
The IncomingReferencesInfo object holds the URI of the referencing model
or model element, the URI of the model element’s type and the name of the
referencing model element.
The following example describes how to
receive notifications from the model repository on client side.
Step 1 – Create
an Eclipse Plug-in Project and add the plug-ins org.modelbus.core.lib.common
and org.modelbus.cxf.dosgi.startup to its required plug-ins.
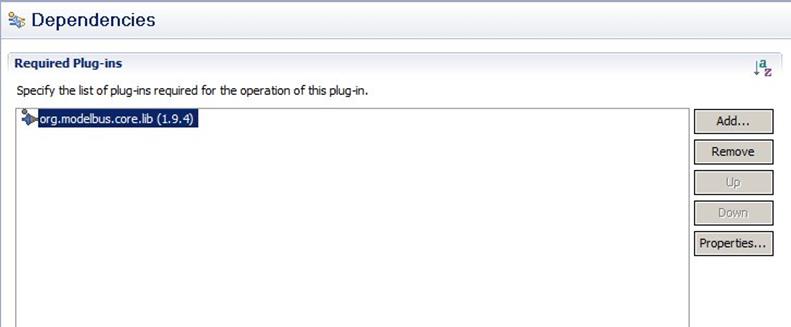
Figure 134 Required Plug-ins Configuration
Step 2 - Implement
the INotificationListener interface
In order to receive notifications from the
repository we have to implement the INotificationListener interface
first. The interface is defined in the package org.modelbus.core.lib.notification
of the ModelBus core lib.
|
public interface
INotificationListener {
public void
notification(String url, String mode, String username, String sessionID);
public void
commitChangeModelNotification(String modelUri,
String messageID, String changeModelContent);
}
|
The interface defines two methods. We have
to implement the method notification, whereas the parameter mode
specifies the kind of notification to receive, for instance delete, create
or update. For this example the interface implementation is named MyNotificationListener.
|
public class
MyNotificationListener implements INotificationListener {
@Override
public void notification(String model, String mode,
String username, String sessionID) {
System.out.println("User
" + username + " " +
mode + "d the model " + model);
}
@Override
public void
commitChangeModelNotification(String modelUri,
String
messageID, String changeModelContent) {
//do
nothing
}
}
|
Step 3 - Register
NotificationListener
After implementing our NotificationListener
we have to register it to ModelBus. Therefore, we need the NotificationListenerManager
that helps us to manage the notification reception. The class is also contained
in the notification package of the ModelBus core lib.
|
public static void
main(String[] args) {
String repLocation =
System.getenv("MODELBUS_REPOSITORY_LOCATION");
NotificationListenerManager
notificationListenerManager = null;
MyNotificationListener
myNotificationListener = null;
try {
// create the NotificationListenerManager with the
location of
the
Modelbus repository
notificationListenerManager
= NotificationListenerManager
.getNotificationListenerManager(repLocation);
// your NotificationListener
myNotificationListener
= new MyNotificationListener();
// add your NotificationListener
notificationListenerManager.addNotificationListener(
myNotificationListener);
} catch (Exception e) {
e.printStackTrace();
}
}
|
First, we have to set the URL of the
repository to the NotificationListenerManager in order to create an
instance of this class. Then we can add our implementation of the INotificationListener
to this manager class. After that the method notification of our
listener will be executed whenever an event is sent via the ModelBus
infrastructure.
If the listening is no longer required we
can deregister our notification listener from the set of managed listeners by
calling the remove method of the NotificationListenerManager
class.
|
//
remove your NotificationListener
notificationListenerManager.removeNotificationListener(
myNotificationListener);
|
|
 Please note that it is currently not
possible to run ModelBus adapters using HTTPS. Please note that it is currently not
possible to run ModelBus adapters using HTTPS.
|
To be able to write an adapter, you must
first install a ModelBus client as described in section 5. To be able to run it, you should also have
a server installed and running as described in section 3. The system variables MODELBUS_SVN_REPOSITORY_LOCATION
and MODELBUS_REPOSITORY_LOCATION must be defined (see Figure 5 and Figure 6). Since ModelBus Release 1.9.7 you
can alternatively define a system variable named MODELBUS_ROOT pointing
to the ModelBus installation folder containing the Modelbus configuration model
(see chapter 3.1.1 for more
detailed information).
The interaction patterns of ModelBus and
the architecture of a provider and a consumer have been described in sections 20.3, 20.4 and 20.5. It is also described that the
interaction between provider and consumer is realized via Apache CXF DOSGI.
Nevertheless, a WSDL will be provided and may be used directly.
The following tutorial describes the basics
of writing those ModelBus provider/consumer adapters using a simple hello
World example to start with. It consists of three projects that need to be
created:
·
interface
·
provider
·
consumer
Step
1 - You need to create a new Eclipse Plug-in
Project (see Figure 135)
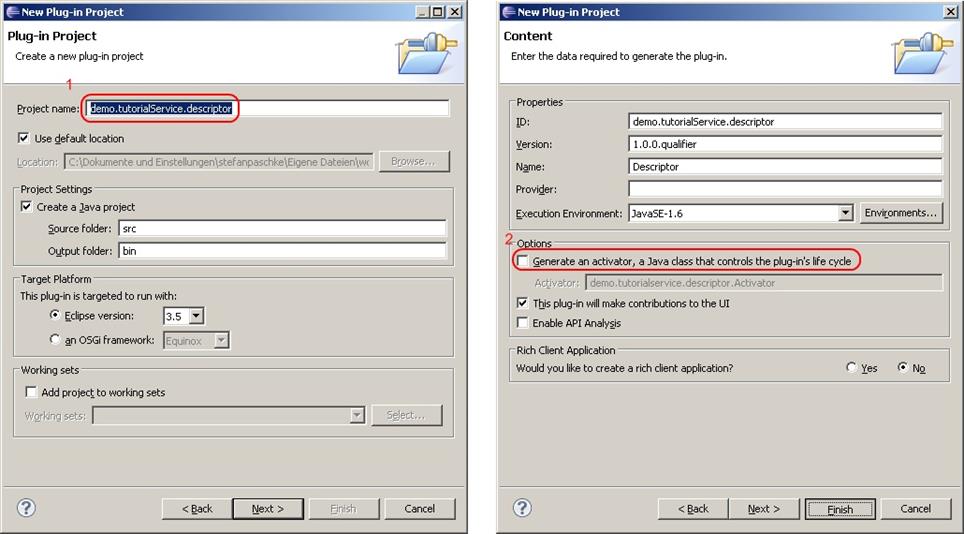
Figure 135 Create descriptor project
Open the New Project Dialog via File à New à Project. Select Plug-in
project and click Next.
Assign a project name, e.g. demo.tutorialService.descriptor. In the second
dialog make sure you do not generate an activator. Press Finish and
confirm to switch the perspective.
Step
2 - Create a new Java package with the same
name as the project, e.g. demo.tutorialService.descriptor by clicking File
à New à Package. It will automatically be
created in the src folder of the project.
Step 3 -
Within the package create an interface (in the context menu of the package
select New -> Interface). Assign a name for the interface, e.g. ITutorialService
(see Figure 136).
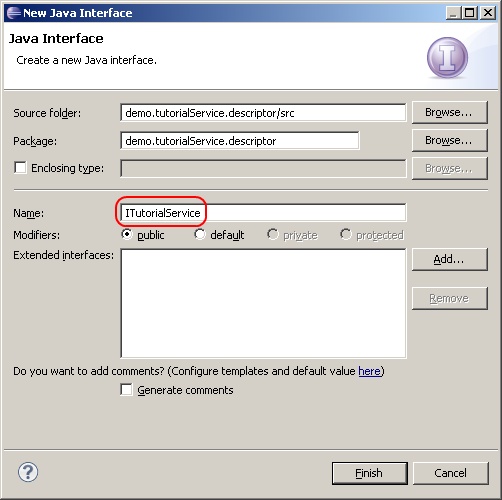
Figure 136 Create an Interface
The following source code will be generated
automatically:
package
demo.tutorialService.descriptor;
public interface ITutorialService {
}
Now you can specify some methods for the
interface created above. If you use this code directly, the WSDL generated will
not have meaningful naming, e.g. the arguments of the operations will
afterwards only be named arg0, arg1, … which is not very useful. For
this reason, some additional annotations have to be added to the interface
code.
Step
4 – Declare the interface as web service and
define a method returning a string with one parameter of type string. This is
done by manually inserting the additional code as shown below:
package
demo.tutorialService.descriptor;
import
javax.jws.WebMethod;
import
javax.jws.WebParam;
import
javax.jws.WebResult;
import
javax.jws.WebService;
@WebService(targetNamespace
= "http://demo.tutorialservice/",
name = "TutorialService")
public interface ITutorialService {
@WebMethod(action = "http://demo.tutorialservice/myOperation")
@WebResult(name = "returnValue")
public String
myOperation(
@WebParam(name="dummyString",
targetNamespace="http://demo.tutorialservice/TutorialService")
String dummyString
);
}
When declaring the Interface as a web service,
you have to assign a targetNamespace ("http://demo.tutorialservice/") and a name for the web service ("TutorialService"). The method myOperation will be exposed as a web service
operation and therefore declared as WebMethod. Define WebResult
to customize the mapping of the return value to a named WSDL part and XML
element. Define WebParam to customize the mapping of an individual
parameter to a Web Service message part and XML element.
As a result, we will have an interface with
the operation myOperation with one parameter dummyString and a
return value. The naming in the java code and the automatically generated WSDL
will be the same.
Step
5 – Expose package demo.tutorialService.descriptor to clients
(see Figure 137).
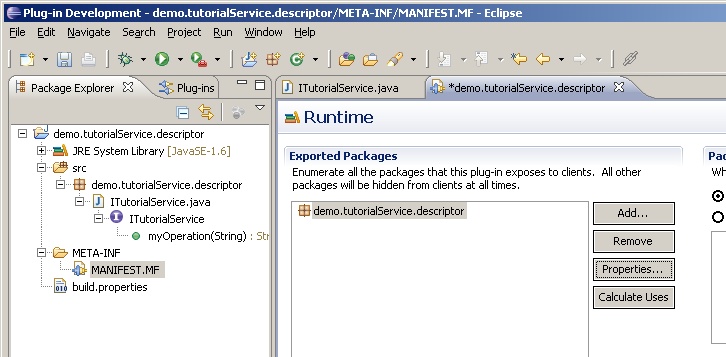
Figure 137 Expose Package
demo.tutorialService.descriptor to Clients
Open the meta information of the project (MANIFEST.MF). Open tab Runtime
and add the package to Exported Packages.
|
 Since ModelBus release 1.9.6 you can use the “ModelBus Service
from Existing Interface” wizard to generate a provider and a consumer
according to your service interface. Please note that this feature is still
in development. Since ModelBus release 1.9.6 you can use the “ModelBus Service
from Existing Interface” wizard to generate a provider and a consumer
according to your service interface. Please note that this feature is still
in development.
|
Step
1 - You need to create a new Eclipse Plug-in
Project (see Figure 138).
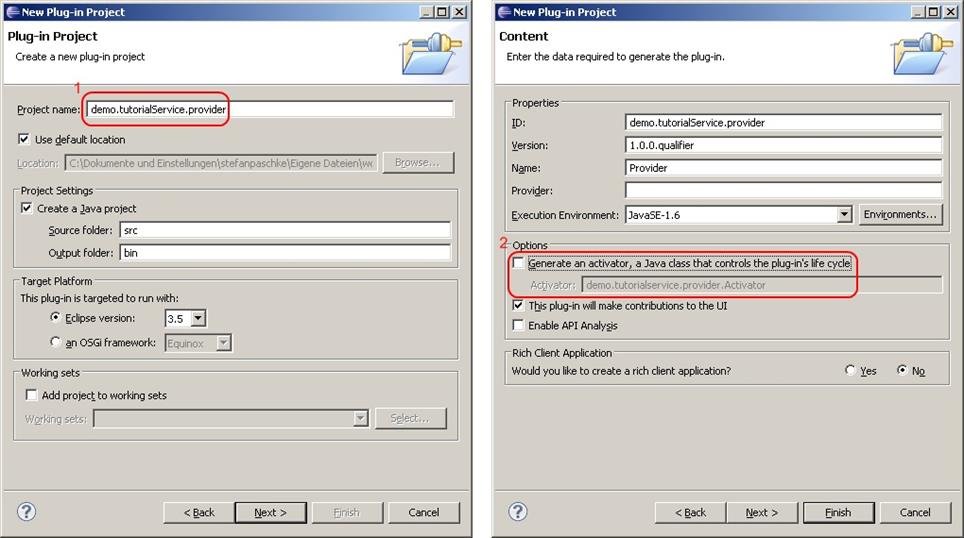
Figure 138 Create plug-in project for provider
Open the New
Project Dialog via File à New à Project. Select Plug-in
project and click Next.
Assign a project name, e.g. demo.tutorialService.provider. In the second
dialog make sure you do not generate an activator.
Step 2 – Create a new package with the same name as the project in the src
folder of it, e.g. demo.tutorialService.provider.
Step
3 – Correct dependencies and specify the
plug-ins required (see Figure 139).
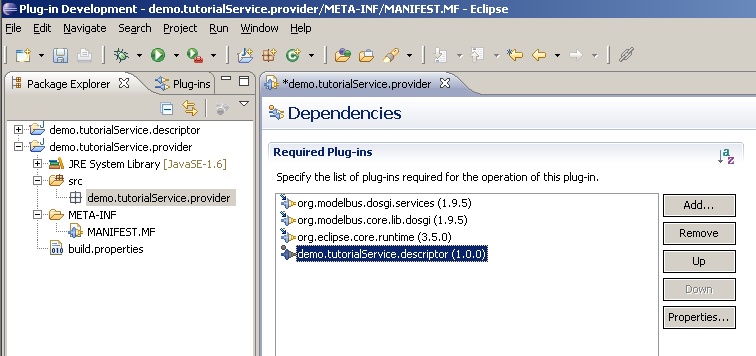
Figure 139 Provider dependencies
Open the meta information of the project (MANIFEST.MF) of the
provider project. Open the tab Dependencies
(shown at the bottom) and add the following plug-ins: org.modelbus.dosgi.services,
org.modelbus.core.lib.dosgi,
org.eclipse.core.runtime
and the descriptor you implemented in the first project demo.tutorialService.descriptor.
Just press the add button and enter the names in the select a Plug-in
field. Don’t forget the descriptor plug-in.
The Provider should provide the service. Thus
it needs to implement the interface from the descriptor.
Step
4 – Create a new Java class TutorialServiceImpl that
implements the interface ITutorialService
you defined in the first project (see Figure 140).
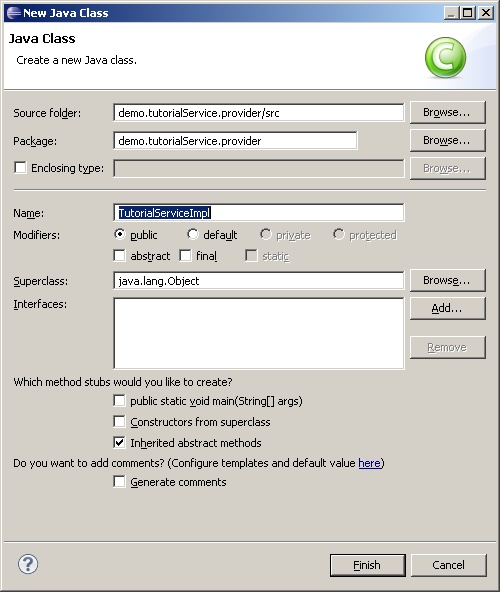
Figure 140 Implement Interface
Extend the source code for the class to
implement the interface ITutorialService
as follows:
When a class implements ITutorialService it has to
implement the inherited abstract method myOperation.
In this example, it returns the argument dummyString
and appends “ World” at the end of the string.
Step
5 – Create a second class Activator in the package demo.tutorialService.provider
(see Figure 141).
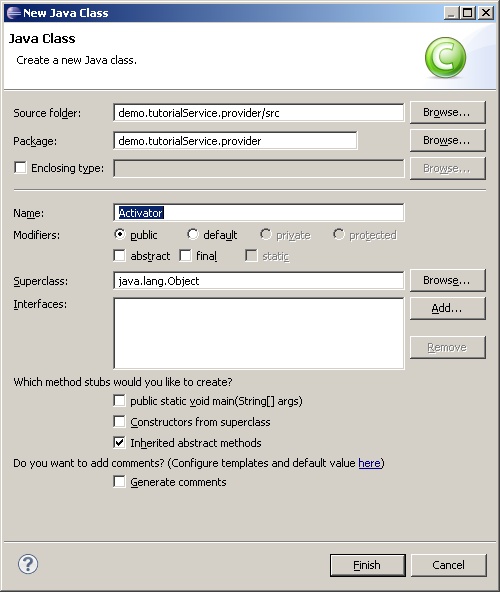
Figure 141 Class Activator
Step
6 – The class needs to inherit from class AbstractModelBusAdapterProviderActivator.
package
demo.tutorialService.provider;
import
org.modelbus.ModelBusServiceConfiguration;
import
org.modelbus.core.lib.dosgi.AbstractModelBusAdapterProviderActivator;
import
org.modelbus.core.lib.dosgi.RepositoryHelper;
import
demo.tutorialService.descriptor.ITutorialService;
public class Activator extends
AbstractModelBusAdapterProviderActivator {
@Override
protected
Object createServiceInstance() {
return
new TutorialServiceImpl();
}
@Override
protected void configure(ModelBusServiceConfiguration config)
{
config.setServiceName("ModelBus
demo service");
}
@Override
public Class
getServiceInterface() {
return ITutorialService.class;
}
}
If you extend AbstractModelBusAdapterProviderActivator
several methods have to be implemented. For this tutorial three methods need to
return a proper value. Rewrite createServiceInstance()
to return a new instance of the class TutorialServiceImpl
you implemented in Step 4. Further change getServiceInterface()
to return the interface class.
In addition, the service name has to be
provided to the ModelBusServiceConfiguration using the argument passed
to the configure() method. In this method, you can also specify the
location where the service should be accessible. By default, ModelBus will
publish the service at port 9090 using the interface name to determine the web
context (in this example the location would be http://localhost:9090/itutorialservice).
The following listing shows some examples to alter the default behavior:
package
demo.tutorialService.provider;
import
org.modelbus.ModelBusServiceConfiguration;
import
org.modelbus.core.lib.dosgi.AbstractModelBusAdapterProviderActivator;
import
org.modelbus.core.lib.dosgi.RepositoryHelper;
import
demo.tutorialService.descriptor.ITutorialService;
public class Activator extends
AbstractModelBusAdapterProviderActivator {
(…)
@Override
protected void configure(ModelBusServiceConfiguration config)
{
config.setServiceName("ModelBus
demo service");
//explicitly
set another service location; manual port selection
config.setOption(ModelBusServiceConfiguration.OPTION_SERVICE_ADDRESS,
"http://localhost:9200/tutorial");
//or: set
service context only; automatic port selection
config.setOption(ModelBusServiceConfiguration.OPTION_OSGI_HTTP_
SERVICE_CONTEXT, "/tutorial");
}
(…)
}
When setting the configuration option ModelBusServiceConfiguration.
OPTION_OSGI_HTTP_SERVICE_CONTEXT instead of explicitly defining a
particular location, the ModelBus server will start up an embedded HTTP server
to host the ModelBus services deployed in the same server instance. In this
case, your service will be deployed at the next free port available above the
ModelBus server port using the specified service context. For example, if you
add the ModelBusServiceConfiguration. OPTION_OSGI_HTTP_SERVICE_ CONTEXT
option with a value like “/tutorial” to the configuration and if you
have the ModelBus server running at port 8080, your service would be accessible
via http://localhost:8081/tutorial
if the port 8081 is free.
|
Please note: When setting the service port explicitly, i.e.
when defining the service location using the ModelBusServiceConfiguration.OPTION_SERVICE_ADDRESS
configuration option, please use another port than the ModelBus server is
running at. Otherwise this would not necessarily cause an exception, but may
make the service unusable for clients.
|
Step
7 – The class Activator needs to be set as activator in the
Manifest of the provider project. Open the meta information (MANIFEST.MF). Open up the
tab Overview and
set Activator to
demo.tutorialService.provider.Activator (see Figure 142).
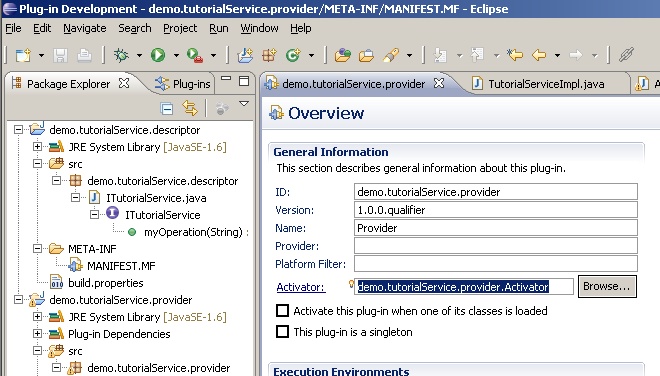
Figure 142 Set the Class Activator as Activator for
the Plug-in
Step
8 – Create a new run configuration for the
project (see Figure 143).
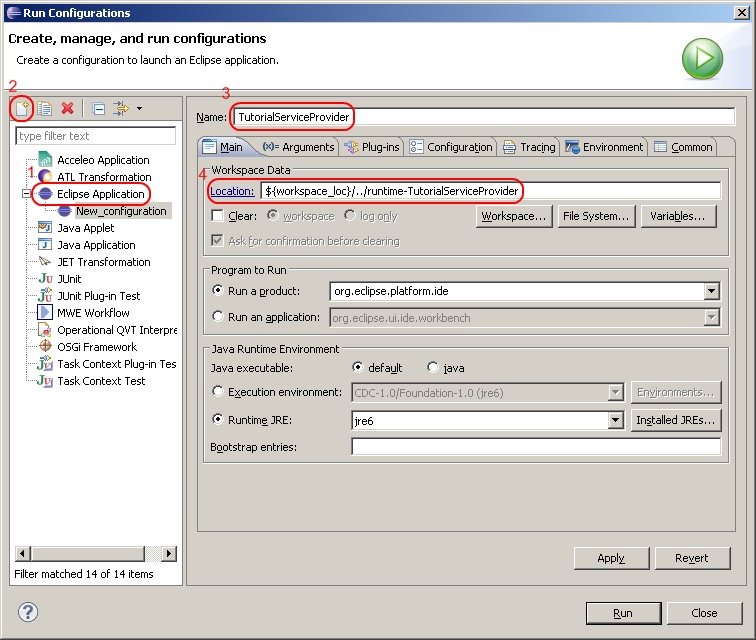
Figure 143 Create a new Run Configuration for the Provider
Click on Run à Run
Configurations to open up a new dialog.
Select Eclipse
Application.
1.
Create a new launch configuration.
2.
Assign a proper name, e.g. TutorialServiceProvider.
3. Correct location
to ${workspace_loc}/../runtime-TutorialServiceProvider.
Go to tab Arguments and append -console –consolelog
to program arguments
(see Figure 144).
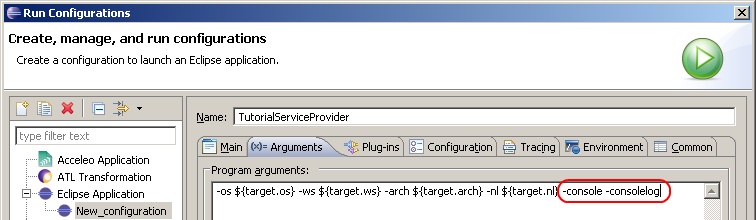
Figure 144 Append Program Arguments
Go to tab Plug-ins and specify the plug-ins the project
has to be launched with (see Figure 145 – this figure does not show the exact names of the plugins to be
selected. It is only a schematic example. For a detailed description of the
steps see the text following the figure.

Figure 145 Correct Plug-ins needed by the Project
Follow these steps:
1.
Set Launch
with to plug-ins selected below only.
2.
Click Deselect
All.
3.
Select the following plug-ins:
a. demo.tutorialService.provider
b. org.modelbus.cxf.dosgi.startup
and set the auto-start value of the demo.tutorialService.provider
Plug-in to true
4.
Very important: click Add Required Plug-ins (you must have
removed any filter if you used them)
5.
Click Apply
6. Click Run
|
Please note: When using the –console program argument
in Eclipse Juno, please make sure to also add the bundles org.eclipse.equinox.console,
org.apache.felix.gogo.runtime and org.apache.felix.gogo.shell to
the run configuration.
|
A second Eclipse should start. In the console
of the original Eclipse a lot of output is generated (see Figure 146).
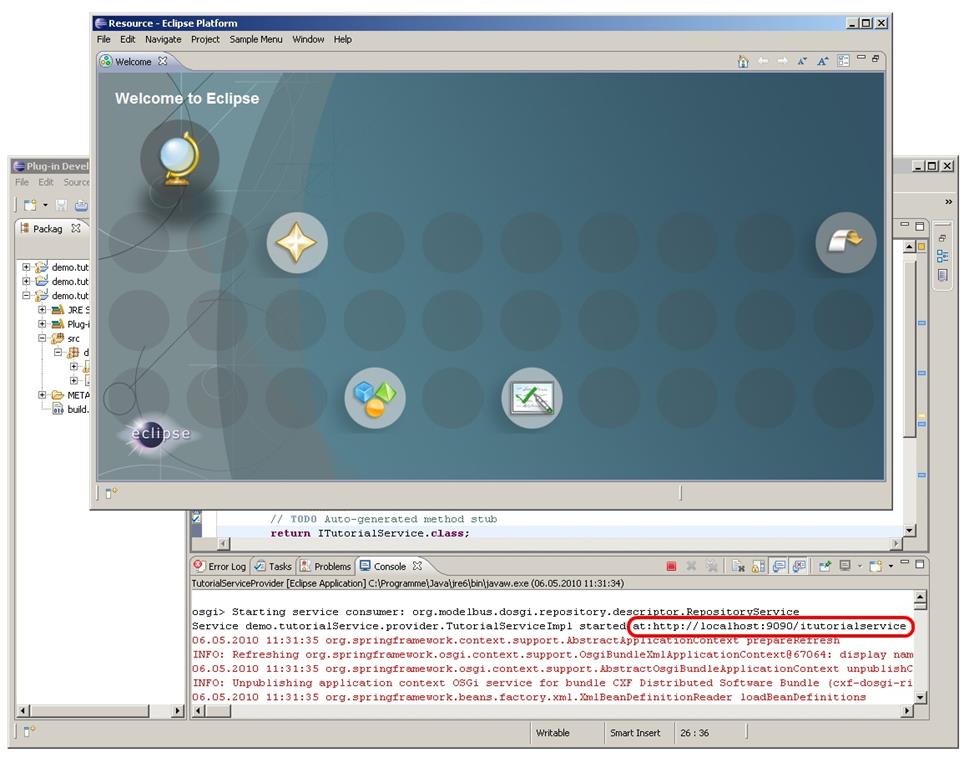
Figure 146 Console Output after Starting Provider
Scroll in the direction of the top of the
output. At the beginning there should be some lines in black and state a URL
(see Figure 146). If they are
not there but somewhere in the middle: did you start the ModelBus server and is
it still running? It is also possible that the black lines have been scrolled
of the console window. In this case you could increase its capacity in its
preferences (see Figure 147) –
select Preferences in the context menu of the console and remove the selection
at Limit console output or increase its size. Once the provider started,
you should be able to get a response by opening this URL in a web browser with
the query string “?wsdl” added at the end, e.g. http://localhost:9090/itutorialservice?wsdl.
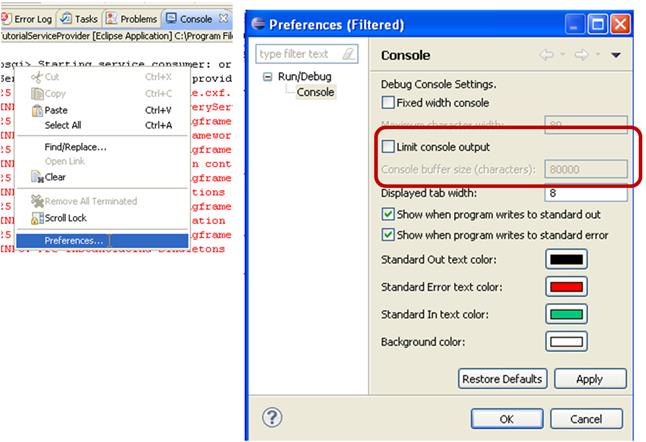
Figure 147 Modify the Console Buffer Capacity
If you are able to access the URL and see
some XML output (the WSDL of the provider - similar to Figure 148) the provider has started up correctly.
You can continue and start developing the consumer. If you take some time you
will discover all the names in the WSDL we defined in the interface (see section
21.6.1 Step 4).
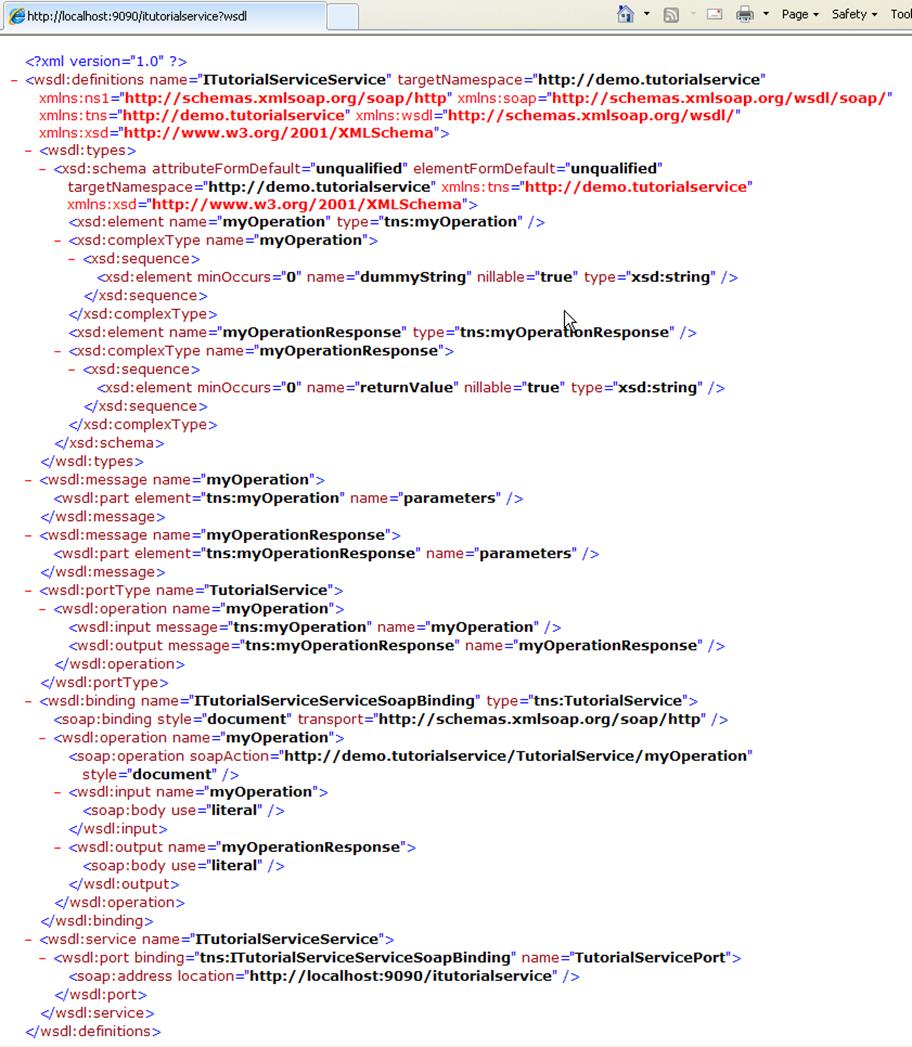
Figure 148 The Provider WSDL
|
Since ModelBus release 1.9.6 you can use the “ModelBus Service
from Existing Interface” wizard to generate a provider and a consumer
according to your service interface. Please note that this feature is still
in beta phase.
|
Step
1 – Create a new Eclipse Plug-in Project
demo.tutorialService.consumer similar to step 1 in the provider adapter
section and set its dependencies as shown in Figure 149.
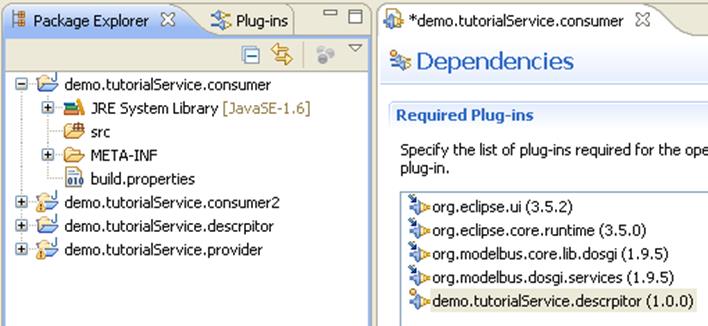
Figure 149 The Consumer Project and its Dependencies
Step
2 – Add a Java package named demo.tutorialService.consumer
to the src folder.
Step
3 – Create a Java class Activator in demo.tutorialService.consumer
similar to step 5 in the provider project (second project).
Replace the generated Activator code with the
following (if you choose a different naming you must probably adapt it):
package
demo.tutorialService.consumer;
import
org.modelbus.core.lib.IRepositoryHelper;
import
org.modelbus.core.lib.configuration.ModelBusServiceConfiguration;
import
org.modelbus.core.lib.dosgi.api.AbstractModelBusAdapterConsumerActivator;
import
demo.tutorialservice.descriptor.ITutorialService;
public class Activator extends
AbstractModelBusAdapterConsumerActivator {
private static ITutorialService myservice;
public
Activator() {
super();
}
@Override
protected void serviceRegistered(Object arg0) {
myservice = (ITutorialService)
arg0;
String result = myservice.myOperation("Hello");
System.out.println("Result:
"+result);
}
@Override
protected void configure(ModelBusServiceConfiguration
arg0) {
// TODO
Auto-generated method stub
}
@SuppressWarnings("rawtypes")
@Override
public Class
getServiceInterface() {
return
ITutorialService.class;
}
}
Step 4 – Add “OSGI-INF” information
· Create a folder OSGI-INF in the root folder of the consumer
project
· Create a folder remote-service in it
·
Create a xml-file remote-services.xml in
it --- mind the additional “s”
Open the
xml-file with Text Editor (or switch to the source tab) and enter the
following text (possibly to be adapted in the highlighted lines):
<?xml version="1.0"
encoding="UTF-8"?>
<service-descriptions
xmlns="http://www.osgi.org/xmlns/sd/v1.0.0">
<service-description>
<provide
interface="demo.tutorialService.descriptor.ITutorialService" />
<property
name="service.exported.interfaces">*</property>
<property
name="service.exported.configs">org.apache.cxf.ws</property>
<property
name="org.apache.cxf.ws.address">http://localhost:9090/itutorialservice</property>
<property
name="org.apache.cxf.ws.frontend">jaxws</property>
</service-description>
</service-descriptions>
Step
6 – Change MANIFEST.MF
Include the OSGI-INF directory in
the build configuration (see Figure 150).
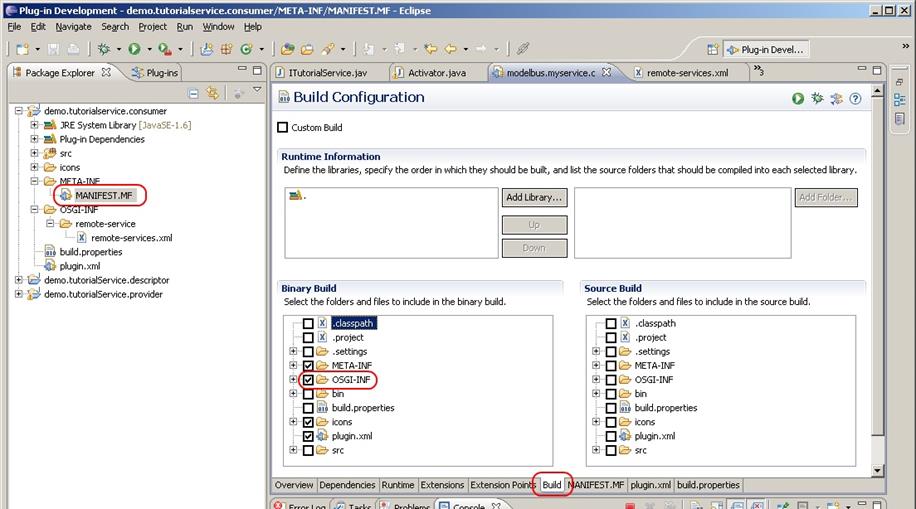
Figure 150 Include OSGI-INF in the Build Configuration
Therefore, open the meta information of the
project (MANIFEST.MF).
Open the tab Build
and select the OSGI-INF directory
and icons.
In the Overview tab select the Activate
this plug-in... and set the activator (demo.tutorialService.consumer.Activator)
(see Figure 151).
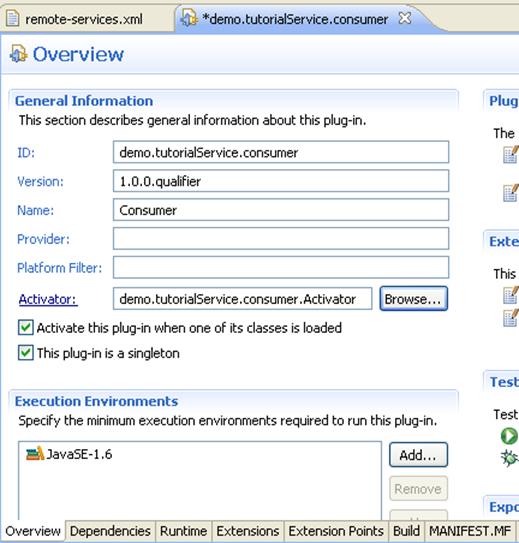
Figure 151 Set Activator
Step
7 – Create a new run configuration for the
project and name it TutorialServiceConsumer. Refer to section Second Project – Provider – Step 8 for a
detailed description. Be careful when you correct the plug-ins. The demo.tutorialService.consumer
plug-in needs to be selected with Auto-start set to true. In
addition, the org.modelbus.cxf.dosgi.startup bundle has to be added to
the run configuration. Please remember to add the required plug-ins to the
configuration by clicking the corresponding button in the dialog.
|
To ensure that the consumer plug-in is able to find the service
implementation, it is required to be started at a higher start level than the
org.modelbus.cxf.dosgi.startup plug-in. Since the default start level
in Eclipse is equal to 4, a start level >= 5 for the consumer bundle is
appropriate.
|
Step 8 – Run the consumer by executing its run configuration (do not
forget to start the server and run the provider before).
The
execution of the testservice method will result in a console output of
the Eclipse workbench that runs the provider (see Figure 152).
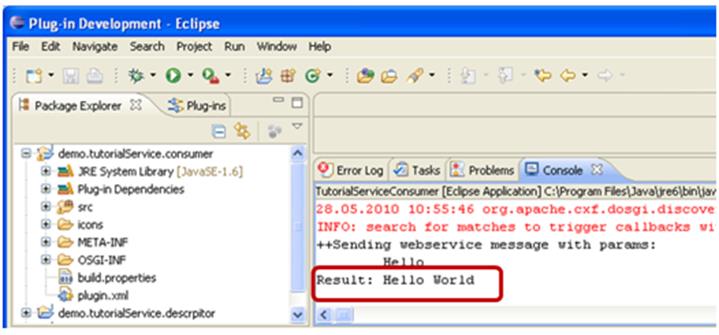
Figure 152 Consumer Results
How are all the previously developed
projects (21.6.1 to 21.6.3) related to each other?
This should be sketched by following the
flow in our small example.
An instance of the Activator class is
executed whenever the consumer is started. It extends the AbstractModelBusAdapterConsumerActivator
which will realize the consumer side of the ModelBus interaction pattern (see
section 20.3).
The Activator Code:
package
demo.tutorialService.consumer;
import org.modelbus.core.lib.IRepositoryHelper;
import
org.modelbus.core.lib.configuration.ModelBusServiceConfiguration;
import
org.modelbus.core.lib.dosgi.api.AbstractModelBusAdapterConsumerActivator;
import
demo.tutorialservice.descriptor.ITutorialService;
public class Activator extends
AbstractModelBusAdapterConsumerActivator {
private static ITutorialService myservice;
public
Activator() {
super();
}
@Override
protected void serviceRegistered(Object arg0) {
myservice = (ITutorialService)
arg0;
String result = myservice.myOperation("Hello");
System.out.println("Result:
"+result);
}
@Override
protected void configure(ModelBusServiceConfiguration
arg0) {
// TODO Auto-generated method
stub
}
@SuppressWarnings("rawtypes")
@Override
protected
Class getServiceInterface() {
return
ITutorialService.class;
}
}
The highlighted operations (light grey) are
the most important in our example – the RepositoryHelper will not be
used here but is of importance when using the repository:
·
getServiceInterface() is used to determine which interface a service has to implement to
be used by the consumer. Thus, in this example, the method returns the service
interface ITutorialService.
·
Within serviceRegistered(Object arg0) a service
instance for the corresponding interface will be populated. In this example,
the service instance is stored in the myservice variable. The myOperation
method of the service will be invoked using the actual parameter “Hello”.
Afterwards, the result is printed out to System.out (shown in the
console window).
The myservice.myOperation method
mentioned above is the one we realized within the provider (see section 21.6.2). It has been described within the
Interface (see section 21.6.1)
as a WSDL and exported. The communication between the consumer and provider
based on the ModelBus Interaction Pattern (see section 20.3) is mostly realized through the AbstractModelBusAdapterConsumerActivator
and the AbstractModelBusAdapterProviderActivator interfaces delivered
with the ModelBus.
Next have a look to the provider side. The
coding needed for the example has been done in section 21.6.2 and was quite simple.
The implementation of the service operation
was quite simple:
package
demo.tutorialService.provider;
import
demo.tutorialService.descriptor.ITutorialService;
public class TutorialServiceImpl implements ITutorialService {
@Override
public String myOperation(String
dummyString) {
return dummyString+" World";
}
}
The activator for the provider extends the AbstractModelBusAdapterProviderActivator
and implements two methods for our needs (both highlighted in the code below):
·
creation of a service instance and
·
provisioning of the service interface.
These will be used whenever a service
instance or its service interface is needed.
package
demo.tutorialService.provider;
import
org.modelbus.ModelBusServiceConfiguration;
import
org.modelbus.core.lib.dosgi.AbstractModelBusAdapterProviderActivator;
import
org.modelbus.core.lib.dosgi.RepositoryHelper;
import
demo.tutorialService.descriptor.ITutorialService;
public class Activator extends
AbstractModelBusAdapterProviderActivator {
@Override
protected Object
createServiceInstance() {
return new
TutorialServiceImpl();
}
@Override
protected void configure(ModelBusServiceConfiguration
arg0) {
config.setServiceName("ModelBus
demo service");
}
@Override
protected
Class getServiceInterface() {
return ITutorialService.class;
}
}
Within in the ModelBus Core Lib several exception
types are defined as follows:
RepositoryException
The RepositoryExecption is an
abstract exception and has an attribute description whose value should contain
a short report why an exception has been thrown. Every further exception in
this specification is derived from RepositoryException.
RepositoryRuntimeException
The repository throws a RepositoryRuntimeException
whenever an error occurs in the runtime of the repository or no other
repository exception of this specification is adequate and relevant in order to
describe the defect correctly.
LockedException
The LockedExecption will be thrown
when a user performs an action on a locked artifact and the action could change
the model.
InvalidRevisionException
When an action is about to perform on an
unresolved version number of a revision the InvalidRevisionException
will be thrown.
RepositoryAuthentificationException
An invalid user authentication, due to an
invalid user and password combination, leads to a RepositoryAuthentificationException.
When this exception is thrown the description value doesn’t contain a report
which leads to an invalid parameter (user or password) of a user.
NonExistingResourceException
The NonExistingResourceException is
thrown whenever an operation is performed on an artifact with an unknown URL
namespace in the context of the repository.
UnresolvedReferencesException
Todo description
ConstraintViolationException
Todo description
InvaildValueException
Whenever an invalid value is passed as an
actual parameter to any ModelBus Core Lib operation an InvalidValueException
will be thrown.
InvalidServiceDescriptionException
The InvalidServiceDescriptionException
is thrown, when the data describing a service to be registered to the
repository is not valid.
Problem:
When trying to obtain the WSDL of the ModelBus itself or one of its services,
the following exception occurs:
org.apache.cxf.binding.soap.SoapFault:
"http://schemas.xmlsoap.org/wsdl/", the namespace on the
"definitions" element, is not a valid SOAP version.
Solution:
Please make sure that you do not have added a query string (e.g. “?wsdl”)
to the value for the system variable MODELBUS_REPOSITORY_LOCATION or to
the corresponding location in the configuration model in case of ModelBus
release 1.9.7 or higher. If this did happen, please remove it and restart the
ModelBus Server as well as the Team Provider client and ModelBus adapter and
consumer instances.
Problem:
ModelBus Server did not start (the first time), bundle is not active
Solution
1: When using a local repository please ensure,
that the MODELBUS_SVN_REPOSITORY_LOCATION environment variable (or the corresponding location in the
configuration model in case of ModelBus release 1.9.7 or higher) is pointing to
an empty directory.
Solution 2: Ensure
that the SVNKit libraries are available for the ModelBus server (see chapter 3).
Solution 3:
If you are using the IP address “0.0.0.0” as repository host (repository
location), please make sure that the specified port is not already in use in
case of each network interfaces installed on the machine and that the server
has sufficient rights to use the port. There may also be another configuration
problem with one of the network interfaces. Please ask your administrator in
this case.
The principles of the creation and
implementation of a consumer and a provider adapter for a service based on the
ModelBus has been described in section 21.6 with a first simple example. The
principles of the communication in the context of the ModelBus are described in
section 20 in particular the ModelBus
Interaction Pattern (see section 20.3), the consumer / provider adapter
concepts (see section 20.4
& 20.5) and the support
offered through the ModelBus Core Lib (see section 20.6).
Within this section a more complex example
for a consumer / provider adapter shall be shown.
The example may be downloaded
from the ModelBus website (www.modelbus.org). It consists of four Eclipse projects to be imported:
·
org.eclipse.emf.library.example
·
org.modelbus.library.example.serviceinterface
·
org.modelbus.library.example.service
·
org.modelbus.library.example.consumer
The first project
contains the Library meta-model. It is based on the well-known Eclipse library meta-model (see
section 24.2.1).
The second project provides the interface definition for the service (see section
24.2.2). The third contains the service provider adapter (see
section 24.2.3) and the last one the consumer adapter (see
section 24.2.4).
The service is using the
OSLO OCL processor, which is delivered in three JAR files that has to be
copied to the Eclipse plugins folder of the Eclipse where the projects above
have been imported to.
The Eclipse to be used
should be a modeling distribution of Eclipse with ModelBus installed (see
section 5).
To execute the adapter
example a ModelBus server needs to be installed and running (see section 3).
The service provider
adapter and consumer adapter will be started using a specific Run
Configuration (see Figure 153). Please see
also the base description in sections 21.6.2
and 21.6.3).
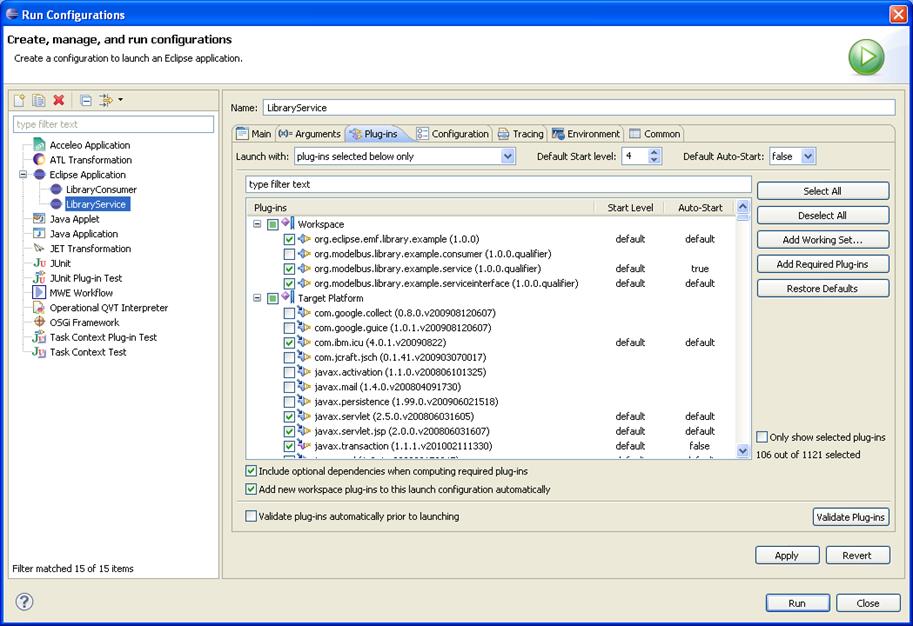
Figure 153 Defining the Run Configurations
For this specific
example we have to select the following plug-ins:
·
for the service provider (LibraryService)
o org.modelbus.library.example.service
o org.modelbus.cxf.dosgi.startup
·
for the service consumer (LibraryConsumer):
o org.modelbus.library.example.consumer
o org.modelbus.cxf.dosgi.startup
Please note that the auto
start values for both, the provider and the consumer plug-in, are required
to be set to true. In addition, in both cases we have to include all
additionally required plug-ins by using the “Add Required Plug-Ins”
button.
|
To ensure that the consumer plug-in is able to find the service
implementation, it is required to be started at a higher start level than the
org.modelbus.cxf.dosgi.startup plug-in. Since the default start level
in Eclipse is equal to 4, a start level >= 5 for the consumer bundle is
appropriate.
|
The library service
will allow us to manipulate and check the validity of instances of the Library meta-model
(see section 24.2.1)
through the ModelBus. It offers the following methods through its LibraryService
interface (see section 24.2.2):
·
to manipulate a library
model
o
addWriter()
Accepts a library model and a name of a writer and adds a writer with that name
to the library model.
o getWriters()
Accepts a library model and returns all writer instances contained in it (as an
array).
o getLooseWriters()
Accepts a library model and returns all writer instances not associated to any
book contained in the library (as a list).
·
to check the validity
o isLibraryModelValid()
Checks the validity of the library model due to some OCL constraints hardcoded
in the server - returns true or false.
The operations
implementing the interface will be coded in the provider adapter (see section 24.2.3).
The rules / constraints being checked will also be coded as OCL expression in
the provider adapter and checked there.
The operations will be invoked from the
consumer adapter through ModelBus. The first (empty) library model will be
created in the consumer adapter and checked in from there to the ModelBus
repository - due to the ModelBus Invocation Pattern - implicitly (see
section 24.3.3 for details).
The library service is based on the well-known
Eclipse library meta model (see Figure 154). It describes a “library” as an aggregation of “books” and
“writers” which are related by an “author” relation.
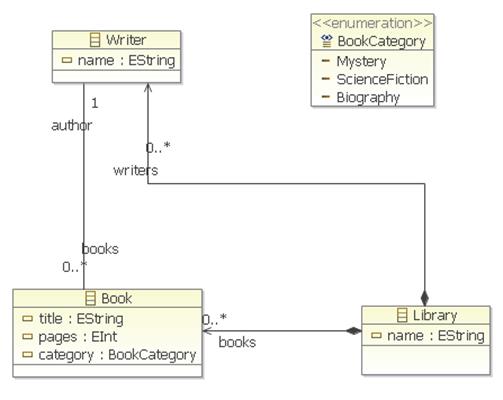
Figure 154 The Library Meta Model
The definition of the service interface
needed for DOSGi is shown in Figure 155. This corresponds to the first project within our basic adapter
implementation description (see section 21.6.1). The interface name, the operation
names and there corresponding Java operations are highlighted within the code.
package org.modelbus.library.example.service;
import java.util.List;
import javax.jws.WebMethod;
import javax.jws.WebParam;
import javax.jws.WebResult;
import javax.jws.WebService;
import library.Library;
import library.Writer;
@WebService(targetNamespace = "http://www.modelbus.org/LibraryService/",
name = "LibraryService")
public interface LibraryService
{
@WebMethod(action = "http://www.modelbus.org/LibraryService/addWriter")
public void
addWriter(
@WebParam(name = "library",
targetNamespace = "http://www.modelbus.org/LibraryService/")
Library
library,
@WebParam(name = "name",
targetNamespace =
"http://www.modelbus.org/LibraryService/")
String
name
);
@WebMethod(action =
"http://www.modelbus.org/LibraryService/isLibraryModelValid")
@WebResult(name = "valid",
targetNamespace = "")
public boolean
isLibraryModelValid(
@WebParam(name = "library",
targetNamespace = "http://www.modelbus.org/LibraryService/")
Library
library
);
@WebMethod(action = "http://www.modelbus.org/LibraryService/getWriters")
@WebResult(name = "writers",
targetNamespace = "")
public List<Writer>
getWriters(
@WebParam(name = "library",
targetNamespace =
"http://www.modelbus.org/LibraryService/")
Library
library
);
@WebMethod(action = "http://www.modelbus.org/LibraryService/getLooseWriters")
@WebResult(name = "looseWriters",
targetNamespace = "")
public List<Writer>
getLooseWriters(
@WebParam(name = "library",
targetNamespace =
"http://www.modelbus.org/LibraryService/")
Library
library
);
}
Figure 155 The Service Interface Definition (DOSGI)
(LibraryService.java)
The interface description in the Java
interface (DOSGi) results in the WSDL interface description shown in Figure 156 (excerpt). When the service is
running, the WSDL can be retrieved by using a web browser and invoking http://localhost:9090/libraryservice?wsdl.
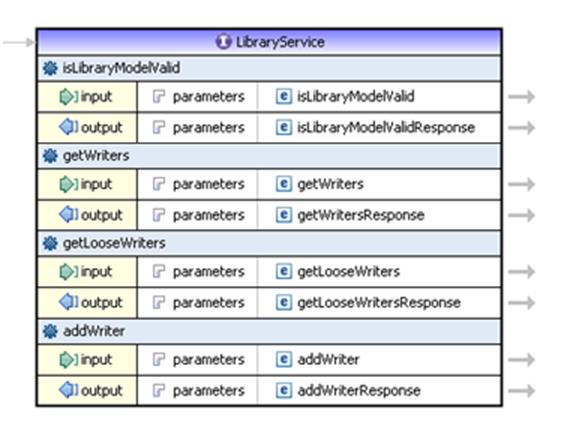
Figure 156 The Service Interface as WSDL (Shown in a
WSDL editor)
For the basic concepts of the service
provider adapter see section 21.6.2. In the library example shown here the service provider adapter (org.modelbus.library.example.service)
consists of four Java classes:
· Activator.java and LibraryServiceImpl.java
comprising the main parts of the service provider adapter
·
OsloOCLEvaluator.java and ExceptionLog.java
are the classes that are used by the service adapter for the validation of the
model based on OCL
The
complete source code is shown in section 24.3.2 and will be explained here partially.
The activator
is as simple as in the example in section 21.6.2. It implements four operations of the
abstract AbstractModelBusAdapterProviderActivator class. Most important
is that getServiceInterface() and createServiceInstance() relate
to our LibraryService and its implementation.
package
org.modelbus.library.example.service;
import
org.modelbus.ModelBusServiceConfiguration;
import
org.modelbus.core.lib.dosgi.AbstractModelBusAdapterProviderActivator;
import
org.modelbus.core.lib.dosgi.RepositoryHelper;
public class Activator extends
AbstractModelBusAdapterProviderActivator {
…
@Override
protected
Class getServiceInterface() {
return
LibraryService.class;
}
@Override
protected
Object createServiceInstance() {
return
new LibraryServiceImpl();
}
….
}
The LibraryServerImpl.java
is more interesting. It implements all the operations on the model (surrounded
red) and the validation functions (surrounded green) accessible through the
service interface (see Figure 157).

Figure 157 LibraryServiceImpl.java outline
For the communication with the ModelBus
repository we need a session object set up within the getSession()
method:
private
Session getSession(){
Session session = new Session();
session.setId(EcoreUtil.generateUUID());
Property propertyUserName = new Property();
propertyUserName.setKey("username");
propertyUserName.setValue("Admin");
Property propertyPassword = new Property();
propertyPassword.setKey("password");
propertyPassword.setValue("ModelBus");
session.getProperties().add(propertyUserName);
session.getProperties().add(propertyPassword);
return
session;
}
The usage of the ModelBus CoreLib API (see
section 20.6) shall be
illustrated with a look inside the addWriter() method implementation:
@Override
public void addWriter(final
Library library, final String name) {
final Writer writer = LibraryFactory.eINSTANCE.createWriter();
writer.setName(name);
library.getWriters().add(writer);
final Resource res = library.eResource();
try {
ModelBusCoreLib.getRepositoryHelper().checkInModel(this.getSession(), res, res.getURI());
}
catch (Exception e) {
throw new RuntimeException(e);
}
}
It uses the Java code generated (see Figure 158) from the Library meta model (library.ecore)
in the org.eclipse.emf.library.example project (highlighted green) and
invokes the checkInModel() operation of the ModelBus Core Lib
(highlighted blue). As one can see, the original library model will be passed
to the operation as a parameter, a new writer model element will be added and
finally the new version of the model will be checked in to the repository
explicitly.
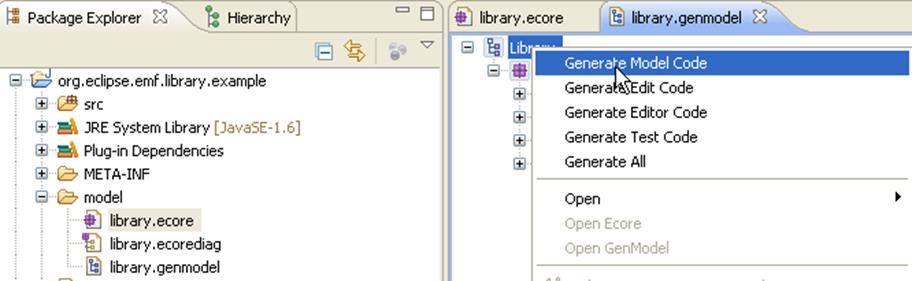
Figure 158 Generate Model Code from the Meta Model
All other LibraryService interface
operation implementations make use of OCL to query and retrieve model elements
from the library model or to validate the model.
The use of OCL for querying shall be illustrated
using the getLooseWriters() operation:
private
OsloOCLEvaluator evaluator;
private final
static String[] OCL_EXPRESSIONS = new
String[]{
"context Library def: getWriters() : Set(Writer) =
self.writers",
"context Library
def: getLooseWriters() : Set(Writer) = self.writers->select(w:Writer |
w.books->isEmpty())"
};
@Override
public List<Writer> getLooseWriters(Library library)
{
evaluator.addModel(library.eClass().getEPackage());
this.initializeOCLProcessor();
final String ocl = "context Library inv: self.getLooseWriters()";
final List<Object> results = this.evaluator.evaluateExpression(library,
ocl);
return toWriterList(results);
}
First it adds the model to the (OCL)
evaluator created at the beginning and initializes the OCL processor
(highlighted green). An OCL expression is defined (String ocl) which
itself uses a helper function defined earlier (highlighted blue). The helper
function will retrieve all writers from the model that have no relation to any
book. These OCL expressions are evaluated (highlighted orange) and the result
is converted to a list.
Finally a validation function shall be
illustrated through the isLibraryModelValid() operation:
@Override
public boolean isLibraryModelValid(final
Library library) {
evaluator.addModel(library.eClass().getEPackage());
boolean valid = true;
//check if library contains writers
final List<Object> results1 = this.evaluator.evaluateExpression(library, "context Library inv:
self.writers->notEmpty()");
if((Boolean)results1.get(0) == false){
System.out.println("Model
is invalid: no writers");
valid
= false;
}
//check if library contains not more than 3
writers
final List<Object> results2 = this.evaluator.evaluateExpression(library, "context Library inv: self.writers->size() <
4");
if((Boolean)results2.get(0) == false){
System.out.println("Model
is invalid: more than 3 writers");
valid
= false;
}
//check if all writer names are not empty
final List<Object> results3 = this.evaluator.evaluateExpression(library, "context Library inv:
self.writers->select(w:Writer | w.name.size() = 0)->isEmpty()");
if((Boolean)results3.get(0) == false){
System.out.println("Model
is invalid: empty writer name detected");
valid
= false;
}
return valid;
}
In the first step the library model is
added to the evaluator. Then the evaluator is invoked to evaluate an OCL
expression, stated directly in the code (see also the comments in the code
above for the OCL constraints). A negative result of an evaluation is printed
to the server console log.
For details of the complete service
provider adapter implementation including the OCL evaluator helper classes see
section 24.3.2.
As last step a closer look into the
consumer adapter should be made. The only class implemented here is the
consumer Activator.java in the org.modelbus.library.example. consumer
project.
The consumer Activator.java outline
looks quite simple (see Figure 159).
Figure 159 The Consumer Activator.java Outline
The complete code can be inspected in
section 24.3.3. The registerRepositoryHelper()
method registers the helper necessary to use the ModelBus Core Lib. The getServiceInterface()
returns the interface to be used to the service - in our case the
LibraryService interface, which is required to access and use it.
All the work the consumer does in the
example is implemented in the serviceRegistered() operation. This should
be discussed in more detail now.
An overview of all the code in the
operation is given first. It will afterwards be explained block by block.
@Override
protected void serviceRegistered(Object service) {
Session
session = new Session();
session.setId(EcoreUtil.generateUUID());
Property
propertyUserName = new Property();
propertyUserName.setKey("username");
propertyUserName.setValue("Admin");
Property
propertyPassword = new Property();
propertyPassword.setKey("password");
propertyPassword.setValue("ModelBus");
session.getProperties().add(propertyUserName);
session.getProperties().add(propertyPassword);
final LibraryService libraryService = (LibraryService)service;
final ResourceSet set = new
ResourceSetImpl();
final Resource res1 = set.createResource(URI.createURI("http://library.modelbus.org/demo.library"));
final EPackage p = LibraryPackage.eINSTANCE;
Library
library = LibraryFactory.eINSTANCE.createLibrary();
library.setName("Demo library");
res1.getContents().add(library);
System.out.println("Performing
library service: isLibraryModelValid");
boolean modelValid = libraryService.isLibraryModelValid(library);
System.out.println("Model
valid: " + modelValid);
final String[] writerNames = new
String[] { "Peter York", "Susan
Oxford", "Brian Woodstock", "Catherine
Jones", "" };
for(final String writerName : writerNames){
System.out.println("Performing
library service: addWriter " +
writerName);
libraryService.addWriter(library,
writerName);
//checkout modified library
final Resource res2 = set.createResource(URI.createURI("http://library.modelbus.org/demo.library"));
try {
ModelBusCoreLib.getRepositoryHelper().checkOutModel(session,
res2);
}
catch (Exception e) {
throw new RuntimeException(e);
}
library
= (Library)res2.getContents().get(0);
for(final Writer writer : library.getWriters()){
System.out.println(writer);
}
System.out.println("Performing
library service: getWriters");
final List<Writer> writers =
libraryService.getWriters(library);
System.out.println("Writers:");
System.out.println("========");
for(final Writer currentWriter : writers){
System.out.println(currentWriter.getName());
}
System.out.println("Performing
library service: isLibraryModelValid");
modelValid
= libraryService.isLibraryModelValid(library);
System.out.println("Model
valid: " + modelValid);
}
}
The first block defines and sets up the
information for the session to be used by the ModelBus Core Lib operations (see
section 20.6) afterwards:
@Override
protected void serviceRegistered(Object service) {
Session
session = new Session();
session.setId(EcoreUtil.generateUUID());
Property
propertyUserName = new Property();
propertyUserName.setKey("username");
propertyUserName.setValue("Admin");
Property
propertyPassword = new Property();
propertyPassword.setKey("password");
propertyPassword.setValue("ModelBus");
session.getProperties().add(propertyUserName);
session.getProperties().add(propertyPassword);
Within the next block access to the Library
Service is provided and a resource set with one specific resource (res1)
is created. The URI of this resource is of importance later on. An empty
library model named “Demo Library” is created and added to the resource (res1).
final LibraryService libraryService = (LibraryService)service;
final ResourceSet set = new
ResourceSetImpl();
final Resource res1 = set.createResource(URI.createURI("http://library.modelbus.org/demo.library"));
final EPackage p = LibraryPackage.eINSTANCE;
Library
library = LibraryFactory.eINSTANCE.createLibrary();
library.setName("Demo library");
res1.getContents().add(library);
The next block is quite short but very
important with concern to the ModelBus and the ModelBus repository:
System.out.println("Performing
library service: isLibraryModelValid");
boolean modelValid = libraryService.isLibraryModelValid(library);
System.out.println("Model
valid: " + modelValid);
It checks the validity of the library model
we created so far by invoking the isLibraryModelValid() operation. This is the first use of the Library Service
through the ModelBus. No explicit check-in of the library model took place so
it is not stored in the repository up to now. At this moment the ModelBus
Interaction Pattern (see section 20.3)
is of importance.
Whenever an element of
type EObject, IModelBusDataSource, Resource or an array or collection of
elements of those types is given (as input or return) of an operation signature
invoked as a service operation through ModelBus the “ModelBus invocation
controller” gets into action.
At the invocation side
the respective objects are checked into the repository and an URI is returned
for it (reference to the object in the repository). The object in the invoked
operation is replaced by the URI and the request passed to the service. At
service side the referencing URI is used to check-out the original object again
and replace the URI automatically by the original objects from the invocation.
The checked in object is kept in the repository.
How does the invocation
controller create an URI for the object checked in implicitly?
In our specific case we
have added the library used as the parameter passed to a resource (res1)
in a resource set. For this resource an URI has been created explicitly. This URI
will be used for the implicit check-in.
The next block is a
loop. Its contained code (highlighted light blue) is executed for every writer
name defined in the array at the top:
final String[] writerNames = new String[] { "Peter
York", "Susan Oxford", "Brian
Woodstock", "Catherine Jones", "" };
for(final String writerName : writerNames){
System.out.println("Performing
library service: addWriter " +
writerName);
libraryService.addWriter(library,
writerName);
//checkout modified library
final Resource res2 = set.createResource(URI.createURI("http://library.modelbus.org/demo.library"));
try {
ModelBusCoreLib.getRepositoryHelper().checkOutModel(session,
res2);
}
catch (Exception e) {
throw new RuntimeException(e);
}
library
= (Library)res2.getContents().get(0);
for(final Writer writer : library.getWriters()){
System.out.println(writer);
}
System.out.println("Performing
library service: getWriters");
final List<Writer> writers =
libraryService.getWriters(library);
System.out.println("Writers:");
System.out.println("========");
for(final Writer currentWriter : writers){
System.out.println(currentWriter.getName());
}
System.out.println("Performing library service:
isLibraryModelValid");
modelValid
= libraryService.isLibraryModelValid(library);
System.out.println("Model
valid: " + modelValid);
}
For the ease of understanding the inner
block of the loop shall be partitioned into blocks and explained block by
block. The partitioning shall be done as follows:
final String[] writerNames = new String[] { "Peter
York", "Susan Oxford", "Brian
Woodstock", "Catherine Jones", "" };
for(final String writerName : writerNames){
System.out.println("Performing
library service: addWriter " +
writerName);
libraryService.addWriter(library,
writerName);
//checkout modified library
final Resource res2 = set.createResource(URI.createURI("http://library.modelbus.org/demo.library"));
try {
ModelBusCoreLib.getRepositoryHelper().checkOutModel(session,
res2);
}
catch (Exception e) {
throw new RuntimeException(e);
}
library
= (Library)res2.getContents().get(0);
for(final Writer writer : library.getWriters()){
System.out.println(writer);
}
System.out.println("Performing
library service: getWriters");
final List<Writer> writers =
libraryService.getWriters(library);
System.out.println("Writers:");
System.out.println("========");
for(final Writer currentWriter : writers){
System.out.println(currentWriter.getName());
}
System.out.println("Performing
library service: isLibraryModelValid");
modelValid
= libraryService.isLibraryModelValid(library);
System.out.println("Model
valid: " + modelValid);
}
The first block in the loop invokes the addWriter()
operation of the library service:
System.out.println("Performing
library service: addWriter " +
writerName);
libraryService.addWriter(library,
writerName);
For the first time in the loop we will
start with the empty library model added to resource res1. The ModelBus
Invocation Pattern will cause it to be checked in again but with the same
URI of res1 but as a new head version. The Library Service operation
implementation of addWriter() will add the writer and will check the new
version of the model into the repository using the same URI as one can see from
the server side code (complete code see section 24.3.2):
@Override
public void addWriter(final
Library library, final String name) {
final Writer writer = LibraryFactory.eINSTANCE.createWriter();
writer.setName(name);
library.getWriters().add(writer);
final Resource res = library.eResource();
try {
ModelBusCoreLib.getRepositoryHelper().checkInModel(this.getSession(), res, res.getURI());
}
catch (Exception e) {
throw new RuntimeException(e);
}
}
Now the model has been changed. To continue
at the consumer side we have to explicitly check it out there since we did not
pass it back as a return parameter. This is done in the following code block:
//checkout modified library
final Resource res2 = set.createResource(URI.createURI("http://library.modelbus.org/demo.library"));
try {
ModelBusCoreLib.getRepositoryHelper()..checkOutModel(session,
res2);
}
catch (Exception e) {
throw new RuntimeException(e);
}
library
= (Library)res2.getContents().get(0);
for(final Writer writer : library.getWriters()){
System.out.println(writer);
}
At the beginning we create a new resource (res2)
with the same URI to access the same repository object but the newest version.
The library model is returned within the resource res2 and we assign it
to the “library” object we have added to resource res1. Finally, we
print all writers we got with the new library model -- at the first time it
should just be “Peter York”. This is done
from the local library model instance.
Then, within the next block, the writers
will be retrieved from the model using the service operations – first as a list
and then as an array.
System.out.println("Performing
library service: getWriters");
final List<Writer> writers =
libraryService.getWriters(library);
System.out.println("Writers:");
System.out.println("========");
for(final Writer currentWriter : writers){
System.out.println(currentWriter.getName());
}
Every time the “library” model is passed to
the service as a parameter and therefore checked in implicitly. This is no
problem with the size of the repository since it only stores the differences
but might increase the execution time. So be careful with the definition of the
service interface and keep the invocation pattern in mind. The model is not
modified and checked in again at the server side by the getWriters()
operations therefore there is no need to check it out again at the consumer.
Within the last block only the validity of
the model is checked which will not change the model:
System.out.println("Performing
library service: isLibraryModelValid");
modelValid
= libraryService.isLibraryModelValid(library);
System.out.println("Model
valid: " + modelValid);
Then the next loop starts adding a new
writer and changing the model which has to be checked out again …
A lot of printing to the console log is
done from the consumer as well as from the producer adapter. The flow of the
execution within the example can be followed there. Keep in mind that separate
console windows for the consumer and producer exist – so you have to switch
them to see both outputs.
A look into the ModelBus repository after
the execution of the library service consumer adapter will show the following
situation:
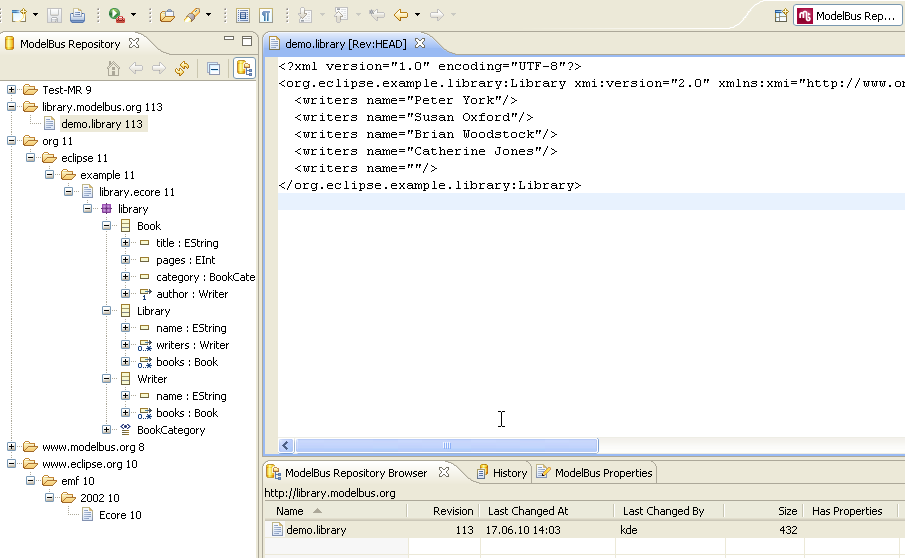
Abbildung 1 Resulting Library Model
The library meta-model can be found as well
as the Ecore meta-model used to define it. Opening the demo.library
model in the text editor shows the content as XML.
The service interface has been defined in
section 24.2.2. A WSDL can be
retrieved from the running service by entering http://localhost:9090/libraryservice?wsdl
in a web browser and saving the (XML) result.
The WSDL can be inspected using a WSDL
editor, e.g. the one from the eclipse Web Tool Platform (WTP) project used
here. This is possibly easier then reading the XML file directly.
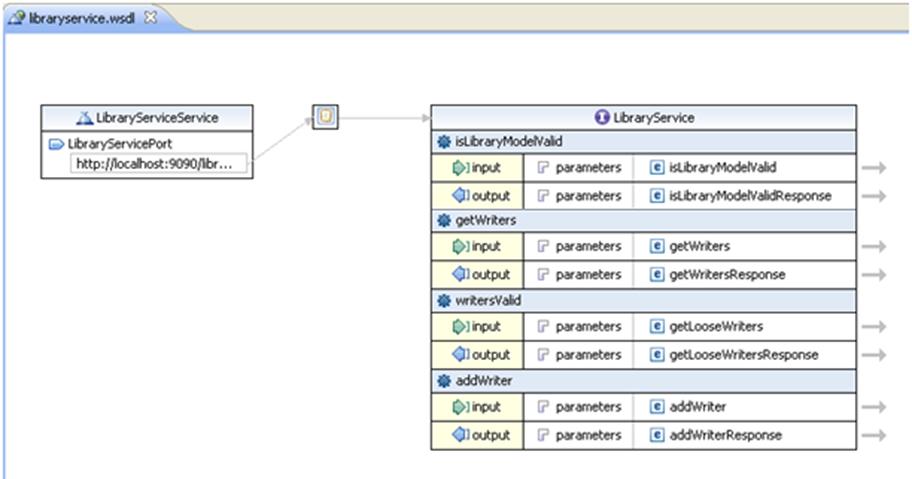
Figure 160 The Library Service WSDL Interface
A closer look at the input parameters, e.g.
of the addWriter() operation, shows the following picture:
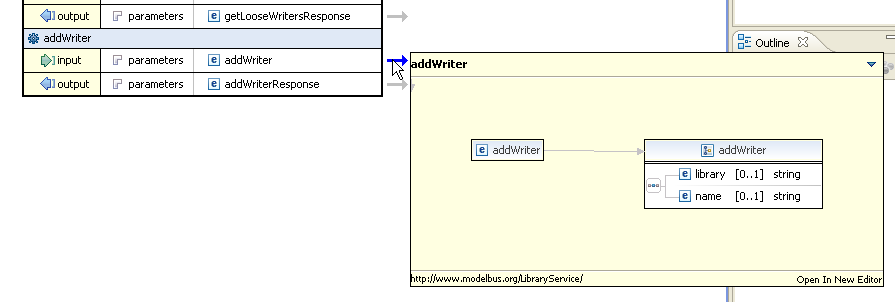
Figure 161 Input Parameters of the addWriter Operation
in the WSDL
Instead of being of type library the first
parameter is of type string, but its name is still library. The reason for this
is that the service expects the parameters with respect to the ModelBus
Interaction Pattern but the implicit actions (check-in and replacement by
an URI) at the consumer side are not performed automatically. So the service
does not expect the library model directly as a parameter here but instead of
it an URI for it in the ModelBus repository.
Using the WSDL of the service directly
requests:
·
to have an explicit and more detailed
description of the service WSDL stating the semantics of the operation
parameters and
·
to perform the eventually necessary check-in/checkout
operations at the consumer side explicitly .
In this section the complete source code
for the library service example is listed without any additional information.
LibraryService.java:
package org.modelbus.library.example.service;
import java.util.List;
import javax.jws.WebMethod;
import javax.jws.WebParam;
import javax.jws.WebResult;
import javax.jws.WebService;
import library.Library;
import library.Writer;
@WebService(targetNamespace = "http://www.modelbus.org/LibraryService/",
name = "LibraryService")
public interface
LibraryService {
@WebMethod(action = "http://www.modelbus.org/LibraryService/addWriter")
public void
addWriter(
@WebParam(name = "library",
targetNamespace = "http://www.modelbus.org/LibraryService/")
Library library,
@WebParam(name = "name",
targetNamespace = "http://www.modelbus.org/LibraryService/")
String name
);
@WebMethod(action = "http://www.modelbus.org/LibraryService/isLibraryModelValid")
@WebResult(name = "valid",
targetNamespace = "")
public boolean
isLibraryModelValid(
@WebParam(name = "library",
targetNamespace = "http://www.modelbus.org/LibraryService/")
Library library
);
@WebMethod(action = "http://www.modelbus.org/LibraryService/getWriters")
@WebResult(name = "writers",
targetNamespace = "")
public
List<Writer> getWriters(
@WebParam(name = "library",
targetNamespace = "http://www.modelbus.org/LibraryService/")
Library library
);
@WebMethod(action = "http://www.modelbus.org/LibraryService/getLooseWriters")
@WebResult(name = "looseWriters",
targetNamespace = "")
public
List<Writer> getLooseWriters(
@WebParam(name = "library",
targetNamespace = "http://www.modelbus.org/LibraryService/")
Library library
);
}
Activator.java:
package org.modelbus.library.example.service;
import
org.modelbus.ModelBusServiceConfiguration;
import
org.modelbus.core.lib.dosgi.AbstractModelBusAdapterProviderActivator;
import
org.modelbus.core.lib.dosgi.RepositoryHelper;
public class
Activator extends
AbstractModelBusAdapterProviderActivator {
@Override
protected void
configure(ModelBusServiceConfiguration config) {
config.setServiceName("ModelBus library demo
service");
}
@SuppressWarnings("unchecked")
@Override
protected Class
getServiceInterface() {
return LibraryService.class;
}
@Override
protected Object
createServiceInstance() {
return new
LibraryServiceImpl();
}
@Override
public void
registerRepositoryHelper(RepositoryHelper helper) {
// do nothing
}
}
LibraryServiceImpl.java:
package org.modelbus.library.example.service;
import java.io.IOException;
import java.util.ArrayList;
import java.util.List;
import
org.eclipse.emf.ecore.resource.Resource;
import org.eclipse.emf.ecore.util.EcoreUtil;
import
org.modelbus.core.lib.dosgi.ModelBusCoreLib;
import
org.modelbus.dosgi.repository.descriptor.Property;
import
org.modelbus.dosgi.repository.descriptor.Session;
import library.Library;
import library.LibraryFactory;
import library.Writer;
public class
LibraryServiceImpl implements LibraryService
{
private
OsloOCLEvaluator evaluator;
public
LibraryServiceImpl(){
this.evaluator = new
OsloOCLEvaluator();
}
private final static
String[] OCL_EXPRESSIONS = new
String[]{
"context Library def: getWriters()
: Set(Writer) = self.writers",
"context Library def:
getLooseWriters() : Set(Writer) = self.writers->select(w:Writer |
w.books->isEmpty())"
};
private final static
String OCL_WRITER_VALID = "context
Writer inv: self.name.size() > 0";
@Override
public void
addWriter(final Library library, final
String name) {
final Writer writer =
LibraryFactory.eINSTANCE.createWriter();
writer.setName(name);
library.getWriters().add(writer);
final Resource res =
library.eResource();
try {
ModelBusCoreLib.getRepositoryHelper().checkInModel(this.getSession(),
res, res.getURI());
} catch (Exception e) {
throw new
RuntimeException(e);
}
}
@Override
public
List<Writer> getLooseWriters(Library library) {
evaluator.addModel(library.eClass().getEPackage());
this.initializeOCLProcessor();
final String ocl = "context
Library inv: self.getLooseWriters()";
final
List<Object> results = this.evaluator.evaluateExpression(library,
ocl);
return toWriterList(results);
}
@Override
public
List<Writer> getWriters(final Library
library) {
evaluator.addModel(library.eClass().getEPackage());
this.initializeOCLProcessor();
final String ocl = "context
Library inv: self.getWriters()";
final
List<Object> results = this.evaluator.evaluateExpression(library,
ocl);
return toWriterList(results);
}
@Override
public boolean
isLibraryModelValid(final Library
library) {
evaluator.addModel(library.eClass().getEPackage());
boolean valid = true;
//check if library contains writers
final
List<Object> results1 = this.evaluator.evaluateExpression(library,
"context Library inv: self.writers->notEmpty()");
if((Boolean)results1.get(0)
== false){
System.out.println("Model
is invalid: no writers");
valid = false;
}
//check if library contains not more
than 3 writers
final
List<Object> results2 = this.evaluator.evaluateExpression(library,
"context Library inv: self.writers->size() < 4");
if((Boolean)results2.get(0)
== false){
System.out.println("Model
is invalid: more than 3 writers");
valid = false;
}
//check if all writer names are not
empty
final
List<Object> results3 = this.evaluator.evaluateExpression(library,
"context Library inv: self.writers->select(w:Writer |
w.name.size() = 0)->isEmpty()");
if((Boolean)results3.get(0)
== false){
System.out.println("Model
is invalid: empty writer name detected");
valid = false;
}
return valid;
}
private void
initializeOCLProcessor(){
for(final
String oclExpression : OCL_EXPRESSIONS){
this.evaluator.createOCLOperation(oclExpression);
}
}
private Session
getSession(){
Session session = new
Session();
session.setId(EcoreUtil.generateUUID());
Property propertyUserName = new
Property();
propertyUserName.setKey("username");
propertyUserName.setValue("Admin");
Property propertyPassword = new
Property();
propertyPassword.setKey("password");
propertyPassword.setValue("ModelBus");
session.getProperties().add(propertyUserName);
session.getProperties().add(propertyPassword);
return session;
}
@SuppressWarnings("unchecked")
private static
List<Writer> toWriterList(List<Object> list){
final
List<Writer> writers = new
ArrayList<Writer>();
final
List<Object> subList = (List<Object>)list.get(0);
for(final
Object obj : subList){
writers.add((Writer)obj);
}
return writers;
}
}
OsloOCLEvaluator.java:
package
org.modelbus.library.example.service;
import
java.util.List;
import
org.eclipse.emf.ecore.EObject;
import
org.eclipse.emf.ecore.EPackage;
import
org.oslo.ocl20.OclProcessor;
import
org.oslo.ocl20.bridge4emf.EmfOclProcessorImpl;
import
org.oslo.ocl20.semantics.bridge.Environment;
import
org.oslo.ocl20.synthesis.RuntimeEnvironment;
public class
OsloOCLEvaluator {
private
OclProcessor processor;
public
OsloOCLEvaluator(){
this.processor = new
EmfOclProcessorImpl(new
ExceptionLog());
}
@SuppressWarnings("unchecked")
public
List<Object> evaluateExpression(final
EObject eobject, final String expression) {
final
Environment env = this.processor.environment("self",
eobject.getClass());
final
RuntimeEnvironment renv = this.processor.runtimeEnvironment("self",
eobject);
System.out.println("\tExpression:
" + expression + " (on: " +
eobject + ")");
List<Object>
results = null;
try {
results
= this.processor.evaluate(expression,
env, renv, this.processor.getLog());
} catch
(Exception e) {
e.printStackTrace();
}
return
results;
}
public
EPackage addModel(final EPackage
model){
this.processor.addModel(model);
return
model;
}
public void
createOCLOperation(final String def){
System.out.println("\tCreating
OCL expression: " + def);
this.processor.analyse(def);
}
}
ExceptionLog.java:
package
org.modelbus.library.example.service;
import
uk.ac.kent.cs.kmf.util.ILog;
public class
ExceptionLog implements ILog {
public
ExceptionLog() {
// TODO
Auto-generated constructor stub
}
@Override
public void
close() {
// TODO
Auto-generated method stub
}
@Override
public void
finalReport() {
// TODO
Auto-generated method stub
}
@Override
public int
getErrors() {
// TODO
Auto-generated method stub
return 0;
}
@Override
public int
getWarnings() {
// TODO
Auto-generated method stub
return 0;
}
@Override
public boolean
hasErrors() {
// TODO
Auto-generated method stub
return false;
}
@Override
public boolean
hasViolations() {
// TODO
Auto-generated method stub
return false;
}
@Override
public boolean
hasWarnings() {
// TODO
Auto-generated method stub
return false;
}
@Override
public void
printMessage(String arg0) {
//throw
new RuntimeException(arg0);
}
@Override
public void
reportError(String arg0) {
throw new
RuntimeException(arg0);
}
@Override
public void
reportError(String arg0, Exception arg1) {
throw new
RuntimeException(arg1);
}
@Override
public void
reportMessage(String arg0) {
// TODO
Auto-generated method stub
}
@Override
public void
reportWarning(String arg0) {
// TODO
Auto-generated method stub
}
@Override
public void
reportWarning(String arg0, Exception arg1) {
// TODO
Auto-generated method stub
}
@Override
public void
reset() {
// TODO
Auto-generated method stub
}
@Override
public void
resetErrors() {
// TODO
Auto-generated method stub
}
@Override
public void
resetViolations() {
// TODO
Auto-generated method stub
}
@Override
public void
resetWarnings() {
// TODO
Auto-generated method stub
}
@Override
public boolean
tooManyViolations() {
// TODO
Auto-generated method stub
return false;
}
}
Activator.java:
package org.modelbus.library.example.service;
import java.io.IOException;
import java.util.List;
import library.Library;
import library.LibraryFactory;
import library.LibraryPackage;
import library.Writer;
import org.eclipse.emf.common.util.URI;
import org.eclipse.emf.ecore.EPackage;
import org.eclipse.emf.ecore.resource.Resource;
import
org.eclipse.emf.ecore.resource.ResourceSet;
import
org.eclipse.emf.ecore.resource.impl.ResourceSetImpl;
import org.eclipse.emf.ecore.util.EcoreUtil;
import
org.modelbus.ModelBusServiceConfiguration;
import org.modelbus.core.lib.dosgi.AbstractModelBusAdapterConsumerActivator;
import
org.modelbus.core.lib.dosgi.RepositoryHelper;
import
org.modelbus.dosgi.repository.descriptor.Property;
import
org.modelbus.dosgi.repository.descriptor.Session;
public class
Activator extends AbstractModelBusAdapterConsumerActivator
{
@Override
protected void
serviceRegistered(Object service) {
Session session = new
Session();
session.setId(EcoreUtil.generateUUID());
Property propertyUserName = new
Property();
propertyUserName.setKey("username");
propertyUserName.setValue("Admin");
Property propertyPassword = new
Property();
propertyPassword.setKey("password");
propertyPassword.setValue("ModelBus");
session.getProperties().add(propertyUserName);
session.getProperties().add(propertyPassword);
final LibraryService
libraryService = (LibraryService)service;
final ResourceSet set
= new ResourceSetImpl();
final Resource res1 =
set.createResource(URI.createURI("http://library.modelbus.org/demo.library"));
final EPackage p
= LibraryPackage.eINSTANCE;
Library library = LibraryFactory.eINSTANCE.createLibrary();
library.setName("Demo
library");
res1.getContents().add(library);
System.out.println("Performing
library service: isLibraryModelValid");
boolean modelValid =
libraryService.isLibraryModelValid(library);
System.out.println("Model
valid: " + modelValid);
final String[]
writerNames = new String[] { "Peter
York", "Susan Oxford", "Brian
Woodstock", "Catherine Jones", "" };
for(final
String writerName : writerNames){
System.out.println("Performing
library service: addWriter " + writerName);
libraryService.addWriter(library, writerName);
//checkout modified library
final
Resource res2 = set.createResource(URI.createURI("http://library.modelbus.org/demo.library"));
try {
ModelBusCoreLib.getRepositoryHelper().checkOutModel(session,
res2);
} catch (Exception
e) {
throw new
RuntimeException(e);
}
library = (Library)res2.getContents().get(0);
for(final
Writer writer : library.getWriters()){
System.out.println(writer);
}
System.out.println("Performing
library service: getWriters");
final
List<Writer> writers = libraryService.getWriters(library);
System.out.println("Writers:");
System.out.println("========");
for(final
Writer currentWriter : writers){
System.out.println(currentWriter.getName());
}
System.out.println("Performing
library service: isLibraryModelValid");
modelValid = libraryService.isLibraryModelValid(library);
System.out.println("Model
valid: " + modelValid);
}
}
@Override
protected void
configure(ModelBusServiceConfiguration config) {
// TODO
Auto-generated method stub
}
@SuppressWarnings("unchecked")
@Override
protected Class
getServiceInterface() {
return LibraryService.class;
}
@Override
public void
registerRepositoryHelper(RepositoryHelper helper) {
// do nothing
}
}